Multi-Platform Integration
Connect Lark, WeCom, QQ and more
💡 Chapter Goal: Learn how to integrate OpenClaw with mainstream domestic platforms like Lark, WeCom, DingTalk, and QQ, enabling you to use your AI assistant anytime, anywhere. Lark, being the most modern and developer-friendly platform, will be introduced first.
📱 Chapter Content
- 9.1 Lark Bot Configuration
- 9.1.1 Introduction to Lark Bots
- 9.1.2 Quick Start
- 9.1.3 Creating a Lark App
- 9.1.4 Configuring OpenClaw
- 9.1.5 Launching and Testing
- 9.1.6 Access Control
- 9.1.7 Group Configuration
- 9.1.8 Obtaining Group/User ID
- 9.1.9 Advanced Configuration
- 9.1.10 Multi-Account Configuration
- 9.1.11 Multi-Agent Configuration
- 9.1.11.1 Using with Lark
- 9.1.11.2 Practical Case: 4 Professional Assistants
- 9.1.11.3 Configuration Notes
- 9.1.11.4 Troubleshooting
- 9.1.11.5 Configuration Comparison
- 9.1.11.6 Usage Recommendations
- 9.1.11.7 Local Multi-Agent Management (No IM Platform Binding Required) ⭐New
- 9.2 WeCom Bot Configuration
- 9.3 DingTalk Bot Configuration
- 9.4 QQ Bot Configuration
9.1 Lark Bot Configuration
💡 Status: Production-ready, supports bot private chats and groups, uses WebSocket long-connection mode to receive messages.
9.1.1 Introduction to Lark Bots
Advantages of Lark:
-
Modern Office
- Document collaboration
- Multi-dimensional tables
- Video conferencing
-
Efficient Communication
- Message cards
- Interactive components
- Streaming output
-
Developer Friendly
- Excellent API design
- Detailed documentation
- WebSocket long connection
-
Free to Use
- Powerful features
- Stable and reliable
9.1.2 Quick Start
There are two ways to add a Lark channel:
Method 1: Add via Installation Wizard (Recommended)
If you have just installed OpenClaw, you can run the wizard directly:
openclaw setupThe wizard will guide you through:
- Creating a Lark app and obtaining credentials
- Configuring app credentials
- Starting the Gateway
✅ After completing the configuration, you can use the following commands to check the Gateway status:
openclaw gateway status      # View Gateway running status
openclaw logs --follow       # View real-time logs
Method 2: Add via Command Line
If you have already completed the initial installation, you can add a Lark channel using the following command:
openclaw channels addThen, follow the interactive prompts to select Feishu, and enter your App ID and App Secret.
✅ After completing the configuration, you can use the following commands to manage the Gateway:
openclaw gateway status      # View Gateway running status
openclaw gateway restart     # Restart Gateway to apply new configuration
openclaw logs --follow       # View real-time logs
9.1.3 Step 1: Create a Lark App
1. Open Lark Open Platform
Visit Lark Open Platform and log in with your Lark account.
💡 Lark (International Version): Please use https://open.larksuite.com/app and set domain: "lark" in the configuration.
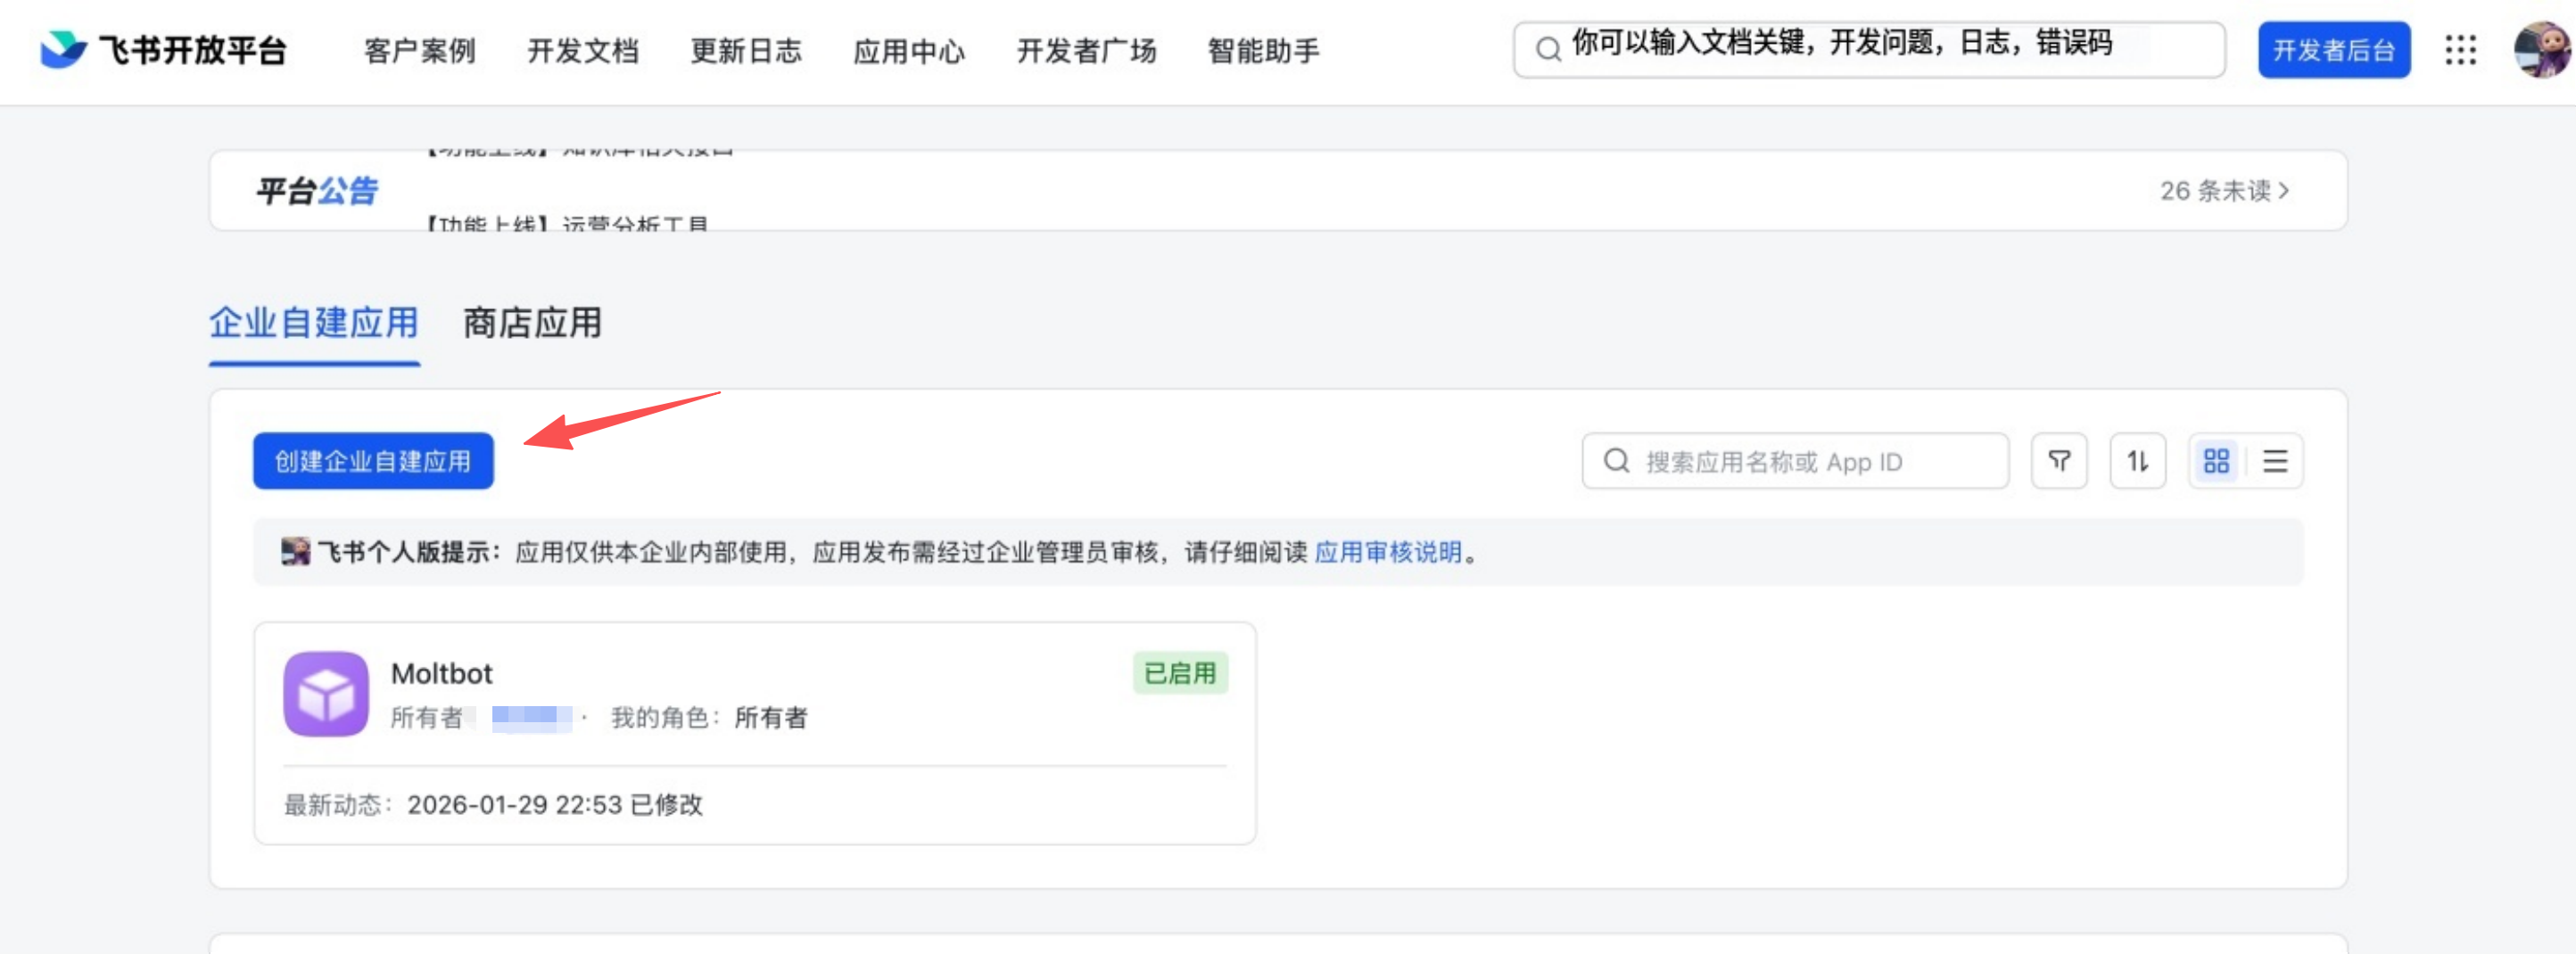
2. Create an Application
- Click Create enterprise custom app
- Fill in the app name and description
- Select an app icon
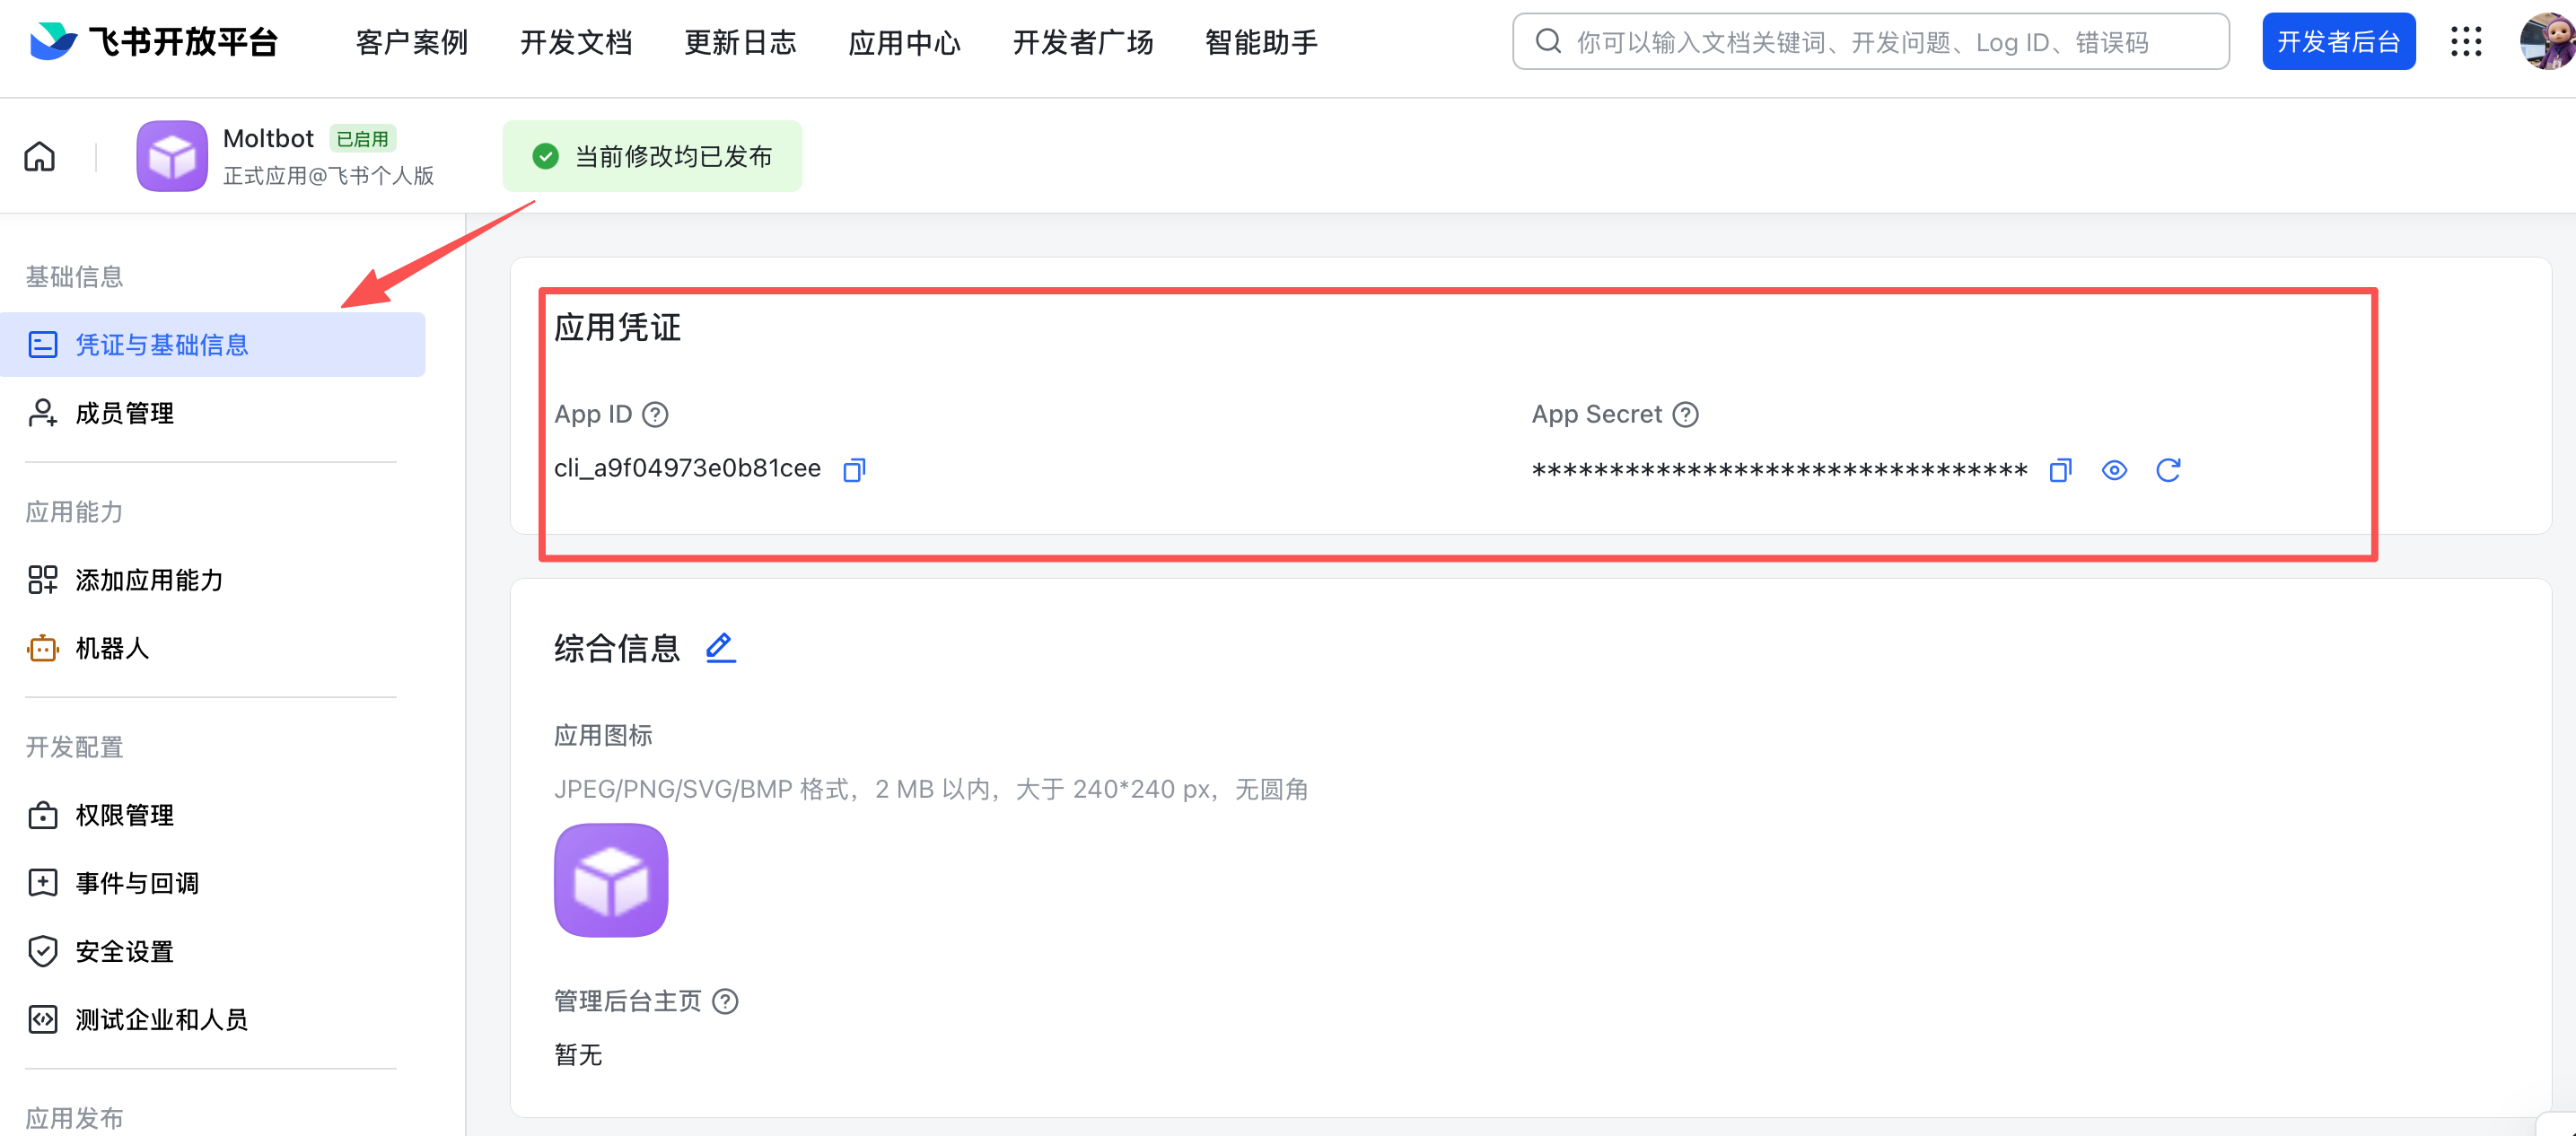
3. Obtain Application Credentials
On the app's Credentials & Basic Info page, copy:
- App ID (format like
cli_xxx) - App Secret
❗ Important: Please keep your App Secret safe and do not share it with others.
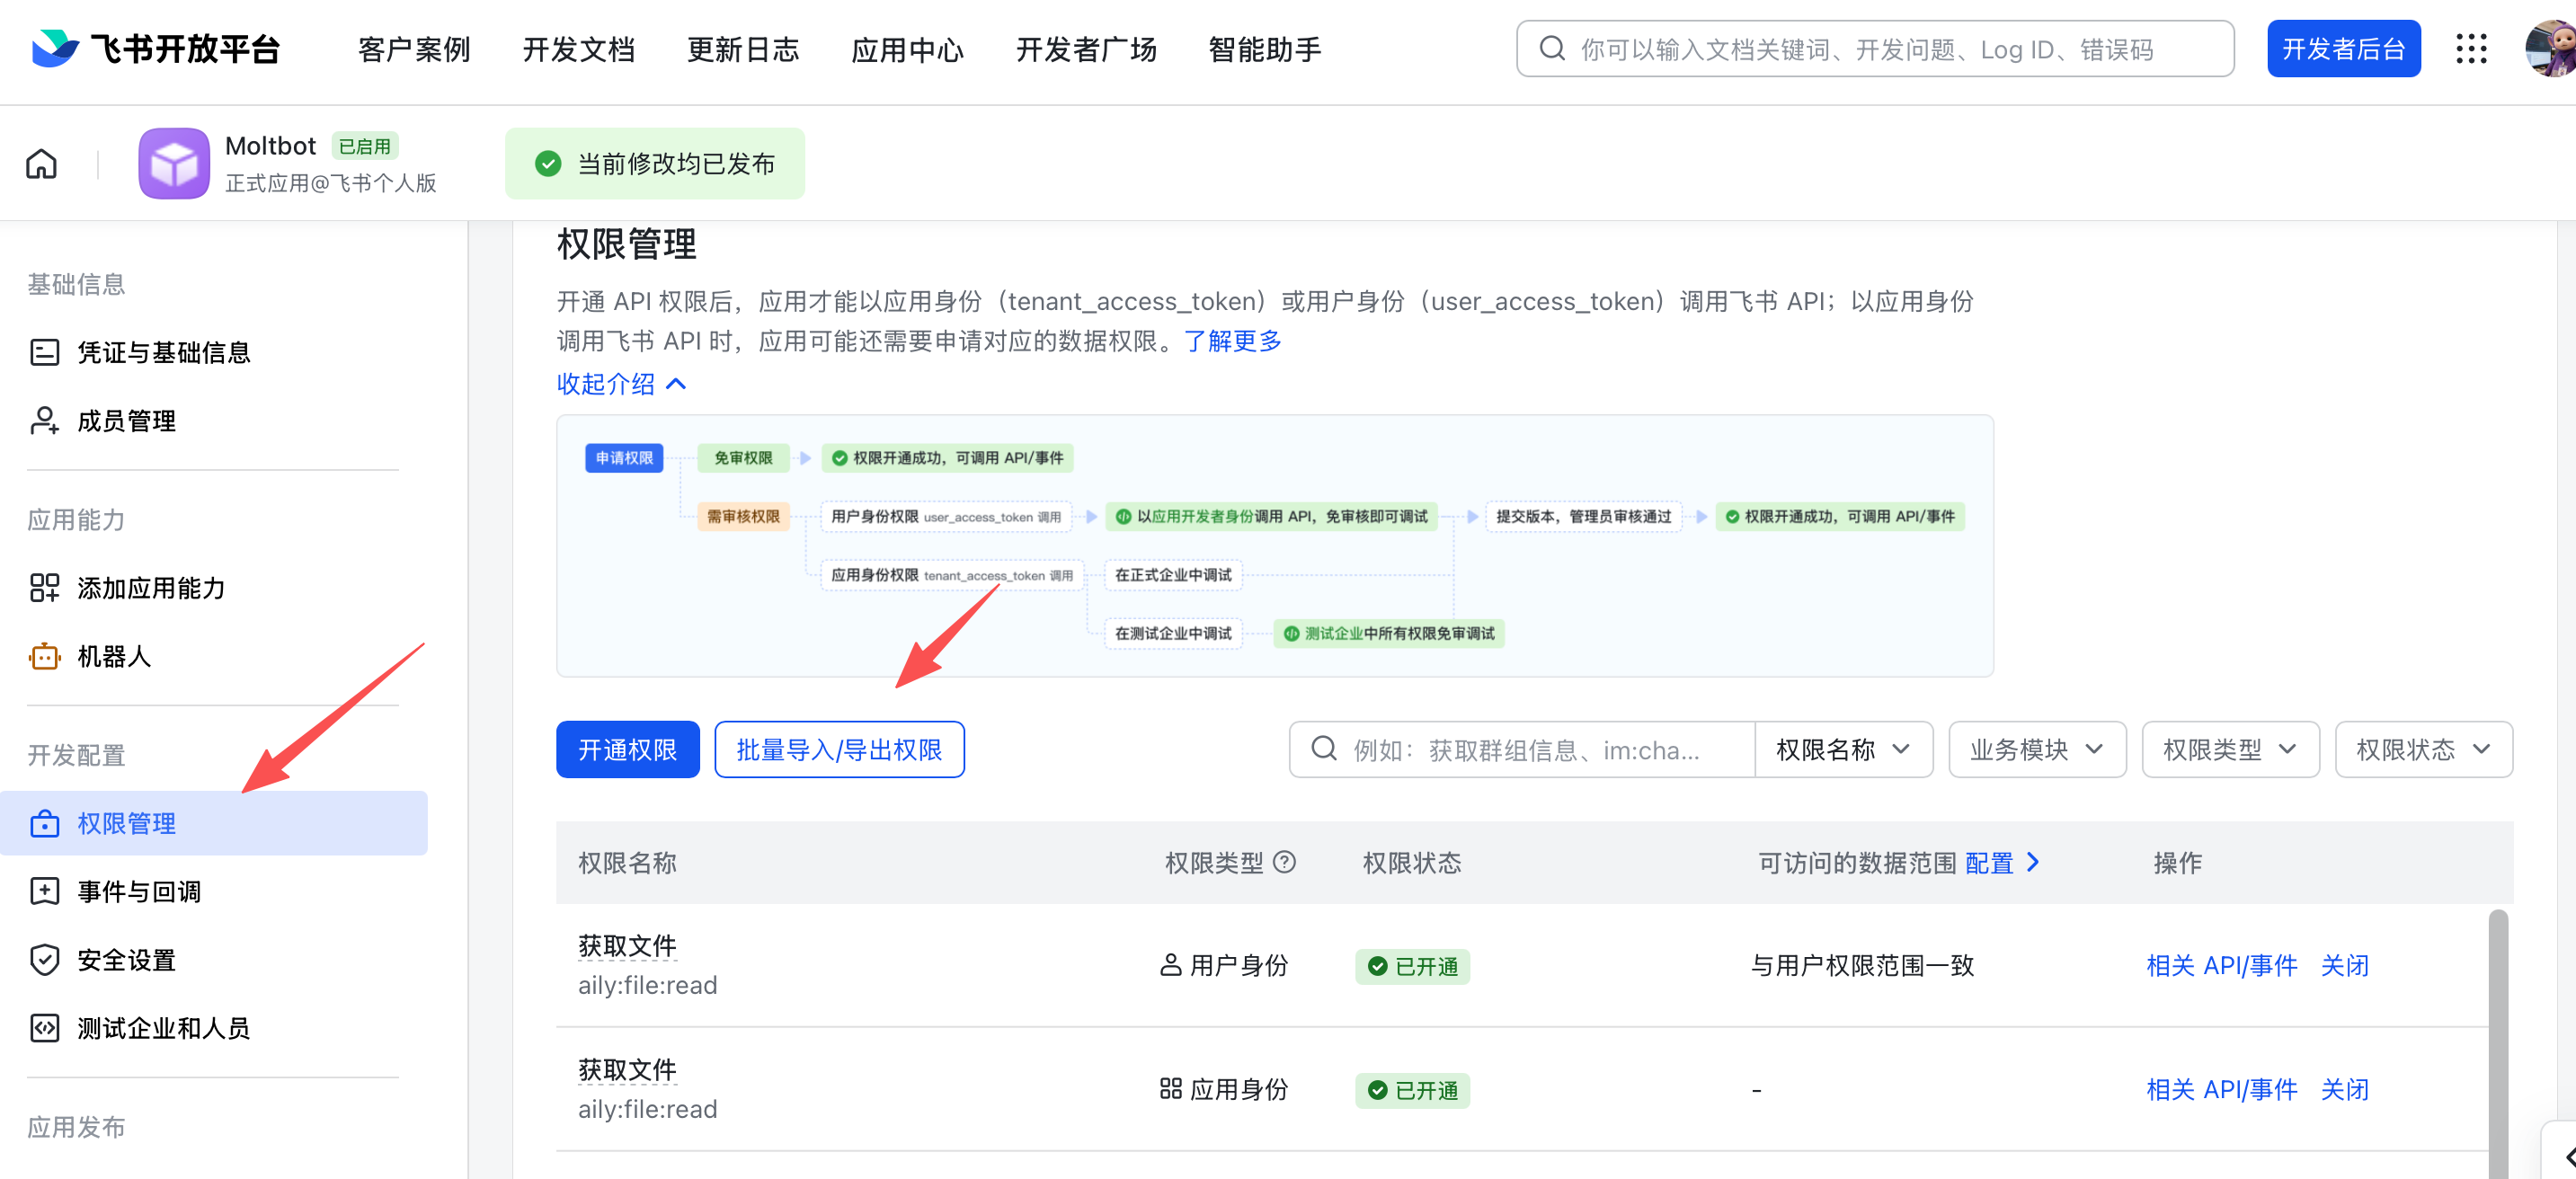
4. Configure Application Permissions
On the Permissions Management page, click the Batch Import button and paste the following JSON configuration to import the required permissions in one go:
{
  "scopes": {
    "tenant": [
      "aily:file:read",
      "aily:file:write",
      "application:application.app_message_stats.overview:readonly",
      "application:application:self_manage",
      "application:bot.menu:write",
      "cardkit:card:write",
      "contact:user.employee_id:readonly",
      "corehr:file:download",
      "docs:document.content:read",
      "event:ip_list",
      "im:chat",
      "im:chat.access_event.bot_p2p_chat:read",
      "im:chat.members:bot_access",
      "im:message",
      "im:message.group_at_msg:readonly",
      "im:message.group_msg",
      "im:message.p2p_msg:readonly",
      "im:message:readonly",
      "im:message:send_as_bot",
      "im:resource",
      "sheets:spreadsheet",
      "wiki:wiki:readonly"
    ],
    "user": [
      "aily:file:read",
      "aily:file:write",
      "im:chat.access_event.bot_p2p_chat:read"
    ]
  }
}
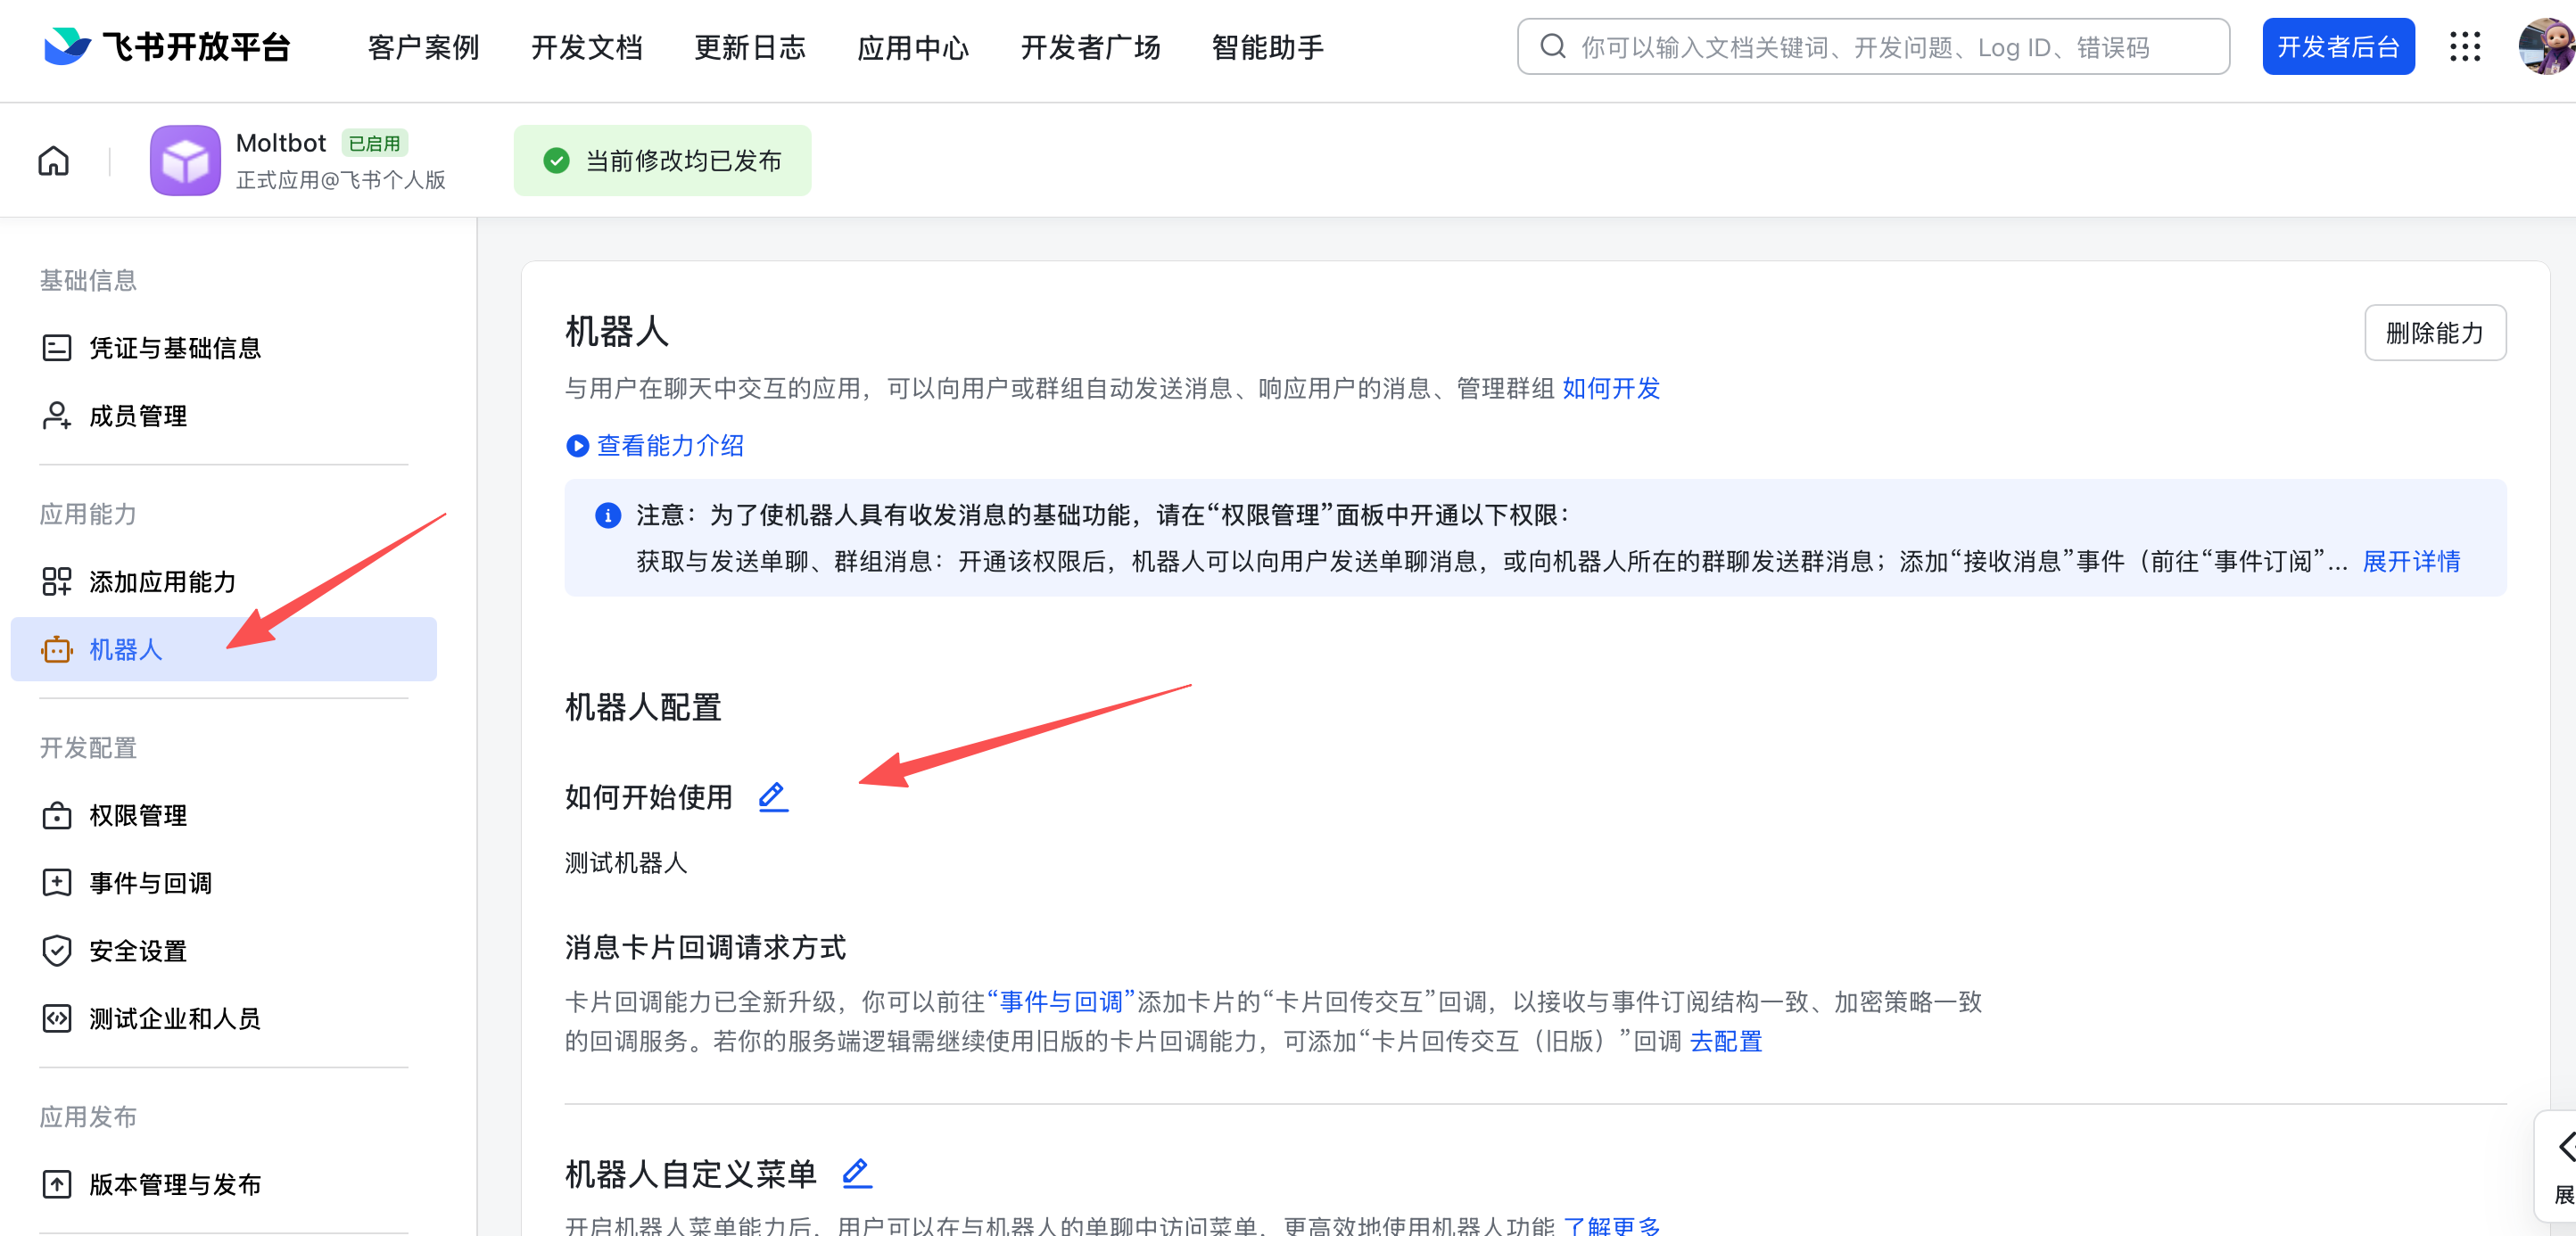
5. Enable Bot Capabilities
On the App Capabilities > Bot page:
- Enable Bot capabilities
- Configure the bot name
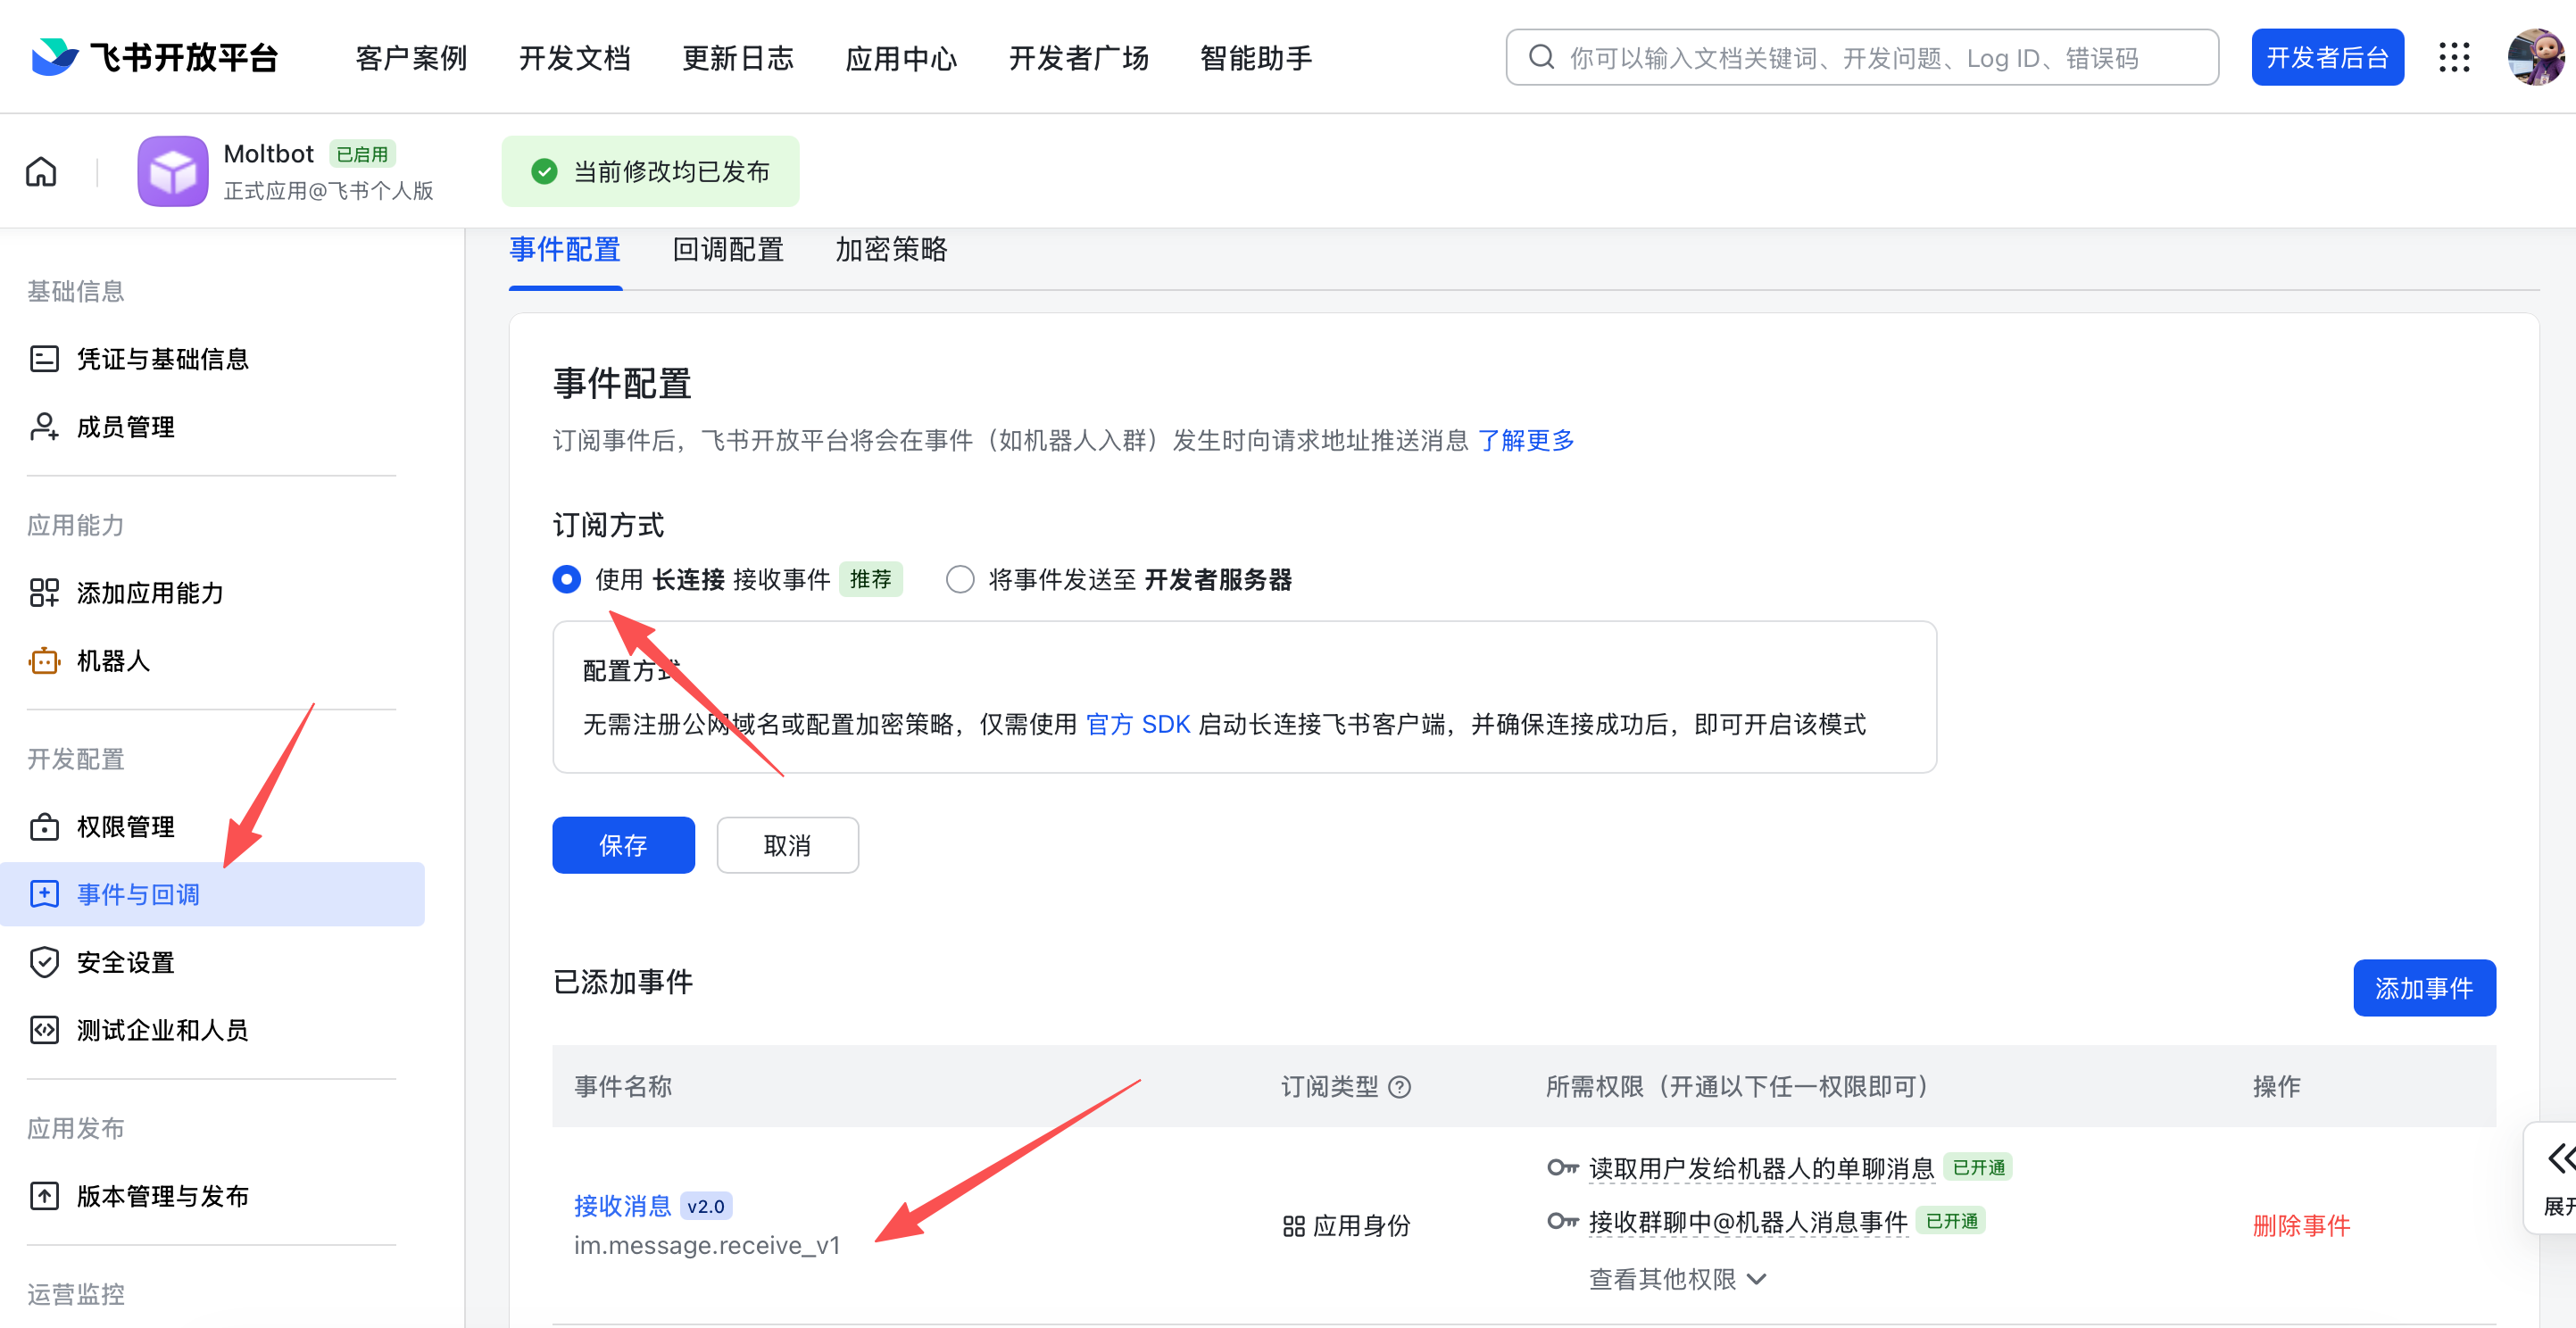
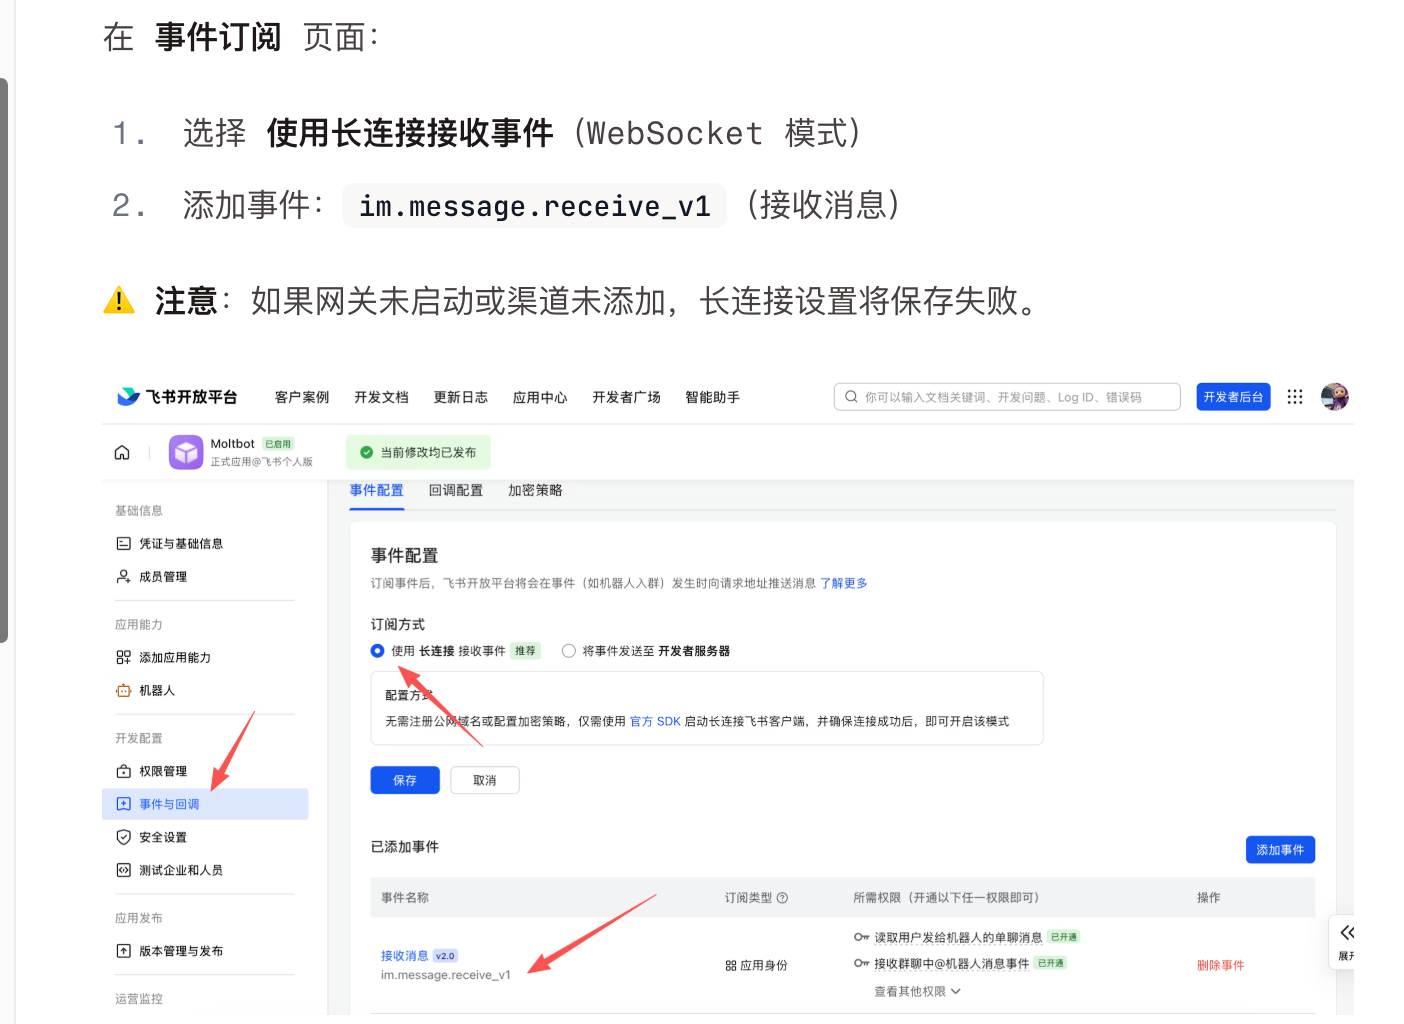
6. Configure Event Subscriptions
⚠️ Important Reminder: Before configuring event subscriptions, please ensure you have completed the following steps:
- Run
openclaw channels addto add the Feishu channel - The Gateway is running (you can check the status with
openclaw gateway status)
On the Event Subscriptions page:
Step 1: Select Long Connection Mode
- Select Use long connection to receive events (WebSocket mode)
Step 2: Add Events
2. Add event: im.message.receive_v1 (Receive messages)
Step 3: Configure Required Permissions (Important)
While configuring event subscriptions, please ensure the following permissions have been added on the Permissions Management page:
| Permission Identifier | Permission Name | Required | Description |
|---|---|---|---|
im:message | Get and send private/group messages | ✅ Required | Receive and send messages |
im:message:send_as_bot | Send messages as an app | ✅ Required | Reply as a bot |
contact:contact.base:readonly | Get basic contact information | ✅ Required | Identify user identity |
💡 Why is contact:contact.base:readonly permission needed?
This permission is used to obtain basic user information (such as username, department, etc.). OpenClaw needs this information to:
- ✅ Identify message senders
- ✅ Implement access control (allowlist/denylist)
- ✅ Provide personalized services
- ✅ Record conversation history
⚠️ If this permission is missing, the bot will not be able to respond to messages normally!
Configuration Screenshot Example:

⚠️ Note: If the Gateway is not started or the channel is not added, the long connection setting will fail to save.
Common Error Troubleshooting:
If you encounter the "Gateway start blocked: set gateway.mode=local" error:
# Ensure gateway.mode is set in the configuration file
{
  "gateway": {
    "mode": "local"
  }
}
If you encounter the "Gateway auth is set to token, but no token is configured" error:
# Method 1: Set token in the configuration file
{
  "gateway": {
    "auth": {
      "mode": "token",
      "token": "your-secure-token"
    }
  }
}

# Method 2: Use environment variables
export OPENCLAW_GATEWAY_TOKEN="your-secure-token"
7. Publish Application
- Create a version on the Version Management & Release page
- Submit for review and publish
- Wait for administrator approval (enterprise custom apps usually pass automatically)
9.1.4 Step 2: Configure OpenClaw
Install Feishu Plugin
# Install Feishu plugin
openclaw plugins install @openclaw/feishu

# Local checkout (run inside git repository)
openclaw plugins install ./extensions/feishu
Configure via Wizard (Recommended)
Run the following command and paste your App ID and App Secret as prompted:
openclaw channels addSelect Feishu, then enter the credentials you obtained in Step 1.
Configure via Configuration File
Edit ~/.openclaw/openclaw.json:
{
  "channels": {
    "feishu": {
      "enabled": true,
      "dmPolicy": "pairing",
      "accounts": {
        "main": {
          "appId": "cli_xxx",
          "appSecret": "xxx",
          "botName": "我的AI助手"
        }
      }
    }
  }
}
Configure via Environment Variables
export FEISHU_APP_ID="cli_xxx"
export FEISHU_APP_SECRET="xxx"
Lark (International Version) Domain Configuration
If your tenant is on Lark (International Version), please set the domain to lark:
{
  "channels": {
    "feishu": {
      "domain": "lark",
      "accounts": {
        "main": {
          "appId": "cli_xxx",
          "appSecret": "xxx"
        }
      }
    }
  }
}
9.1.5 Step 3: Launch and Test
1. Start the Gateway
# Install and start the Gateway
openclaw gateway install

# Check Gateway status
openclaw gateway status

# View real-time logs
openclaw logs --follow
Indicators of successful Gateway startup:
✅ Gateway: running (pid xxxxx, state active)
✅ Gateway target: ws://127.0.0.1:18789
✅ Source: local loopback
2. Send a Test Message
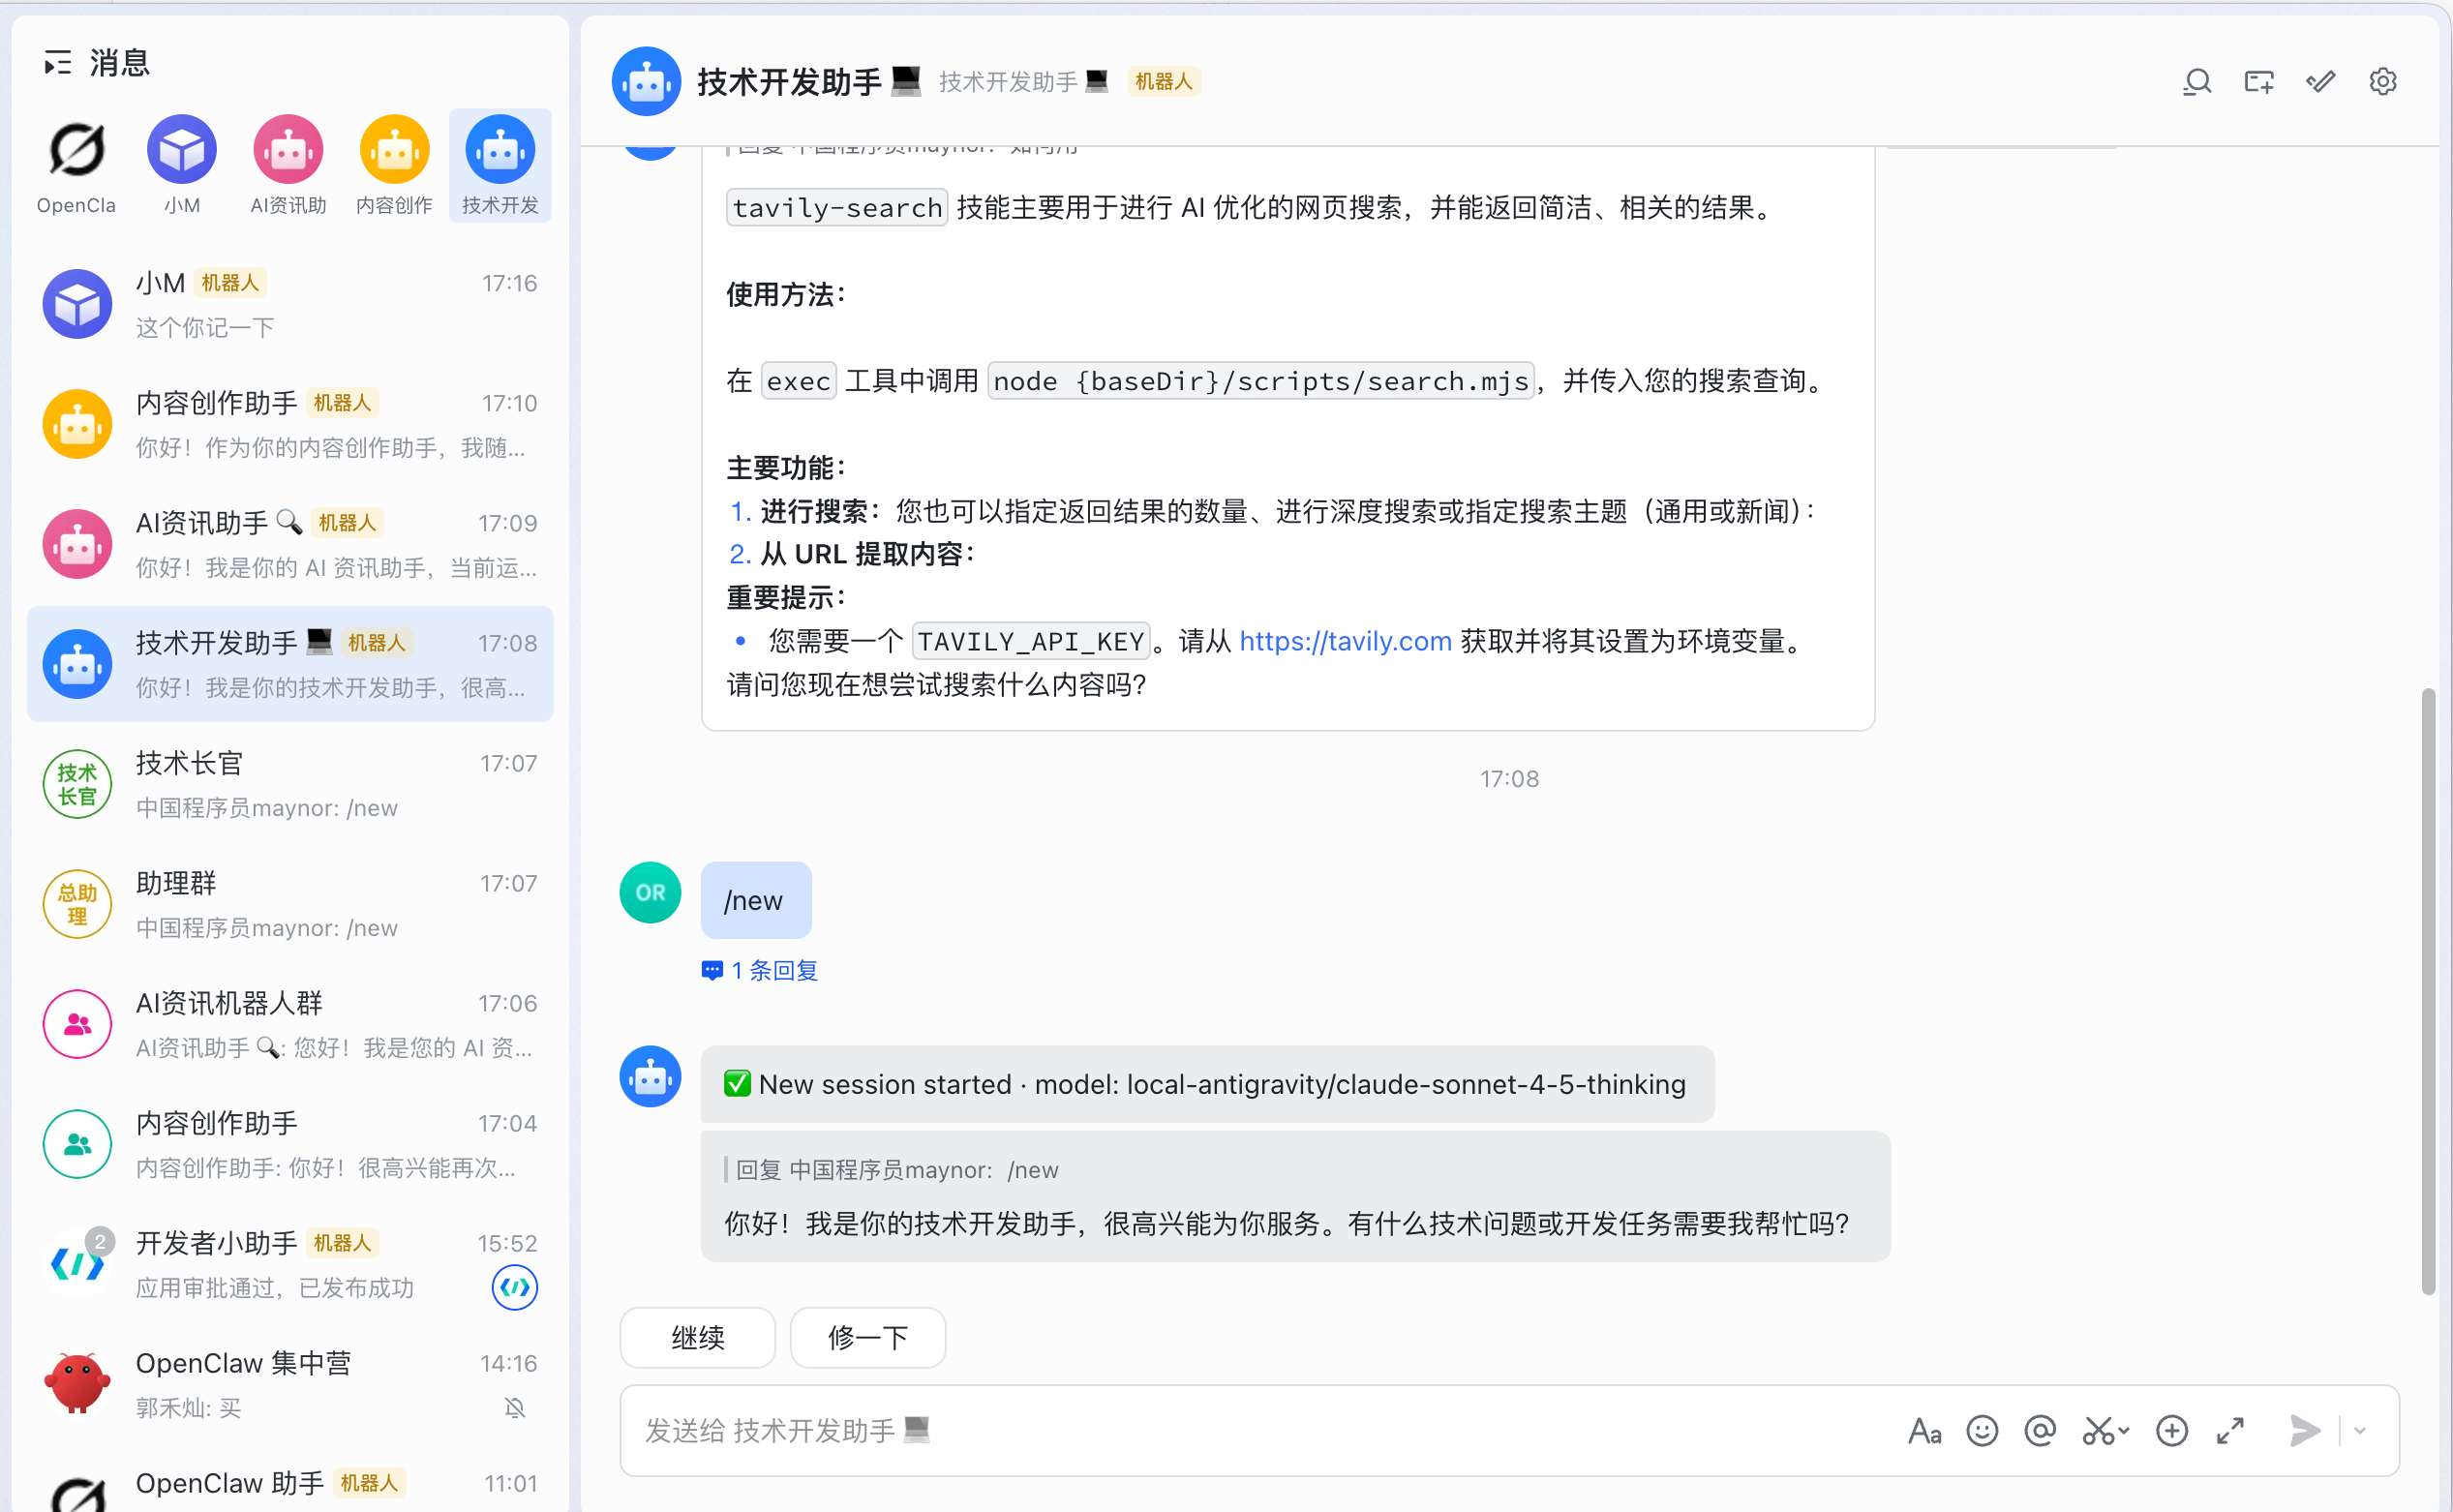
Find the bot you created in Lark and send a message, for example: "hi".
You should see in the logs:
HEARTBEAT_OK
hi
connected | running
agent main | session main (heartbeat) | local-antigravity/gemini-3-pro-high
3. Pairing Authorization
By default (dmPolicy: "pairing"), the bot will reply with a pairing code. You need to approve this code:
# View pending pairing requests
openclaw pairing list feishu

# Approve pairing (replace <pairing code> with the actual code received)
openclaw pairing approve feishu <pairing code>

# Example
openclaw pairing approve feishu ABC123
After approval, you can chat normally.
If you don't want to use pairing mode:
{
  "channels": {
    "feishu": {
      "dmPolicy": "open",
      "allowFrom": ["*"]
    }
  }
}
9.1.6 Access Control
Private Chat Access
Default policy: dmPolicy: "pairing", unknown users will receive a pairing code
Approve pairing:
openclaw pairing list feishu           # View pending list
openclaw pairing approve feishu <CODE> # Approve
Whitelist mode: Configure allowed user Open IDs via channels.feishu.allowFrom
Group Access
1. Group Policy (channels.feishu.groupPolicy):
"open"= Allow everyone in the group (default)"allowlist"= Only allow users ingroupAllowFrom"disabled"= Disable group messages
2. @Mention Requirement (channels.feishu.groups.<chat_id>.requireMention):
true= Requires @mentioning the bot to respond (default)false= Responds without @mentioning
9.1.7 Group Configuration Example
Allow all groups, requires @mention (default behavior)
{
  "channels": {
    "feishu": {
      "groupPolicy": "open"
      // Default requireMention: true
    }
  }
}
Allow all groups, no @mention required
Needs to be configured for specific groups:
{
  "channels": {
    "feishu": {
      "groups": {
        "oc_xxx": { "requireMention": false }
      }
    }
  }
}
Only allow specific users to use in groups
{
  "channels": {
    "feishu": {
      "groupPolicy": "allowlist",
      "groupAllowFrom": ["ou_xxx", "ou_yyy"]
    }
  }
}
9.1.8 Obtaining Group/User ID
Obtaining Group ID (chat_id)
Group ID format is oc_xxx, which can be obtained in the following ways:
Method 1 (Recommended):
- Start the Gateway and @mention the bot in a group to send a message
- Run
openclaw logs --followto view thechat_idin the logs
Method 2: Use the Lark API debugging tool to get a list of groups the bot is in.
Obtaining User ID (open_id)
User ID format is ou_xxx, which can be obtained in the following ways:
Method 1 (Recommended):
- Start the Gateway and send a message to the bot
- Run
openclaw logs --followto view theopen_idin the logs
Method 2: View the pairing request list, which contains the user's Open ID:
openclaw pairing list feishu9.1.9 Advanced Configuration
Custom Menu
Add common commands to the menu
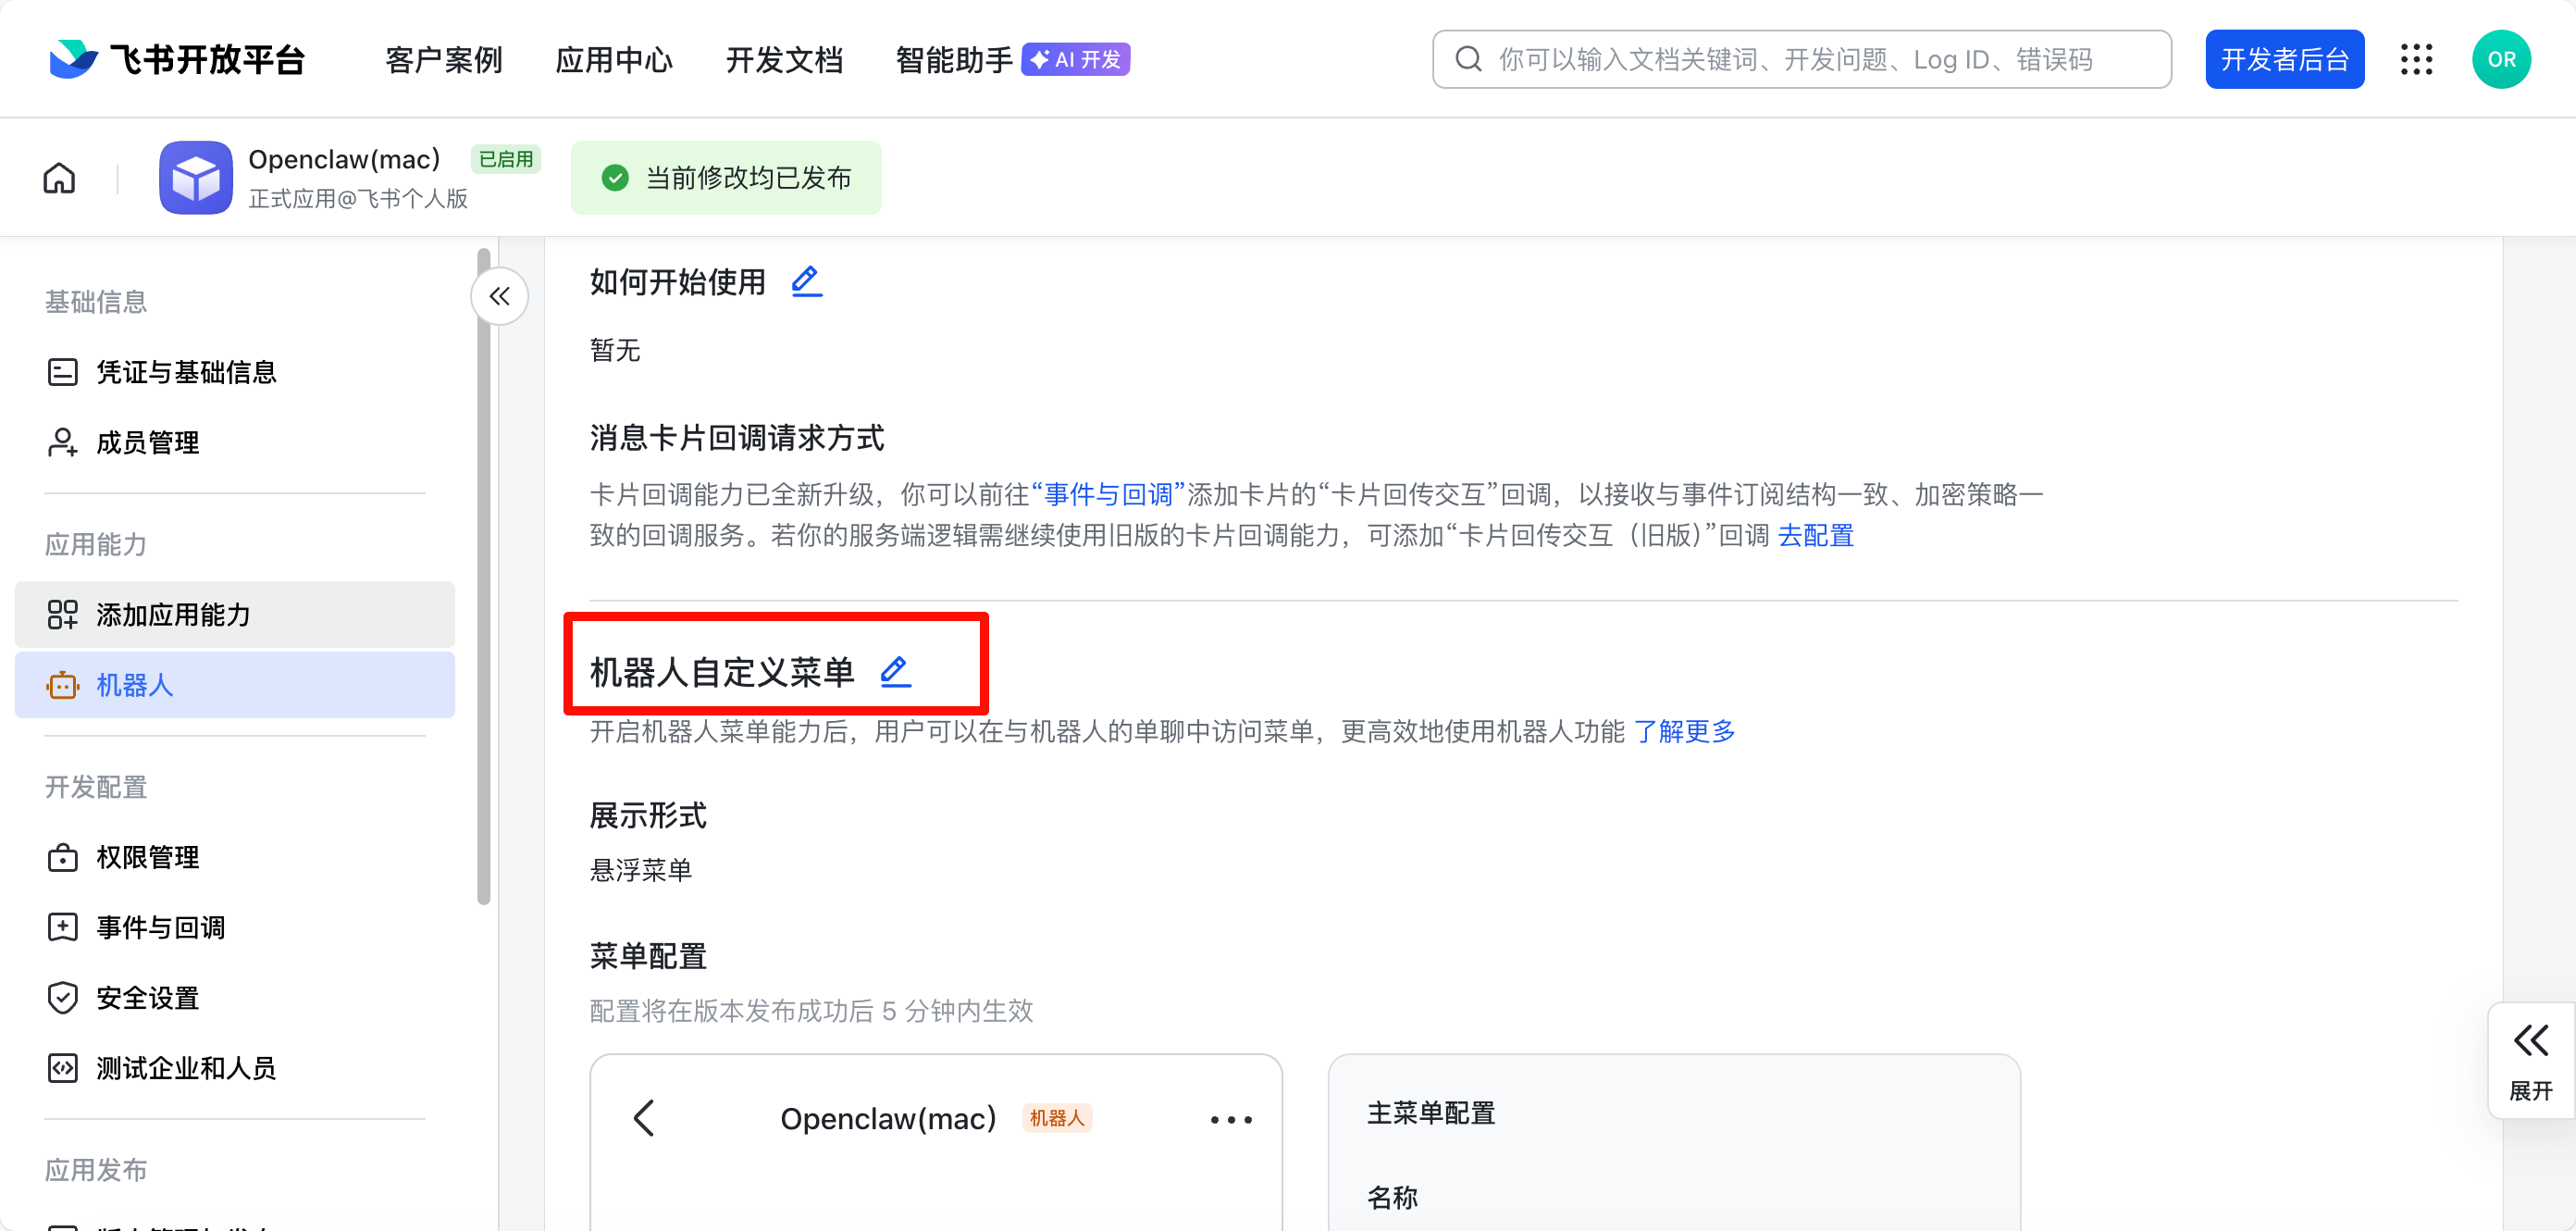
Here I created three common commands: New Conversation, List Skills, Continue.

Multi-Account Configuration
OpenClaw supports managing multiple Lark bots simultaneously, which is very useful in the following scenarios:
- Different teams use different bots
- Separation of test and production environments
- Dedicated bots for different functions
- Primary and backup bot configurations
Basic Configuration Example (2 bots):
{
  "channels": {
    "feishu": {
      "enabled": true,
      "dmPolicy": "pairing",
      "accounts": {
        "bot1": {
          "appId": "cli_xxxxxxxxxxxxxxxx",
          "appSecret": "your-app-secret-1",
          "botName": "OpenClaw助手1",
          "enabled": true
        },
        "bot2": {
          "appId": "cli_yyyyyyyyyyyyyyyy",
          "appSecret": "your-app-secret-2",
          "botName": "OpenClaw助手2",
          "enabled": true
        }
      },
      "domain": "feishu",
      "groupPolicy": "open",
      "connectionMode": "websocket",
      "requireMention": true,
      "renderMode": "auto",
      "streaming": true,
      "blockStreaming": true,
      "replyToMode": "all"
    }
  },
  "gateway": {
    "port": 18789,
    "mode": "local",
    "bind": "lan",
    "auth": {
      "mode": "token",
      "token": "your-secure-token-here"
    }
  },
  "agents": {
    "defaults": {
      "model": {
        "primary": "your-provider/your-model"
      },
      "workspace": "/path/to/your/workspace",
      "compaction": {
        "mode": "safeguard"
      },
      "maxConcurrent": 4,
      "subagents": {
        "maxConcurrent": 8
      }
    }
  }
}
💡 Practical Tip: The configuration example above comes from a real multi-bot deployment case. Note that appSecret and token should be kept secure in a production environment and not committed to a code repository.
Multi-Bot Configuration Example (4 Professional Assistants):
{
  "channels": {
    "feishu": {
      "enabled": true,
      "dmPolicy": "pairing",
      "accounts": {
        "main-assistant": {
          "appId": "cli_main_xxxxxx",
          "appSecret": "your-main-secret",
          "botName": "主助理",
          "enabled": true
        },
        "content-creator": {
          "appId": "cli_content_xxxxxx",
          "appSecret": "your-content-secret",
          "botName": "内容创作助手",
          "enabled": true
        },
        "tech-dev": {
          "appId": "cli_tech_xxxxxx",
          "appSecret": "your-tech-secret",
          "botName": "技术开发助手",
          "enabled": true
        },
        "ai-news": {
          "appId": "cli_news_xxxxxx",
          "appSecret": "your-news-secret",
          "botName": "AI资讯助手",
          "enabled": true
        }
      },
      "domain": "feishu",
      "groupPolicy": "open",
      "connectionMode": "websocket",
      "requireMention": true,
      "streaming": true,
      "blockStreaming": true,
      "replyToMode": "all"
    }
  },
  "agents": {
    "defaults": {
      "model": {
        "primary": "anthropic/claude-sonnet-4"
      },
      "workspace": "/path/to/workspace",
      "compaction": {
        "mode": "safeguard"
      },
      "maxConcurrent": 4,
      "subagents": {
        "maxConcurrent": 8
      }
    }
  }
}
⚠️ Important Note: In multi-account configuration, you do not need to use bindings to bind different agents. All bots will automatically share the agents.defaults configuration. If different models are needed, you can switch them using the /model command in the conversation.
Configuration Description:
| Parameter | Description | Required |
|---|---|---|
accounts.<id> | Unique account identifier (custom) | ✅ |
appId | Lark app's App ID | ✅ |
appSecret | Lark app's App Secret | ✅ |
botName | Bot display name | ❌ |
enabled | Whether to enable this account | ❌ (default true) |
Multi-Bot Usage Scenarios:
-
One-Person Company/Independent Developer
- Main Assistant: Task distribution, schedule management
- Content Creation Assistant: Articles, video scripts
- Technical Development Assistant: Code development, debugging
- AI News Assistant: Industry trend tracking
-
Team Collaboration
- Technical Team Assistant: Code review, technical discussions
- Product Team Assistant: Requirements analysis, user feedback
- Operations Team Assistant: Data analysis, content operations
- Test Assistant: Dedicated for test environments
-
Environment Separation
- Production Environment Assistant: For official business use
- Test Environment Assistant: For feature testing
- Development Environment Assistant: For development debugging
Important
On the Event Subscriptions page:
Step 1: Select Long Connection Mode
- Select Use long connection to receive events (WebSocket mode)
Step 2: Add Events
2. Add event: im.message.receive_v1 (Receive messages)
Step 3: Configure Required Permissions 3. On the Permissions Management page, ensure the following have been added:
- ✅
im:message(Get and send private/group messages) - ✅
im:message:send_as_bot(Send messages as an app) - ✅
contact:contact.base:readonly(Get basic contact information) ⭐ Required
💡 Missing contact:contact.base:readonly permission will cause the bot to be unable to identify users and respond to messages normally.
- Add event:
im.message.receive_v1(Receive messages)
Practical Scenario 1: Team Separation
Create dedicated bots for different teams:
{
  "channels": {
    "feishu": {
      "accounts": {
        "tech-team": {
          "appId": "cli_tech_xxx",
          "appSecret": "tech_secret",
          "botName": "技术团队助手",
          "enabled": true
        },
        "sales-team": {
          "appId": "cli_sales_xxx",
          "appSecret": "sales_secret",
          "botName": "销售团队助手",
          "enabled": true
        },
        "hr-team": {
          "appId": "cli_hr_xxx",
          "appSecret": "hr_secret",
          "botName": "HR助手",
          "enabled": true
        }
      }
    }
  }
}
Practical Scenario 2: Environment Separation
Use different bots for test and production environments:
{
  "channels": {
    "feishu": {
      "accounts": {
        "production": {
          "appId": "cli_prod_xxx",
          "appSecret": "prod_secret",
          "botName": "OpenClaw生产环境",
          "enabled": true,
          "dmPolicy": "pairing"
        },
        "staging": {
          "appId": "cli_staging_xxx",
          "appSecret": "staging_secret",
          "botName": "OpenClaw测试环境",
          "enabled": true,
          "dmPolicy": "open"
        },
        "development": {
          "appId": "cli_dev_xxx",
          "appSecret": "dev_secret",
          "botName": "OpenClaw开发环境",
          "enabled": false
        }
      }
    }
  }
}
Practical Scenario 3: Function Separation
Use dedicated bots for different functions:
{
  "channels": {
    "feishu": {
      "accounts": {
        "general": {
          "appId": "cli_general_xxx",
          "appSecret": "general_secret",
          "botName": "通用助手",
          "enabled": true
        },
        "code-review": {
          "appId": "cli_code_xxx",
          "appSecret": "code_secret",
          "botName": "代码审查助手",
          "enabled": true
        },
        "document": {
          "appId": "cli_doc_xxx",
          "appSecret": "doc_secret",
          "botName": "文档助手",
          "enabled": true
        }
      }
    }
  }
}
Using with Multiple Agents
Bind different Lark bots to different Agents to achieve more granular functional separation:
{
  "agents": {
    "list": [
      {
        "id": "general-agent",
        "workspace": "/home/user/general",
        "agentDir": "/home/user/.openclaw/agents/general/agent"
      },
      {
        "id": "code-agent",
        "workspace": "/home/user/code-review",
        "agentDir": "/home/user/.openclaw/agents/code/agent"
      },
      {
        "id": "doc-agent",
        "workspace": "/home/user/document",
        "agentDir": "/home/user/.openclaw/agents/doc/agent"
      }
    ]
  },
  "channels": {
    "feishu": {
      "accounts": {
        "general": {
          "appId": "cli_general_xxx",
          "appSecret": "general_secret",
          "botName": "通用助手"
        },
        "code-review": {
          "appId": "cli_code_xxx",
          "appSecret": "code_secret",
          "botName": "代码审查助手"
        },
        "document": {
          "appId": "cli_doc_xxx",
          "appSecret": "doc_secret",
          "botName": "文档助手"
        }
      }
    }
  },
  "bindings": [
    {
      "agentId": "general-agent",
      "match": {
        "channel": "feishu",
        "account": "general"
      }
    },
    {
      "agentId": "code-agent",
      "match": {
        "channel": "feishu",
        "account": "code-review"
      }
    },
    {
      "agentId": "doc-agent",
      "match": {
        "channel": "feishu",
        "account": "document"
      }
    }
  ]
}
Managing Multiple Bots
# View status of all Feishu accounts
openclaw channels list feishu

# Enable a specific account
openclaw channels enable feishu backup

# Disable a specific account
openclaw channels disable feishu test

# Restart a specific account
openclaw channels restart feishu main

# View logs for a specific account
openclaw logs --channel feishu --account main --follow
Configuration File Location
# Main configuration file
~/.openclaw/openclaw.json

# Or use independent channel configuration files
~/.openclaw/channels/feishu.json
Independent Configuration File Example:
# Create independent configuration file
mkdir -p ~/.openclaw/channels
nano ~/.openclaw/channels/feishu.json
{
"enabled": true,
"accounts": {
"main": {
"appId": "cli_xxx",
"appSecret": "xxx",
"botName": "主机器人"
},
"backup": {
"appId": "cli_yyy",
"appSecret": "yyy",
"botName": "备用机器人"
}
}
}Notes:
-
App ID and App Secret must be unique
- Each bot must use a different Lark app
- Multiple accounts cannot share the same App ID
-
Account Identifier Naming Convention
- Use lowercase letters and hyphens
- Avoid special characters
- Recommended to use meaningful names (e.g.,
tech-team,production)
-
Enable/Disable Control
enabled: true- Account enabled, bot will receive and process messagesenabled: false- Account disabled, bot will not receive messages- Can be switched at any time by modifying the configuration file or command line
-
Gateway Restart
- After modifying the configuration, the Gateway needs to be restarted:
openclaw gateway restart - Or reload the configuration:
openclaw channels reload
- After modifying the configuration, the Gateway needs to be restarted:
-
Log Viewing
- For multiple accounts, logs will be tagged with the account identifier
- Use the
--accountparameter to filter logs for a specific account
Troubleshooting:
Problem 1: A bot is not receiving messages
# Check if the account is enabled
openclaw channels status feishu

# View logs for that account
openclaw logs --channel feishu --account main --follow

# Check if the configuration is correct
openclaw config get channels.feishu.accounts.main
Problem 2: Multiple bots conflict
Ensure each bot uses a different Lark app:
- Different App IDs
- Different App Secrets
- Create multiple applications on the Lark Open Platform
Problem 3: Account switch not taking effect
# Restart the Gateway
openclaw gateway restart

# Or reload the configuration
openclaw channels reload feishu
Problem 4: Configuration validation failed - bindings error
Error: bindings.0.match: Unrecognized key: "account"Reason: In multi-account configuration, bindings are not needed to bind agents.
Solution:
- Delete the
bindingssection from the configuration file - All bots will automatically use the
agents.defaultsconfiguration - If different models are needed, switch them using the
/modelcommand in the conversation
Correct configuration structure:
{
  "channels": {
    "feishu": {
      "accounts": {
        "bot1": { ... },
        "bot2": { ... }
      }
    }
  },
  "agents": {
    "defaults": {
      "model": { "primary": "your-model" },
      "workspace": "/path/to/workspace"
    }
  }
  // ❌ No bindings needed
}
Problem 5: openclaw doctor reports an error after configuration
# Run diagnostics
openclaw doctor

# If configuration issues are prompted, run auto-fix
openclaw doctor --fix

# Verify configuration
openclaw doctor
# Should see: ✅ Config valid
Best Practices:
-
Use meaningful account names
"accounts": { "prod-main": { ... }, // Production environment main bot "prod-backup": { ... }, // Production environment backup "test": { ... } // Test environment } -
Use different policies for different environments
"production": { "dmPolicy": "pairing", // Production environment requires pairing "groupPolicy": "allowlist" // Group whitelist }, "development": { "dmPolicy": "open", // Development environment open access "groupPolicy": "open" // Group open } -
Regularly back up configurations
# Back up configuration file cp ~/.openclaw/openclaw.json ~/.openclaw/openclaw.json.backup # Or use OpenClaw backup command openclaw backup create -
Manage sensitive information using environment variables
# Set in ~/.bashrc or ~/.zshrc
export FEISHU_MAIN_APP_ID="cli_xxx"
export FEISHU_MAIN_APP_SECRET="xxx"
export FEISHU_BACKUP_APP_ID="cli_yyy"
export FEISHU_BACKUP_APP_SECRET="yyy"
Then reference in the configuration file:
{
  "channels": {
    "feishu": {
      "accounts": {
        "main": {
          "appId": "${FEISHU_MAIN_APP_ID}",
          "appSecret": "${FEISHU_MAIN_APP_SECRET}"
        }
      }
    }
  }
}
Streaming Output
Lark supports streaming output through interactive cards, where the bot updates card content in real-time to show generation progress.
{
  "channels": {
    "feishu": {
      "streaming": true,      // Enable streaming card output (default true)
      "blockStreaming": true  // Enable block-level streaming (default true)
    }
  }
}
To disable streaming output (wait for complete reply then send all at once), set streaming: false.
Message Quoting
In group chats, the bot's replies can quote the user's original message, making the conversation context clearer.
{
  "channels": {
    "feishu": {
      "replyToMode": "all",  // Account-level configuration (default "all")
      "groups": {
        "oc_xxx": {
          "replyToMode": "first"  // Specific groups can override
        }
      }
    }
  }
}
replyToMode values:
"off"= Do not quote original message (private chat default)"first"= Only quote original message in the first reply"all"= Quote original message in all replies (group chat default)
Multi-Agent Routing
Through bindings configuration, you can connect a single Lark bot to multiple Agents with different functions or personalities:
{
  "agents": {
    "list": [
      { "id": "main" },
      {
        "id": "clawd-fan",
        "workspace": "/home/user/clawd-fan",
        "agentDir": "/home/user/.openclaw/agents/clawd-fan/agent"
      },
      {
        "id": "clawd-xi",
        "workspace": "/home/user/clawd-xi",
        "agentDir": "/home/user/.openclaw/agents/clawd-xi/agent"
      }
    ]
  },
  "bindings": [
    {
      "agentId": "main",
      "match": {
        "channel": "feishu",
        "peer": { "kind": "dm", "id": "ou_28b31a88..." }
      }
    },
    {
      "agentId": "clawd-fan",
      "match": {
        "channel": "feishu",
        "peer": { "kind": "dm", "id": "ou_0fe6b1c9..." }
      }
    },
    {
      "agentId": "clawd-xi",
      "match": {
        "channel": "feishu",
        "peer": { "kind": "group", "id": "oc_xxx..." }
      }
    }
  ]
}
9.1.10 Common Commands
Bot Commands
| Command | Description |
|---|---|
/status | View bot status |
/reset | Reset conversation session |
/model | View/switch model |
Gateway Management Commands
| Command | Description |
|---|---|
openclaw gateway status | View Gateway running status |
openclaw gateway install | Install/start Gateway service |
openclaw gateway stop | Stop Gateway service |
openclaw gateway restart | Restart Gateway service |
openclaw logs --follow | View real-time log output |
9.1.11 Troubleshooting
Bot not responding in groups
- Check if the bot has been added to the group
- Check if the bot was @mentioned (default requires @mention)
- Check if
groupPolicyis"disabled" - View logs:
openclaw logs --follow
Bot not receiving messages
Possible causes and solutions:
-
Check if the app has been published and approved
# Check app status on Lark Open Platform # Ensure the app has been reviewed and published -
Check if event subscriptions are configured correctly
- ✅ "Use long connection to receive events" (WebSocket mode) is selected
- ✅ Event
im.message.receive_v1is added - ✅ Long connection status shows "Connected"
-
Check if permission configuration is complete ⭐ Important
Missing permissions will cause the bot to not function properly. Please ensure the following permissions have been added:
Permission Identifier Permission Name How to Check im:messageGet and send private/group messages View on Permissions Management page im:message:send_as_botSend messages as an app View on Permissions Management page contact:contact.base:readonlyGet basic contact information ⭐ Required, otherwise unable to identify users How to check permissions:
1. Log in to Lark Open Platform
2. Go to your application
3. Click "Permissions Management"
4. Confirm that all three permissions listed above have been added
5. If any are missing, click "Add Permission" to supplement
Common errors:
- ❌ Only
im:messagewas added,contact:contact.base:readonlywas forgotten - ❌ App was not republished after adding permissions
- ❌ Permission scope is set incorrectly
- ❌ Only
-
Check Gateway status
# Check if Gateway is running normally openclaw gateway status # View real-time logs openclaw logs --follow -
Check channel configuration
# View Feishu channel configuration openclaw channels list # Confirm appId and appSecret are correct openclaw config get channels.feishu -
Check if the app has been published and approved
-
Check if event subscriptions are configured correctly (
im.message.receive_v1) -
Check if long connection mode is selected
-
Check if app permissions are complete
-
Check if the Gateway is running:
openclaw gateway status -
View real-time logs:
openclaw logs --follow
Configuration file JSON syntax error
Error example:
JSON5 parse error at line 443: Python True/False vs JSON true/falseSolution:
# Check JSON syntax
cat ~/.openclaw/openclaw.json | python -m json.tool

# Common errors:
# ❌ "enabled": True   (Python syntax)
# ✅ "enabled": true   (JSON syntax)

# ❌ Extra comma
# ✅ No comma for the last item
Gateway startup failed
Error 1: Gateway start blocked
# Error message
Gateway start blocked: set gateway.mode=local (current: unset)

# Solution: Add to configuration file
{
  "gateway": {
    "mode": "local"
  }
}
Error 2: Gateway auth token not configured
# Error message
Gateway auth is set to token, but no token is configured

# Solution 1: Configuration file
{
  "gateway": {
    "auth": {
      "mode": "token",
      "token": "your-secure-token"
    }
  }
}

# Solution 2: Environment variable
export OPENCLAW_GATEWAY_TOKEN="your-secure-token"
Error 3: Plugin not found
# Error message
Config validation failed: plugins.entries.qqbot: plugin not found: qqbot

# Solution: Remove configuration for uninstalled plugins
{
  "plugins": {
    "entries": {
      "feishu": {
        "enabled": true
      }
      // Remove qqbot, ddingtalk, wecom, etc. for uninstalled plugins
    }
  }
}
Error 4: Workspace path error
# Error message
run error: Error: ENOENT: no such file or directory, mkdir '/root'

# Solution: Correct workspace path (macOS example)
{
  "agents": {
    "defaults": {
      "workspace": "/Users/yourusername/clawd"  // Use the correct macOS path
    }
  }
}
What to do if App Secret is leaked
- Reset App Secret on Lark Open Platform
- Update App Secret in the configuration file
- Restart Gateway:
openclaw gateway restart
Failed to send message
- Check if the app has
im:message:send_as_botpermission - Check if the app has been published
- View logs for detailed error information:
openclaw logs --follow
Gateway port occupied
# Error message
Port 18789 is already in use

# Solution 1: Stop existing Gateway
openclaw gateway stop

# Solution 2: Use a different port
{
  "gateway": {
    "port": 18790
  }
}
Configuration changes not taking effect
# Must restart Gateway after modifying configuration
openclaw gateway restart

# Or reload configuration
openclaw channels reload feishu

# Check if configuration is loaded correctly
openclaw config get channels.feishu
9.1.12 Configuration Reference
| Configuration Item | Description | Default Value |
|---|---|---|
channels.feishu.enabled | Enable/disable channel | true |
channels.feishu.domain | API domain (feishu or lark) | feishu |
channels.feishu.accounts.<id>.appId | App App ID | - |
channels.feishu.accounts.<id>.appSecret | App App Secret | - |
channels.feishu.dmPolicy | Private chat policy | pairing |
channels.feishu.allowFrom | Private chat whitelist (open_id list) | - |
channels.feishu.groupPolicy | Group policy | open |
channels.feishu.groupAllowFrom | Group whitelist | - |
channels.feishu.groups.<chat_id>.requireMention | Whether @mention is required | true |
channels.feishu.textChunkLimit | Message chunk size | 2000 |
channels.feishu.mediaMaxMb | Media size limit | 30 |
channels.feishu.streaming | Enable streaming card output | true |
channels.feishu.blockStreaming | Enable block-level streaming | true |
dmPolicy Strategy Description
| Value | Behavior |
|---|---|
"pairing" | Default. Unknown users receive a pairing code, can only chat after administrator approval |
"allowlist" | Only users in allowFrom list can chat, others are silently ignored |
"open" | Allow all users to chat (requires adding "*" to allowFrom) |
"disabled" | Completely prohibit private chats |
9.1.13 Supported Message Types
Receive
- ✅ Text messages
- ✅ Images
- ✅ Files
- ✅ Audio
- ✅ Video
- ✅ Emojis
Send
- ✅ Text messages
- ✅ Images
- ✅ Files
- ✅ Audio
- ⚠️ Rich text (partially supported)
9.1.14 Integration with Lark Ecosystem
Integrate Lark Docs
Features:
- Create documents
- Edit documents
- Share documents
- Permission management

Example:
You: Save this content to Lark Docs
OpenClaw: Saved to Lark Docs ✅
Link: https://...
Integrate Lark Multi-dimensional Tables
Features:
- Create tables
- Add data
- Query data
- Data analysis

Example:
You: Add invoice information to the multi-dimensional table
OpenClaw: 3 records added ✅
Integrate Lark Calendar
Features:
- Create events
- Modify events
- Delete events
- Event reminders

Example:
You: Meeting tomorrow at 3 PM
OpenClaw: Added to Lark Calendar ✅
9.1.15 Practical Case: Configuring Dual Bots
💡 Real Case: This section demonstrates a practical dual-bot configuration case, suitable for scenarios requiring separation of different functions or teams.
Scenario Description
A team needs two Lark bots:
- Bot 1: For daily office work and general tasks
- Bot 2: For specific projects or test environments
Complete Configuration Steps
1. Create two applications on Lark Open Platform
Create two enterprise custom apps separately and obtain:
- Bot 1: App ID
cli_xxxxxxxxxxxxxxxx, App Secret - Bot 2: App ID
cli_yyyyyyyyyyyyyyyy, App Secret
2. Configure OpenClaw
Edit ~/.openclaw/openclaw.json:
{
  "meta": {
    "lastTouchedVersion": "2026.2.6-3",
    "lastTouchedAt": "2026-02-08T09:49:58.322Z"
  },
  "channels": {
    "feishu": {
      "enabled": true,
      "dmPolicy": "pairing",
      "accounts": {
        "bot1": {
          "appId": "cli_xxxxxxxxxxxxxxxx",
          "appSecret": "your-app-secret-1",
          "botName": "OpenClaw助手1",
          "enabled": true
        },
        "bot2": {
          "appId": "cli_yyyyyyyyyyyyyyyy",
          "appSecret": "your-app-secret-2",
          "botName": "OpenClaw助手2",
          "enabled": true
        }
      },
      "domain": "feishu",
      "groupPolicy": "open",
      "connectionMode": "websocket",
      "requireMention": true,
      "renderMode": "auto",
      "streaming": true,
      "blockStreaming": true,
      "replyToMode": "all"
    }
  },
  "gateway": {
    "port": 18789,
    "mode": "local",
    "bind": "lan",
    "auth": {
      "mode": "token",
      "token": "your-secure-random-token-here"
    }
  },
  "agents": {
    "defaults": {
      "model": {
        "primary": "your-model-provider/your-model"
      },
      "workspace": "/path/to/your/workspace",
      "compaction": {
        "mode": "safeguard"
      },
      "maxConcurrent": 4
    }
  },
  "plugins": {
    "entries": {
      "feishu": {
        "enabled": true
      }
    }
  }
}
3. Configure Lark App Permissions
Configure permissions for both applications separately (batch import JSON, refer to section 9.1.3).
4. Configure Event Subscriptions
Configure for both applications separately:
- Select Use long connection to receive events
- Add event:
im.message.receive_v1
5. Start the Gateway
# Start Gateway
openclaw gateway install

# Check status
openclaw gateway status

# Should see:
# ✅ Gateway: running (pid 57344, state active)
# ✅ Gateway target: ws://127.0.0.1:18789
6. Test Bots
Send messages to both bots separately in Lark:
You: hi
Bot: [Pairing Code] Please ask administrator to approve pairing
7. Approve Pairing
# View pairing requests
openclaw pairing list feishu

# Approve Bot 1
openclaw pairing approve feishu <Pairing code 1>

# Approve Bot 2
openclaw pairing approve feishu <Pairing code 2>
8. Verify Operation
Check logs to confirm both bots are running normally:
openclaw logs --follow

# Should see:
# HEARTBEAT_OK
# hi
# connected | running
# agent main | session main (heartbeat)
Common Problem Handling
Problem 1: Configuration file JSON syntax error
# Error: JSON5 parse error at line 443
# Cause: Used Python syntax (True/False) instead of JSON syntax (true/false)

# Check syntax
cat ~/.openclaw/openclaw.json | python -m json.tool

# Correction:
# ❌ "enabled": True
# ✅ "enabled": true
Problem 2: Gateway startup failed
# Error: Gateway start blocked: set gateway.mode=local
# Solution: Ensure gateway.mode is configured

{
  "gateway": {
    "mode": "local"
  }
}
Problem 3: Workspace path error
# Error: ENOENT: no such file or directory, mkdir '/root'
# Cause: Linux path used in configuration file, but actual OS is macOS

# Correction (macOS):
{
  "agents": {
    "defaults": {
      "workspace": "/Users/yourusername/clawd"
    }
  }
}
Problem 4: Plugin not found
# Error: plugin not found: qqbot
# Cause: Configuration file referenced an uninstalled plugin

# Solution: Only keep installed plugins
{
  "plugins": {
    "entries": {
      "feishu": {
        "enabled": true
      }
      // Remove qqbot, ddingtalk, wecom, etc.
    }
  }
}
Configuration Checklist
- Two Lark applications created
- App ID and App Secret obtained
- Configuration file JSON syntax correct
-
gateway.modeset to "local" -
gateway.auth.tokenconfigured -
workspacepath correct (macOS/Linux) - Only installed plugins configured
- Permissions configured for both applications
- Event subscriptions configured for both applications (long connection)
- Both applications published
- Gateway started and running normally
- Both bots approved for pairing
- Logs show normal operation
Success Indicators
After successful configuration, you should see:
# Gateway status
$ openclaw gateway status
✅ Gateway: running (pid xxxxx, state active)
✅ Gateway target: ws://127.0.0.1:18789

# Log output
$ openclaw logs --follow
HEARTBEAT_OK
hi
connected | running
agent main | session main (heartbeat) | your-model-provider/your-model
tokens 25k/200k (13%)
Both bots can receive and reply to messages normally! 🎉
9.4 QQ Bot Configuration
9.4.1 Introduction to QQ Bots
Advantages of QQ:
-
User Base
- Large user volume
- Wide coverage
- Established usage habits
-
Social Attributes
- Active group chats
- Strong interactivity
- Entertainment features
-
Open Platform
- QQ Channels
- QQ Group Bots
- API support
-
Free to Use
- Basic features are free
- Easy to get started
9.4.2 Creating a QQ Bot
⚠️ Important Note: QQ Open Platform requires account registration first, not direct QQ login! Please complete registration first.
Step 1: Register for a QQ Open Platform Account
-
Visit QQ Open Platform:
https://q.qq.com/ -
Register a new account:
- ⚠️ Not QQ login, requires separate registration
- Click the "Register" button
- Fill in registration information
- Complete email/phone verification
-
Log in to the platform:
- Log in using the newly registered account
- Do not use QQ scan code login
Step 2: Create a Bot
-
Go to Bot Management:
- After logging in, click "Bots"
- Click "Create Bot"
-
Fill in bot information:
- Bot Name: Custom (e.g., My AI Assistant)
- Bot Avatar: Upload image
- Bot Introduction: Briefly describe functions
- Click "Create"
-
Wait for review:
- Submit and wait for review (usually a few minutes)
- Can be used after approval
Step 3: Configure the Bot
-
Obtain bot credentials:
- Go to the bot details page
- Click "Development Management"
- Record the following information:
- Bot ID (BotAppID)
- Bot Secret
-
Configure IP Whitelist:
- On the "Development Management" page
- Find "IP Whitelist" settings
- Add your server's public IP address
- Click "Save"
-
Add test users:
- In "Management" → "Member Management"
- Click "Add Member"
- Enter your QQ number
- Add yourself as a test user
-
Scan QR code to add bot as friend:
- Find the QR code on the bot details page
- Scan with your mobile QQ
- Add the bot as a friend
Step 4: Configure OpenClaw Connection
-
Obtain server IP address:
- If using Tencent Cloud, view the public IP in the console
- Record this IP address
-
Configure in Tencent Cloud Lighthouse (if using Tencent Cloud):
- Log in to Tencent Cloud: https://console.cloud.tencent.com/lighthouse
- Go to instance details
- Click the "Application Management" tab
- Find the "QQ Bot Configuration" area
- Fill in:
- Bot ID (BotAppID)
- Bot Secret
- Click "Apply Configuration"
-
Local configuration method:
# Run configuration wizard
openclaw onboard

# Select QuickStart
# Select model (e.g., Kimi 2.5)
# Enter model API Key
# Select channel: QQ
# Enter Bot ID and Secret
9.4.3 Configure OpenClaw
💡 Prerequisite: Please complete the basic installation and configuration of OpenClaw first, see Chapter 2: Environment Setup.
Method 1: Using Tencent Cloud Lighthouse (Recommended)
If you deploy OpenClaw using Tencent Cloud Lighthouse, configuration is very simple:
-
Go to Application Management:
- Log in to Tencent Cloud console
- Go to Lighthouse
- Click instance → "Application Management"
-
Configure QQ Bot:
- Find the "QQ Bot Configuration" area
- Fill in Bot ID and Secret
- Click "Apply Configuration"
- Wait for configuration to take effect
-
Verify connection:
- Open mobile QQ
- Send a message to the bot: "Hello"
- If you receive a reply, the configuration is successful
Method 2: Local Configuration
If you are deploying locally or on another cloud server, use the command line to configure:
# 1. Run configuration wizard
openclaw onboard

# 2. Select configuration options
# - Select Yes to accept risks
# - Select QuickStart

# 3. Configure model
# - Select model provider (e.g., Moonshot AI)
# - Enter API Key
# - Select default model (e.g., kimi-code/kimi-for-codi)

# 4. Configure channel
# - Select channel: QQ
# - Enter Bot ID (BotAppID)
# - Enter Bot Secret

# 5. Configure Skills and Hooks
# - Skills: Select Yes, can skip installation for now
# - Hooks: Select session-memory

# 6. Restart service
# - Select Yes to restart gateway service

# 7. Test connection
# - Select to open TUI (terminal user interface)
# - Or test directly in QQ
Method 3: Manually Edit Configuration File
# Edit configuration file
nano ~/.openclaw/config.json

# Add QQ configuration
{
  "channels": {
    "qq": {
      "enabled": true,
      "botAppId": "你的机器人ID",
      "botSecret": "你的机器人密钥",
      "profiles": ["default"]
    }
  }
}

# Restart service
systemctl --user restart openclaw-gateway.service
Start Gateway Service
# Method 1: Foreground run (for testing)
openclaw gateway --port 18789 --verbose

# Method 2: Background run (recommended)
nohup openclaw gateway --port 18789 --verbose > /dev/null 2>&1 &

# Method 3: Use systemd (most stable)
systemctl --user enable openclaw-gateway.service
systemctl --user start openclaw-gateway.service
Verify Configuration
# View service status
systemctl --user status openclaw-gateway.service

# View logs
journalctl --user -u openclaw-gateway.service -f

# Test connection
# Send a message to the bot in QQ: "Hello"
9.4.4 Practical Cases
Case 1: Personal Assistant
Features:
- Daily conversation
- Information query
- Task reminders
- Entertainment interaction

Usage example:
You: What's the weather like today?
OpenClaw: It's sunny today, 15-25°C

You: Remind me to submit homework tomorrow
OpenClaw: Reminder set ✅
Case 2: Group Management
Features:
- Group announcements
- Member management
- Message statistics
- Auto-reply

Usage example:
Admin: @OpenClaw Post announcement
OpenClaw: Announcement posted ✅

Member: @OpenClaw Query group rules
OpenClaw: Group rules are as follows...
Case 3: Entertainment Interaction
Features:
- Chat conversation
- Tell jokes
- Guess riddles
- Play games

Usage example:
You: Tell a joke
OpenClaw: Okay, listen to this...

You: Guess a riddle
OpenClaw: What is it that...
9.4.5 Limitations and Notes
Feature Limitations:
⚠️ QQ bots have the following limitations:
- Message frequency limits
- Feature permission limits
- Strict review requirements
- Some APIs require application
- Currently does not support actively sending messages (tested 2026.2.6)Notes:
✅ Comply with platform rules
✅ Do not send illegal content
✅ Use API reasonably
✅ Respond to users promptly
✅ Regularly check service status
Common Problems:
-
Bot not replying to messages:
- Check if IP whitelist is correct
- Check if Bot ID and Secret are correct
- Check if Gateway service is running
- Check server logs
-
Unable to connect after configuration:
- Confirm added as test user
- Confirm added bot as friend
- Restart Gateway service
- Check firewall settings
-
Message delay:
- Check network connection
- Check server load
- Consider upgrading server configuration
9.5 Discord Bot Configuration (Reference)
⚠️ Outdated Notice: This section was written in January 2026, when OpenClaw was still called Clawbot/Moltbot. Although some commands are outdated, the configuration process can still be used as a reference.
9.5.1 Introduction to Discord Bots
Advantages of Discord:
-
International Platform
- Global user base
- Multi-language support
- Active community
-
Developer Friendly
- Comprehensive API
- Detailed documentation
- Flexible permissions
-
Rich Features
- Supports voice channels
- Supports rich text
- Supports custom emojis
Applicable Scenarios:
- ✅ International team collaboration
- ✅ Gaming communities
- ✅ Open source projects
- ✅ Technical exchange
9.5.2 Creating a Discord Bot
Step 1: Visit Developer Portal
https://discord.com/developers/applicationsStep 2: Create an Application
- Click "New Application"
- Enter application name (e.g., My OpenClaw Bot)
- Click "Create"
Step 3: Create a Bot
- Select "Bot" from the left menu
- Click "Add Bot"
- Click "Reset Token" → "Copy"
- ⚠️ Save Token, it cannot be viewed again later
Step 4: Configure Bot Permissions
- Scroll down on the Bot page
- Enable "Message Content Intent"
- Click "Save Changes"
Step 5: Generate Invite Link
- Select "OAuth2" → "URL Generator" from the left menu
- Check
botin "Scopes" - Check the following in "Bot Permissions":
- Send Messages
- Read Message History
- Copy the generated URL
Step 6: Invite Bot to Server
- Open the copied URL in your browser
- Select your Discord server
- Click "Authorize"
- Complete verification
9.5.3 Configure OpenClaw (Old Command Reference)
⚠️ Note: The following commands use the old clawdbot command; the new version should use openclaw.
Configuration Steps (needs to be updated to new commands):
# Old command (for reference only)
clawdbot onboard

# New command (recommended)
openclaw onboard

# Configuration process:
# 1. Select Yes to accept risks
# 2. Select QuickStart
# 3. Configure model (e.g., GLM 4.7)
# 4. Select channel: Discord
# 5. Enter Bot Token
# 6. Configure Skills and Hooks
Start Service:
# Old command
clawdbot gateway --port 18789 --verbose

# New command
openclaw gateway --port 18789 --verbose

# Background run
nohup openclaw gateway --port 18789 --verbose > /dev/null 2>&1 &
Pairing Connection:
# 1. Private message the Bot in Discord to get the pairing code
# 2. Stop Gateway service (Ctrl+C)
# 3. Run pairing command (old version)
clawdbot pairing approve discord <Pairing code>

# New command (needs confirmation)
openclaw pairing approve discord <Pairing code>

# 4. Restart Gateway
openclaw gateway --port 18789 --verbose
9.5.4 Using Discord Bot
Private Chat Mode:
1. Find your Bot in Discord
2. Click on the Bot's avatar
3. Click "Send Message"
4. Send messages directly
Group Chat Mode:
1. @mention the Bot in the channel
2. Type your question
3. The Bot will reply to you

Example:
@MyBot What's the weather like today?
9.5.5 Notes
Command Updates:
- The
clawdbotcommands used in this section are outdated - The new version uniformly uses the
openclawcommand - The configuration process is largely the same, but commands need to be updated
Configuration Reference:
- Discord's configuration process is still valid
- Bot creation steps have not changed
- Mainly OpenClaw commands need to be updated
Recommended Practice:
- Prioritize using domestic platforms (Lark, QQ, WeCom)
- Discord is suitable for international teams
- If you need to use Discord, please refer to the latest official documentation
9.5 Platform Comparison and Selection
9.5.1 Feature Comparison
| Feature | Lark | WeCom | DingTalk | |
|---|---|---|---|---|
| Enterprise Office | ⭐⭐⭐⭐⭐ | ⭐⭐⭐⭐⭐ | ⭐⭐⭐⭐⭐ | ⭐⭐ |
| Instant Messaging | ⭐⭐⭐⭐⭐ | ⭐⭐⭐⭐⭐ | ⭐⭐⭐⭐ | ⭐⭐⭐⭐⭐ |
| Document Collaboration | ⭐⭐⭐⭐⭐ | ⭐⭐⭐ | ⭐⭐⭐⭐ | ⭐ |
| Developer Friendly | ⭐⭐⭐⭐⭐ | ⭐⭐⭐⭐ | ⭐⭐⭐⭐ | ⭐⭐⭐ |
| User Base | ⭐⭐⭐ | ⭐⭐⭐⭐ | ⭐⭐⭐⭐ | ⭐⭐⭐⭐⭐ |
| Free Tier | ⭐⭐⭐⭐⭐ | ⭐⭐⭐⭐⭐ | ⭐⭐⭐⭐⭐ | ⭐⭐⭐⭐⭐ |
9.5.2 Recommended Usage Scenarios
Lark:
✅ Suitable Scenarios:
- Modern office
- Document collaboration
- Knowledge management
- Team collaboration
- Technical teams

❌ Not Suitable For:
- Traditional enterprises
- Simple requirementsWeCom:
✅ Suitable Scenarios:
- Internal enterprise use
- Needs interoperability with WeChat
- Customer service
- Marketing and promotion

❌ Not Suitable For:
- Pure personal use
- Requires complex document collaborationDingTalk:
✅ Suitable Scenarios:
- Enterprise office
- Attendance management
- Approval workflows
- Project management

❌ Not Suitable For:
- Personal entertainment
- Social interactionQQ:
✅ Suitable Scenarios:
- Personal use
- Social interaction
- Entertainment features
- Student groups

❌ Not Suitable For:
- Enterprise office
- Formal occasions
9.5.3 Multi-Platform Combination Strategies
Strategy 1: Work + Life Separation
Work: Lark/WeCom/DingTalk
Life: QQ

Advantages:
- Separation of work and life
- Higher focus
- Easier management
Strategy 2: Full Platform Coverage
Connect to all platforms simultaneously

Advantages:
- Covers all users
- Use anytime, anywhere
- Complementary features

Disadvantages:
- High maintenance cost
- Scattered messages
Strategy 3: Primary and Secondary Pairing (Recommended)
Primary Platform: Lark (daily use)
Secondary Platform: WeCom (customer communication)

Advantages:
- Clear focus
- Controllable costs
- Easy to manage
📝 Chapter Summary
This chapter covered OpenClaw's multi-platform integration features:
Core Content
-
Lark Bot Configuration
- Create a Lark application
- Configure OpenClaw
- Practical cases (personal assistant, project management)
- Integration with Lark ecosystem
- Advanced features (streaming output, multi-Agent routing)
-
WeCom Bot Configuration
- Register and create an application
- Configure OpenClaw
- Practical cases (personal assistant, team collaboration, customer service)
- Mobile usage tips
-
DingTalk Bot Configuration
- Create a DingTalk application
- Configure OpenClaw
- Practical cases (work assistant, approval workflows)
-
QQ Bot Configuration
- Create a QQ bot
- Configure OpenClaw
- Practical cases (personal assistant, group management, entertainment interaction)
- Limitations and considerations
Platform Selection
- Lark: Modern office, document collaboration, technical teams (recommended priority)
- WeCom: Enterprise office, customer service
- DingTalk: Attendance management, approval workflows
- QQ: Personal use, social interaction
Practical Tips
- ✅ Choose the appropriate platform
- ✅ Configure permissions reasonably
- ✅ Optimize user experience
- ✅ Use multiple platforms in combination
- ✅ Comply with platform rules
Next Steps
- Learn Chapter 10: API Service Encapsulation
- Master Banana drawing, Notion synchronization, etc.
- Build a multi-functional AI toolbox
🎯 Practical Exercises
Exercise 1: Configure Lark Bot
- Register on Lark Open Platform
- Create an application
- Configure OpenClaw
- Test document integration
Exercise 2: Configure WeCom Bot
- Register WeCom
- Create an application
- Configure OpenClaw
- Test basic features
Exercise 3: Multi-Platform Comparison
- Experience all 4 platforms
- Compare feature differences
- Choose the platform that suits you
💡 Common Questions
Q1: Which platform is best? A: It depends on the usage scenario. For technical teams, Lark is recommended (developer-friendly, powerful features). For enterprises, Lark/DingTalk. For personal use, QQ. For customer service, WeCom.
Q2: Can multiple platforms be connected simultaneously? A: Yes, OpenClaw supports connecting to multiple platforms simultaneously.
Q3: Is the configuration complex? A: Cloud deployment is very simple; refer to the official tutorial. Lark configuration is the simplest, supporting WebSocket long connections.
Q4: Is it free? A: The basic features of the platforms are free, and OpenClaw is also free.
Q5: Can it be used on mobile? A: Yes, all platforms support mobile. Lark offers the best mobile experience.
📚 Reference Resources
Official Tutorials
Lark:
- Quick Start Guide: https://cloud.tencent.com/developer/article/2626151
- Video Tutorial: https://cloud.tencent.com/developer/video/85055
WeCom:
- Quick Start Guide: https://cloud.tencent.com/developer/article/2625147
- Video Tutorial: https://cloud.tencent.com/developer/video/85003
DingTalk:
- Quick Start Guide: https://cloud.tencent.com/developer/article/2626553
- Video Tutorial: https://cloud.tencent.com/developer/video/85055
QQ:
- Quick Start Guide: https://cloud.tencent.com/developer/article/2626045
- Video Tutorial: https://cloud.tencent.com/developer/video/85003
Community Resources
- OpenClaw Community: https://docs.openclaw.ai
- Discussion Group: Scan code to join
- Issue Feedback: GitHub Issues
Next Chapter Preview: Chapter 10 will cover API service encapsulation, including Banana drawing integration, Notion data synchronization, video generation services, voice synthesis integration, and more.
9.1.16 Multi-Bot Multi-Agent Mode: Building Your AI Assistant Team
💡 Complete Tutorial: This section details how to use a multi-Gateway + multi-Lark bot architecture to build a professional AI assistant team.
9.1.16.1 Why Do We Need Multi-Agent?
As a solopreneur, you might need different types of AI assistants to handle various tasks:
- Main Assistant: Uses the most powerful model (Claude Opus) for complex tasks
- Content Creation Assistant: Focuses on article writing, copywriting
- Technical Development Assistant: Handles code development, technical issues
- AI News Assistant: Quickly retrieves and organizes AI industry trends
Traditional single-Agent mode requires frequent switching of models and contexts, leading to low efficiency. Multi-Agent mode allows you to have multiple specialized assistants working simultaneously, each with its own responsibilities.
9.1.16.2 Implementation Plan Comparison
Plan One: Single Gateway + Bindings (Not Recommended)
{
  "bindings": [
    {
      "agentId": "main-agent",
      "match": {
        "channel": "feishu",
        "peer": {
          "kind": "group",
          "id": "oc_xxx"
        }
      }
    }
  ]
}Problems:
- ❌ OpenClaw 2026.3.2's bindings feature is unstable
- ❌
peer.idmatching often fails - ❌ All groups are routed to the same agent
- ❌ Requires
/reset+/agentcommands for manual switching
Plan Two: Multi-Gateway + Multi-Lark Bots (Recommended) ✅
Core Idea:
- Create 4 Lark bot applications
- Start 4 independent OpenClaw Gateways
- Each Gateway connects to one Lark bot
- Each Gateway uses a different Agent and model
Advantages:
- ✅ Completely independent, no interference
- ✅ Directly chat with different bots to switch agents
- ✅ No group configuration needed
- ✅ No manual switching commands needed
- ✅ Clear configuration, easy to manage
- ✅ Can restart individual Gateways independently
9.1.16.3 Architecture Design
Overall Architecture
┌─────────────────────────────────────────────────────────┐
│                      Lark (Feishu)                       │
├─────────────────────────────────────────────────────────┤
│  机器人1: 主助理          机器人2: 内容创作助手          │
│  机器人3: 技术开发助手    机器人4: AI资讯助手            │
└─────────────────────────────────────────────────────────┘
                          ↓ WebSocket
┌─────────────────────────────────────────────────────────┐
│                   OpenClaw Gateway 层                    │
├──────────────┬──────────────┬──────────────┬────────────┤
│ Gateway 1    │ Gateway 2    │ Gateway 3    │ Gateway 4  │
│ 端口: 18789  │ 端口: 18790  │ 端口: 18791  │ 端口: 18792│
│ Profile:     │ Profile:     │ Profile:     │ Profile:   │
│ main-        │ content-     │ tech-dev     │ ai-news    │
│ assistant    │ creator      │              │            │
└──────────────┴──────────────┴──────────────┴────────────┘
                          ↓
┌─────────────────────────────────────────────────────────┐
│                      Agent 层                            │
├──────────────┬──────────────┬──────────────┬────────────┤
│ main-agent   │ content-agent│ tech-agent   │ainews-agent│
│ Claude Opus  │ Claude Sonnet│ Claude Sonnet│ Gemini 2.5 │
│ 4.6 Thinking │ 4.5          │ 4.5 Thinking │ Flash      │
└──────────────┴──────────────┴──────────────┴────────────┘
Profile Isolation Mechanism
Using the --profile <name> parameter, OpenClaw will:
- Configuration file:
~/.openclaw-<name>/openclaw.json - State data:
~/.openclaw-<name>/ - Independent ports: 18789, 18790, 18791, 18792
- Independent sessions: Completely isolated context
9.1.16.4 Configuration Steps
Step One: Create Lark Bot Applications
Create 4 bot applications on the Lark Open Platform:
-
Main Assistant
- Application Name: Main Assistant
- Description: The primary assistant for handling complex tasks
- Get App ID and App Secret
-
Content Creation Assistant
- Application Name: Content Creation Assistant
- Description: Focuses on content creation and copywriting
- Get App ID and App Secret
-
Technical Development Assistant
- Application Name: Technical Development Assistant
- Description: Handles code development and technical issues
- Get App ID and App Secret
-
AI News Assistant
- Application Name: AI News Assistant
- Description: Quickly retrieves AI industry news
- Get App ID and App Secret
Important Configuration:
- Enable bot capabilities
- Configure event subscription: Select "Long Connection" mode
- Add permissions: Message reception, message sending
Step Two: Configure Agents
Create 4 Agent configuration directories:
mkdir -p agent-configs/{main-agent,content-agent,tech-agent,ainews-agent}Create configuration files for each Agent:
agent-configs/main-agent/USER.md:
# User Information

- Name: Maynor
- Occupation: Solopreneur
- Work Area: AI technology, content creation, technical developmentagent-configs/main-agent/SOUL.md:
# Agent Identity

You are Maynor's main assistant, responsible for handling various complex tasks. Use the Claude Opus 4.6 Thinking model to provide the highest quality service.
Similarly, create configuration files for the other 3 Agents.
Step Three: Run Configuration Script
Use an automation script to create multi-Gateway configurations:
# Download configuration script
curl -O https://example.com/setup-multi-gateway.sh
chmod +x setup-multi-gateway.sh

# Run configuration script
./setup-multi-gateway.sh
The script will automatically:
- Stop the current Gateway
- Back up existing configuration
- Create 4 independent Profile configurations
- Generate management scripts
Step Four: Start All Gateways
# Start all Gateways
./start-all-gateways.sh

# Check status
./check-gateways.sh

# Verify configuration
./verify-setup.sh
9.1.16.5 Usage
Direct Private Chat with Bots
This is the simplest way to use them:
-
Handle Complex Tasks
- Search for the "Main Assistant" bot in Lark
- Send messages directly
- Automatically uses Claude Opus 4.6 Thinking
-
Create Content
- Search for the "Content Creation Assistant" bot
- Send writing requests
- Automatically uses Claude Sonnet 4.5
-
Develop Code
- Search for the "Technical Development Assistant" bot
- Send technical questions
- Automatically uses Claude Sonnet 4.5 Thinking
-
Get Information
- Search for the "AI News Assistant" bot
- Request latest updates
- Automatically uses Gemini 2.5 Flash (fast response)
Use in Groups (Optional)
If you need to use them in groups:
- Add the corresponding bot to the group
- @ the bot to send messages
- Each group can have multiple bots for flexible switching
Suggestions:
- Work group: Add Main Assistant + Technical Development Assistant
- Content creation group: Add Content Creation Assistant
- News group: Add AI News Assistant
9.1.16.6 Management and Maintenance
Daily Management
# View status of all Gateways
./check-gateways.sh

# View real-time logs
tail -f logs-main-assistant.log
tail -f logs-content-creator.log
tail -f logs-tech-dev.log
tail -f logs-ai-news.log

# View all logs
tail -f logs-*.log
Restart Gateway
# Restart all
./stop-all-gateways.sh
sleep 2
./start-all-gateways.sh

# Restart a single one
ps aux | grep "openclaw.*--profile main-assistant"
kill <PID>
./start-main-assistant.sh
Modify Configuration
# Edit configuration
vim ~/.openclaw-main-assistant/openclaw.json

# Verify configuration
jq . ~/.openclaw-main-assistant/openclaw.json

# Restart to take effect
# (Stop and restart the corresponding Gateway)
Monitor Resources
# View memory usage
ps aux | grep openclaw-gateway | awk '{print $4, $11}'

# View CPU usage
ps aux | grep openclaw-gateway | awk '{print $3, $11}'

# View port usage
lsof -i :18789
lsof -i :18790
lsof -i :18791
lsof -i :18792
9.1.16.7 Practical Cases
Case One: Content Creation Workflow
Scenario: Writing a technical article
-
Ideation Phase
- Private chat with "Main Assistant": Discuss article topic and outline
- Use Claude Opus for deep thinking
-
Writing Phase
- Private chat with "Content Creation Assistant": Draft article content
- Use Claude Sonnet for quick generation
-
Code Examples
- Private chat with "Technical Development Assistant": Write code examples
- Use Claude Sonnet Thinking to ensure code quality
-
Information Supplement
- Private chat with "AI News Assistant": Get latest technical trends
- Use Gemini Flash for quick retrieval
Case Two: Technical Development Workflow
Scenario: Developing a new feature
-
Requirements Analysis
- Main Assistant: Analyze requirements, design architecture
-
Code Implementation
- Technical Development Assistant: Write code, debug issues
-
Documentation Writing
- Content Creation Assistant: Write technical documentation
-
Technical Research
- AI News Assistant: Find relevant technical resources
Case Three: Daily Work Scenarios
9:00 AM - Plan Work
- Main Assistant: Create today's work plan
10:00 AM - Writing
- Content Creation Assistant: Write an article
2:00 PM - Development
- Technical Development Assistant: Write code
4:00 PM - Learning
- AI News Assistant: Learn about industry trends
8:00 PM - Summary
- Main Assistant: Summarize today's work
9.1.16.8 Performance and Cost
Resource Usage
- Memory: Approximately 400MB per Gateway
- Total Memory: Approximately 1.6GB for 4 Gateways
- CPU: Almost 0 when idle, varies based on task during processing
- Disk: Configuration files and logs approximately 100MB
Cost Analysis
Assuming using a self-built API proxy:
| Agent | Model | Purpose | Monthly Usage | Monthly Cost |
|---|---|---|---|---|
| main-agent | Claude Opus 4.6 | Complex tasks | 1 million tokens | $15 |
| content-agent | Claude Sonnet 4.5 | Content creation | 2 million tokens | $6 |
| tech-agent | Claude Sonnet 4.5 | Technical development | 1.5 million tokens | $4.5 |
| ainews-agent | Gemini 2.5 Flash | Information retrieval | 3 million tokens | $0 |
| Total | - | - | 7.5 million tokens | $25.5 |
Cost Optimization Suggestions:
- Use Gemini Flash for simple tasks (free)
- Only use Claude Opus for complex tasks
- Use Claude Sonnet for content creation (cost-effective)
9.1.16.9 Troubleshooting
Gateway Startup Failure
Symptom: After running ./start-all-gateways.sh, ./check-gateways.sh shows the process is not running
Troubleshooting Steps:
# 1. View logs
tail -50 logs-main-assistant.log

# 2. Check configuration
jq . ~/.openclaw-main-assistant/openclaw.json

# 3. Check port usage
lsof -i :18789

# 4. Run doctor
openclaw --profile main-assistant doctor
Common Issues:
- Configuration file format error: Run
jqto verify - Port already in use: Change port or stop the occupying process
- Lark configuration error: Check App ID and App Secret
Bot Unresponsive
Symptom: @ the bot in Lark, no reply
Troubleshooting Steps:
# 1. Check if Gateway is running
./check-gateways.sh

# 2. View real-time logs
tail -f logs-main-assistant.log

# 3. Check Lark connection
grep "WebSocket client started" logs-main-assistant.log
Common Causes:
- Gateway not started: Run
./start-all-gateways.sh - Lark connection disconnected: Check network, restart Gateway
- Configuration error: Verify Lark App ID and Secret
Used Incorrect Agent
Symptom: Private chat with "Content Creation Assistant", but it uses the Claude Opus model
Cause: Agent setting error in the configuration file
Solution:
# Check configuration
jq '.agents.list[0].id, .agents.list[0].model.primary' \
  ~/.openclaw-content-creator/openclaw.json

# Should output:
# "content-agent"
# "local-antigravity/claude-sonnet-4-5"
9.1.16.10 Advanced Tips
Tip One: Use tmux for Management
# Create a tmux session
tmux new -s openclaw

# Split windows
Ctrl+b %  # Vertical split
Ctrl+b "  # Horizontal split

# Run different Gateways in different windows
./start-main-assistant.sh
./start-content-creator.sh
./start-tech-dev.sh
./start-ai-news.sh

# View all logs
tail -f logs-*.log
Tip Two: Configure Autostart on Boot
Use launchd (macOS):
# Create plist file
cat > ~/Library/LaunchAgents/com.openclaw.main-assistant.plist << 'EOF'
<?xml version="1.0" encoding="UTF-8"?>
<!DOCTYPE plist PUBLIC "-//Apple//DTD PLIST 1.0//EN" "http://www.apple.com/DTDs/PropertyList-1.0.dtd">
<plist version="1.0">
<dict>
  <key>Label</key>
  <string>com.openclaw.main-assistant</string>
  <key>ProgramArguments</key>
  <array>
    <string>/usr/local/bin/openclaw</string>
    <string>--profile</string>
    <string>main-assistant</string>
    <string>gateway</string>
    <string>run</string>
  </array>
  <key>RunAtLoad</key>
  <true/>
  <key>KeepAlive</key>
  <true/>
</dict>
</plist>
EOF

# Load service
launchctl load ~/Library/LaunchAgents/com.openclaw.main-assistant.plist
Tip Three: Log Rotation
# Create log rotation script
cat > rotate-logs.sh << 'EOF'
#!/bin/zsh
for log in logs-*.log; do
  if [ -f "$log" ] && [ $(stat -f%z "$log") -gt 10485760 ]; then
    mv "$log" "$log.$(date +%Y%m%d_%H%M%S)"
    touch "$log"
  fi
done
EOF

chmod +x rotate-logs.sh

# Add to crontab (execute hourly)
crontab -e
# Add: 0 * * * * /path/to/rotate-logs.sh
9.1.16.11 Summary
The multi-Gateway + multi-Lark bot solution is currently the most stable and simplest way to implement multi-Agent:
Core Advantages:
- ✅ Directly private chat with different bots, automatically using the corresponding agent
- ✅ Completely independent, no interference
- ✅ No complex bindings configuration needed
- ✅ No manual switching commands needed
- ✅ Clear configuration, easy to manage
Applicable Scenarios:
- Solopreneurs
- Need multiple specialized assistants
- Different tasks use different models
- Pursuit of stability and reliability
Next Steps:
- Create Lark bot applications
- Run the configuration script
- Start all Gateways
- Start using your AI assistant team!
9.1.17 Multi-Agent Configuration (Traditional Method)
⚠️ Note: This section describes the traditional single Gateway + Bindings method. The multi-Gateway solution above is recommended.
What is Multi-Agent?
Multi-Agent configuration allows:
- Each Lark bot to use a different Agent
- Each Agent to use a different model
- Each Agent to use an independent workspace
- Each Agent to have independent configuration and context
9.1.17.1 Configuration Structure (Traditional Method)
{
  "agents": {
    "list": [
      {
        "id": "agent-id",
        "workspace": "/path/to/workspace",
        "model": {
          "primary": "provider/model"
        }
      }
    ],
    "defaults": {
      "compaction": { "mode": "safeguard" },
      "maxConcurrent": 4
    }
  },
  "channels": {
    "feishu": {
      "accounts": {
        "bot-name": { ... }
      }
    }
  },
  "bindings": [
    {
      "agentId": "agent-id",
      "match": {
        "channel": "feishu",
        "peer": {
          "kind": "dm",
          "id": "ou_user_id"
        }
      }
    }
  ]
}
9.1.17.2 Practical Case: 4 Professional Assistants (Traditional Method)
Scenario: A one-person company needs different professional assistants to handle different tasks.
Configuration Example:
{
  "agents": {
    "list": [
      {
        "id": "main-agent",
        "workspace": "/Users/username/clawd",
        "model": {
          "primary": "anthropic/claude-sonnet-4"
        }
      },
      {
        "id": "content-agent",
        "workspace": "/Users/username/clawd/content",
        "model": {
          "primary": "anthropic/claude-sonnet-4"
        }
      },
      {
        "id": "tech-agent",
        "workspace": "/Users/username/clawd/tech",
        "model": {
          "primary": "anthropic/claude-sonnet-4"
        }
      },
      {
        "id": "ainews-agent",
        "workspace": "/Users/username/clawd/ainews",
        "model": {
          "primary": "google/gemini-2-flash"
        }
      }
    ],
    "defaults": {
      "compaction": { "mode": "safeguard" },
      "maxConcurrent": 4,
      "subagents": { "maxConcurrent": 8 }
    }
  },
  "channels": {
    "feishu": {
      "accounts": {
        "main-assistant": {
          "appId": "cli_main_xxx",
          "appSecret": "xxx",
          "botName": "主助理"
        },
        "content-creator": {
          "appId": "cli_content_xxx",
          "appSecret": "xxx",
          "botName": "内容创作助手"
        },
        "tech-dev": {
          "appId": "cli_tech_xxx",
          "appSecret": "xxx",
          "botName": "技术开发助手"
        },
        "ai-news": {
          "appId": "cli_news_xxx",
          "appSecret": "xxx",
          "botName": "AI资讯助手"
        }
      }
    }
  },
  "bindings": [
    {
      "agentId": "main-agent",
      "match": {
        "channel": "feishu",
        "peer": { "kind": "dm", "id": "ou_xxx1" }
      }
    },
    {
      "agentId": "content-agent",
      "match": {
        "channel": "feishu",
        "peer": { "kind": "dm", "id": "ou_xxx2" }
      }
    },
    {
      "agentId": "tech-agent",
      "match": {
        "channel": "feishu",
        "peer": { "kind": "dm", "id": "ou_xxx3" }
      }
    },
    {
      "agentId": "ainews-agent",
      "match": {
        "channel": "feishu",
        "peer": { "kind": "dm", "id": "ou_xxx4" }
      }
    }
  ]
}
9.1.17.3 Getting User ID (Traditional Method)
Method 1: Get from logs (Recommended)
# 1. Start gateway and view logs
openclaw gateway restart
openclaw logs --follow

# 2. Send messages to each bot in Lark

# 3. Find open_id in logs
# Format: ou_xxxxxxxxxxxxxxxx
Log Example:
[feishu] Received message from ou_18d36d8a49c010dfe20ace2a29250c04
[feishu] Bot: 主助理
Method 2: Get via pairing request
openclaw pairing list feishu

# Output example:
# Pending pairing requests:
# - Code: ABC123, User: ou_xxx, Bot: 主助理
9.1.17.4 Configuration Steps (Traditional Method)
Step 1: Create Workspace Directories
mkdir -p /Users/username/clawd/content
mkdir -p /Users/username/clawd/tech
mkdir -p /Users/username/clawd/ainews
Step 2: Get All User IDs
Follow the method above to get the user ID corresponding to each bot.
Step 3: Update Configuration File
Fill in the obtained user IDs in the bindings section.
Step 4: Apply Configuration
# Backup existing configuration
cp ~/.openclaw/openclaw.json ~/.openclaw/openclaw.json.backup

# Apply new configuration
cp your-config.json ~/.openclaw/openclaw.json

# Verify configuration
openclaw doctor

# Restart gateway
openclaw gateway restart
Step 5: Verify Operation
# View Agent status
openclaw doctor

# Should see:
# Agents: main-agent (default), content-agent, tech-agent, ainews-agent
# Session store: 4 entries

# View logs
openclaw logs --follow | grep bindings

# Should see:
# [bindings] Matched agent: main-agent for user ou_xxx
9.1.17.5 Configuration Notes
⚠️ Important: agents.list Configuration Restrictions
This is the most common configuration error! Each Agent in agents.list can only contain the following fields:
{
  "id": "agent-id",           // ✅ Agent identifier (required)
  "workspace": "/path",       // ✅ Workspace path (required)
  "model": { "primary": "" }  // ✅ Model to use (optional)
  // ❌ Cannot contain compaction
  // ❌ Cannot contain maxConcurrent
  // ❌ Cannot contain subagents
  // ❌ Cannot contain models
}
Error Example (will cause configuration validation to fail):
{
  "agents": {
    "list": [
      {
        "id": "main-agent",
        "workspace": "/path",
        "compaction": { "mode": "safeguard" },  // ❌ Error!
        "maxConcurrent": 4                       // ❌ Error!
      }
    ]
  }
}
Correct Example:
{
  "agents": {
    "list": [
      {
        "id": "main-agent",
        "workspace": "/path",
        "model": { "primary": "provider/model" }  // ✅ Correct
      }
    ],
    "defaults": {
      "compaction": { "mode": "safeguard" },  // ✅ Configure here
      "maxConcurrent": 4,                     // ✅ Configure here
      "subagents": { "maxConcurrent": 8 }     // ✅ Configure here
    }
  }
}
2. General configurations must be placed in agents.defaults:
All configuration items shared by Agents must be placed in agents.defaults, including:
compaction- Context compaction strategymaxConcurrent- Maximum concurrent requestssubagents- Sub-Agent configurationmodels- Additional model configurations
{
  "defaults": {
    "model": {
      "primary": "default-provider/default-model"
    },
    "workspace": "/default/workspace",
    "compaction": { "mode": "safeguard" },
    "maxConcurrent": 4,
    "subagents": { "maxConcurrent": 8 }
  }
}
3. Bindings order matters:
OpenClaw will match bindings in order; the first matching rule will be used.
"bindings": [
  // 1. Most specific match (specific user)
  { "agentId": "main-agent", "match": { "peer": { "id": "ou_xxx" } } },
  // 2. Less specific match (specific group)
  { "agentId": "tech-agent", "match": { "peer": { "kind": "group" } } },
  // 3. Finally, the default match
  { "agentId": "default-agent", "match": { "channel": "feishu" } }
]
4. User ID is unique:
Each Lark user can only be bound to one Agent.
Troubleshooting
Problem 1: Configuration validation failed - agents.list contains unsupported fields
# Error message
Config invalid
File: ~/.openclaw/openclaw.json
Problem:
- agents.list.0: Unrecognized keys: "compaction", "maxConcurrent"
- agents.list.1: Unrecognized keys: "compaction", "maxConcurrent"
- agents.list.2: Unrecognized keys: "compaction", "maxConcurrent"
- agents.list.3: Unrecognized keys: "compaction", "maxConcurrent"
Run: openclaw doctor --fixCause: The Agent configuration in agents.list contains fields that can only be used in agents.defaults.
Solution:
# Method 1: Automatic fix (recommended)
openclaw doctor --fix

# Method 2: Manual fix
# Edit the configuration file and move compaction and maxConcurrent from agents.list to agents.defaults
Before Fix:
{
  "agents": {
    "list": [
      {
        "id": "main-agent",
        "workspace": "/path",
        "compaction": { "mode": "safeguard" },  // ❌ Incorrect location
        "maxConcurrent": 4                       // ❌ Incorrect location
      }
    ]
  }
}
After Fix:
{
  "agents": {
    "list": [
      {
        "id": "main-agent",
        "workspace": "/path",
        "model": { "primary": "provider/model" }
      }
    ],
    "defaults": {
      "compaction": { "mode": "safeguard" },  // ✅ Correct location
      "maxConcurrent": 4                       // ✅ Correct location
    }
  }
}
Verify Fix:
# Verify configuration
openclaw doctor

# Should see:
# ✅ Config valid
# ✅ 4 agents configured
# ✅ 4 bindings configured
Problem 2: Bindings not taking effect
# Check if user ID is correct
openclaw logs --follow | grep "ou_"

# View bindings matching status
openclaw logs --follow | grep bindings
Problem 3: User ID not found
# Use debug level logs
openclaw logs --follow --level debug

# Or view pairing requests
openclaw pairing list feishu
Problem 4: openclaw doctor reports error after configuration modification
# Error message
Unknown config keys:
- agents.list[0].compaction
- agents.list[0].maxConcurrent
- agents.list[1].compaction
- agents.list[1].maxConcurrent
...

Run "openclaw doctor --fix" to remove these keys.Solution:
# Run automatic fix
openclaw doctor --fix

# Verify configuration
openclaw doctor

# Restart gateway
openclaw gateway restart

# View status
openclaw gateway status
Problem 5: Version mismatch warning
# Warning message
Config was last written by a newer OpenClaw (2026.2.6-3);
current version is 2026.2.1-zh.3.
Run "openclaw doctor --fix" to apply changes.Explanation: This is a normal version prompt and does not affect usage. If you want to eliminate the warning:
openclaw doctor --fix9.1.17.6 Configuration Comparison
| Feature | Single Agent Mode | Multi-Agent Mode |
|---|---|---|
| Configuration Complexity | Simple | Complex |
| Model Selection | Same for all bots | Different for each bot |
| Workspace | Shared | Isolated |
| Requires bindings | ❌ | ✅ |
| Requires user ID | ❌ | ✅ |
| Applicable Scenarios | Simple use | Professional division of labor |
9.1.17.7 Usage Recommendations
Scenarios recommended for Multi-Agent:
- ✅ Need different bots to use different models
- ✅ Need isolated workspaces
- ✅ Need independent configurations and contexts
- ✅ Clear professional division of labor
Scenarios recommended for Single Agent:
- ✅ Simple and easy to maintain configuration
- ✅ All bots use the same model
- ✅ No need for workspace isolation
- ✅ Quick start
9.1.18 Local Multi-Agent Management (No IM Platform Binding Required)
💡 Important Note: Multi-Agent management can be used not only for IM platforms like Lark, but also fully supports local use. If you don't need to bind Lark bots, you can directly use multiple Agents via the Web UI, command line, or TUI interface.
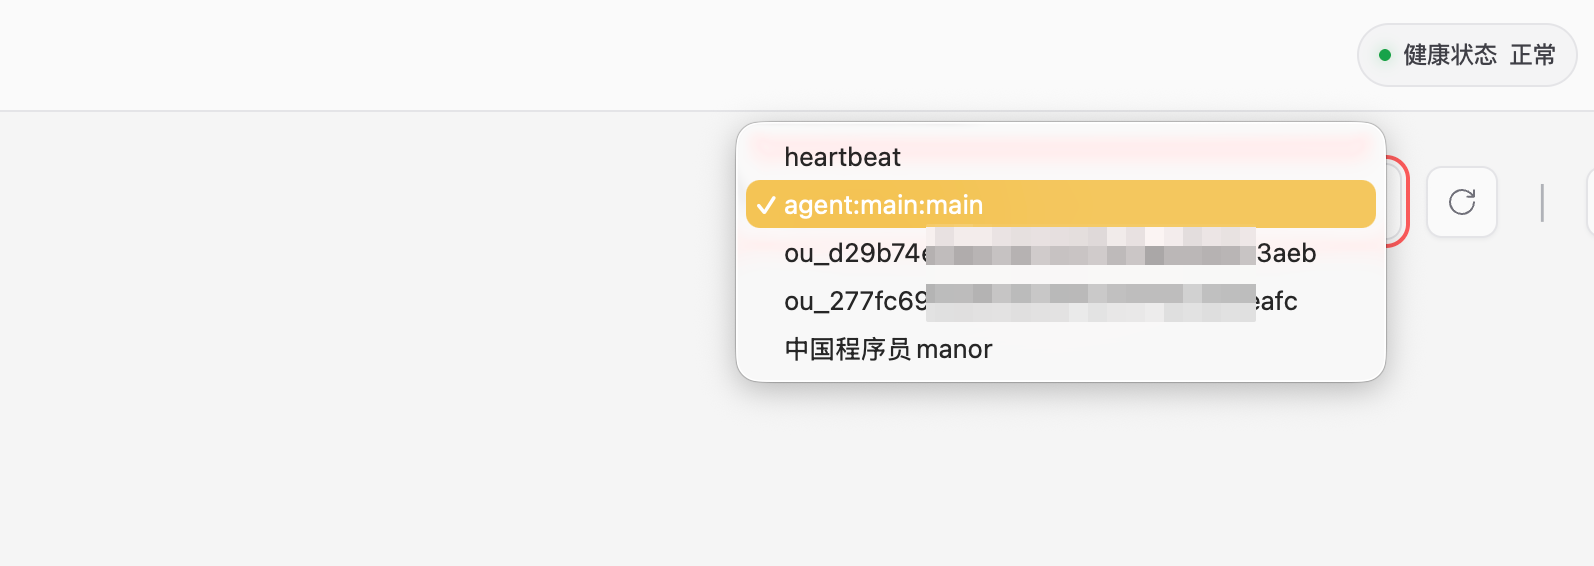
Local Usage Methods
OpenClaw provides multiple local usage methods without configuring any IM platform:
Method One: Web UI (Recommended)
# Open Web interface
openclaw dashboard

# Or access directly
http://127.0.0.1:18789/?token=你的tokenAdvantages:
- ✅ Graphical interface, intuitive operation
- ✅ Supports file upload and download
- ✅ Real-time display of Token consumption
- ✅ Supports multi-turn conversation history
Method Two: Command Line Conversation
# Send message directly
openclaw agent --message "你好,帮我分析一下这个项目"

# Input via pipe
echo "帮我总结这个文件的内容" | openclaw agent --message

# Specify output file
openclaw agent --message "生成项目文档" --output docs.mdAdvantages:
- ✅ Quickly execute single tasks
- ✅ Suitable for script automation
- ✅ Can be integrated into workflows
Method Three: TUI Terminal Interface
# Start terminal interactive interface
openclaw tuiAdvantages:
- ✅ Interactive conversation within the terminal
- ✅ Supports multi-turn conversations
- ✅ Suitable for server environments
Local Multi-Agent Configuration
Configuration file location: ~/.openclaw/openclaw.json
Configuration Example:
{
  "agents": {
    "list": [
      {
        "id": "main-agent",
        "workspace": "/Users/username/work",
        "model": { "primary": "anthropic/claude-sonnet-4" }
      },
      {
        "id": "content-agent",
        "workspace": "/Users/username/content",
        "model": { "primary": "anthropic/claude-sonnet-4" }
      },
      {
        "id": "code-agent",
        "workspace": "/Users/username/code",
        "model": { "primary": "deepseek/deepseek-chat" }
      },
      {
        "id": "research-agent",
        "workspace": "/Users/username/research",
        "model": { "primary": "google/gemini-2-flash" }
      }
    ],
    "defaults": {
      "compaction": { "mode": "safeguard" },
      "maxConcurrent": 4,
      "subagents": { "maxConcurrent": 8 }
    }
  }
}
Configuration Description:
-
agents.list: Defines all available Agentsid: Agent identifier (required)workspace: Workspace path (required)model.primary: Model to use (optional)
-
agents.defaults: Configurations shared by all Agentscompaction: Context compaction strategymaxConcurrent: Maximum concurrent requestssubagents: Sub-Agent configuration
Agent Management Commands
List All Agents
openclaw agents list

# Output example:
# Available agents:
# - main-agent (default)
#   Workspace: /Users/username/work
#   Model: anthropic/claude-sonnet-4
# - content-agent
#   Workspace: /Users/username/content
#   Model: anthropic/claude-sonnet-4
# - code-agent
#   Workspace: /Users/username/code
#   Model: deepseek/deepseek-chat
# - research-agent
#   Workspace: /Users/username/research
#   Model: google/gemini-2-flash
Switch Agent
# Switch to specified Agent
openclaw agents switch content-agent

# Output:
# Switched to agent: content-agent
# Workspace: /Users/username/content
# Model: anthropic/claude-sonnet-4
View Current Agent
# View currently used Agent
openclaw agents current

# Output:
# Current agent: content-agent
# Workspace: /Users/username/content
# Model: anthropic/claude-sonnet-4
View Agent Configuration
# View configuration of specified Agent
openclaw agents config content-agent

# View configuration of current Agent
openclaw agents config
View Agent Status
# View status of all Agents
openclaw doctor

# Output example:
# ✅ Config valid
# ✅ 4 agents configured
# ✅ Gateway running
# ✅ Session store: 12 entries
Practical Case: 4 Professional Assistants
Scenario: A personal developer needs different professional assistants to handle different tasks.
Configuration Steps:
Step 1: Create Workspace Directories
mkdir -p ~/work/main
mkdir -p ~/work/content
mkdir -p ~/work/code
mkdir -p ~/work/research
Step 2: Edit Configuration File
# Backup existing configuration
cp ~/.openclaw/openclaw.json ~/.openclaw/openclaw.json.backup

# Edit configuration
nano ~/.openclaw/openclaw.json
Paste the configuration example above, modifying the paths to your actual paths.
Step 3: Verify Configuration
# Verify configuration is correct
openclaw doctor

# Should see:
# ✅ Config valid
# ✅ 4 agents configured
Step 4: Restart Gateway
# Restart gateway to apply configuration
openclaw gateway restart

# View status
openclaw gateway status
Step 5: Use Different Agents
# Use main assistant for general tasks
openclaw agents switch main-agent
openclaw agent --message "帮我整理今天的待办事项"

# Use content assistant for article creation
openclaw agents switch content-agent
openclaw agent --message "帮我写一篇关于 AI 的文章"

# Use code assistant for project development
openclaw agents switch code-agent
openclaw agent --message "帮我优化这段 Python 代码"

# Use research assistant to gather information
openclaw agents switch research-agent
openclaw agent --message "帮我搜集关于量子计算的最新研究"
Usage Scenario Comparison
| Scenario | Recommended Method | Agent Configuration | Advantages |
|---|---|---|---|
| Personal local use | Web UI + Multi-Agent | Different Agents for different tasks | Workspace isolation, flexible models |
| Team collaboration | Lark + Multi-Agent | Different bots bound to different Agents | Team members use their own assistants |
| Quick testing | Command line + Single Agent | Use default Agent | Simple configuration, quick start |
| Server environment | TUI + Multi-Agent | Different Agents for different projects | Interactive in terminal, resource isolation |
Typical Workflow
Scenario: Daily workflow of a one-person company
# Morning: Use main assistant to check schedule
openclaw agents switch main-agent
openclaw agent --message "显示今天的日程安排"

# Forenoon: Use code assistant to develop project
openclaw agents switch code-agent
openclaw agent --message "帮我实现用户登录功能"

# Noon: Use research assistant to learn new technologies
openclaw agents switch research-agent
openclaw agent --message "搜集 Rust 语言的学习资料"

# Afternoon: Use content assistant to write articles
openclaw agents switch content-agent
openclaw agent --message "写一篇关于今天开发经验的博客"

# Evening: Use main assistant to summarize the day
openclaw agents switch main-agent
openclaw agent --message "生成今日工作总结"
Configuration Tips
Tip 1: Use different models for different tasks
{
  "agents": {
    "list": [
      {
        "id": "chat-agent",
        "workspace": "/Users/username/chat",
        "model": { "primary": "anthropic/claude-sonnet-4" }
      },
      {
        "id": "code-agent",
        "workspace": "/Users/username/code",
        "model": { "primary": "deepseek/deepseek-chat" }
      },
      {
        "id": "fast-agent",
        "workspace": "/Users/username/fast",
        "model": { "primary": "google/gemini-2-flash" }
      }
    ]
  }
}Explanation:
- Claude Sonnet 4: General conversation and complex tasks
- DeepSeek: Code generation and technical questions
- Gemini Flash: Fast response and simple tasks
Tip 2: Use aliases to simplify switching
# Add aliases to ~/.zshrc or ~/.bashrc
alias oc-main='openclaw agents switch main-agent'
alias oc-code='openclaw agents switch code-agent'
alias oc-content='openclaw agents switch content-agent'
alias oc-research='openclaw agents switch research-agent'

# Use aliases to switch quickly
oc-code
openclaw agent --message "帮我写一个排序算法"
Tip 3: Configure independent Skills for each Agent
# Install development-related Skills for the code assistant
openclaw agents switch code-agent
openclaw skill install github-integration
openclaw skill install code-review

# Install writing-related Skills for the content assistant
openclaw agents switch content-agent
openclaw skill install grammar-check
openclaw skill install seo-optimizer
Common Questions
Problem 1: Workspace doesn't change after switching Agent
# Check current Agent
openclaw agents current

# Check configuration
openclaw agents config

# Restart gateway
openclaw gateway restart
Problem 2: Agent not found
# List all Agents
openclaw agents list

# Check configuration file
cat ~/.openclaw/openclaw.json | grep -A 5 "agents"
Problem 3: Agent configuration validation failed
# Run diagnostics
openclaw doctor

# Automatic fix
openclaw doctor --fix
Best Practices
-
Workspace Isolation
- Create independent workspaces for each Agent
- Avoid mixing files from different tasks
-
Model Selection
- Choose the appropriate model based on task type
- Use DeepSeek for coding tasks, Claude for general tasks
-
Regular Backup
- Regularly back up configuration files
- Manage configurations using version control
-
Naming Conventions
- Use meaningful names for Agent IDs
- Clear and explicit workspace paths
-
Resource Management
- Set
maxConcurrentreasonably - Regularly clean up unused sessions
- Set
9.12 OpenClaw Manager - Visual Management Tool
💡 Modern Management Interface: OpenClaw Manager is a web management interface based on React + Tailwind CSS, used for visually managing multiple OpenClaw Gateway instances.
9.12.1 Why Do We Need OpenClaw Manager?
When you use a multi-Gateway architecture (where each Lark bot corresponds to an independent Gateway instance), traditional command-line management becomes cumbersome. OpenClaw Manager provides:
Core Value:
- 📊 Real-time Monitoring: At a glance, view the running status of all Gateways
- 🎮 One-Click Control: Start/stop/restart services without memorizing commands
- ➕ Graphical Creation: Create new Gateways via forms, no manual configuration editing
- ✏️ Online Editing: Visually edit Gateway configurations and Agent personalities
- ⚙️ Keep-Alive Configuration: One-click configuration of launchd keep-alive service
- 📝 Log Viewing: Real-time viewing of running logs for each service
- 💻 Beautiful Interface: Modern design, responsive layout
9.12.2 Features
1. Automatic Discovery of Gateway Instances 🔍
The system automatically scans the ~/.openclaw-* directory, reads configuration files, and displays all Gateway instances.
Features:
- Automatically reads port, model, Agent information
- Caching mechanism (1-minute TTL) for improved performance
- Supports manual refresh for discovery
2. Create New Gateway ➕
Create new Gateway instances through a graphical interface, without manually editing configuration files.
Configuration Items:
Basic Information:
- Profile ID: Unique identifier (e.g.,
my-assistant) - Bot Name: Display name (e.g.,
My Assistant) - Port Number: Gateway listening port (suggested 18789-18799)
Agent Configuration:
- Agent ID: Agent identifier (e.g.,
main-agent) - AI Model:
- Preset models: Claude Opus 4.6, Claude Sonnet 4.5, Gemini 2.5 Pro, etc.
- Custom models: Enter any model ID (e.g.,
gpt-4o,deepseek-chat)
Lark Configuration:
- App ID: Lark application ID (
cli_xxxxxxxxxxxxxxxx) - App Secret: Lark application secret
Personality Setting 📝:
- SOUL.md editor: Use Markdown to define the Agent's role, personality, professional domain, and response style
Example SOUL.md:
# Technical Consultant Agent

## Role Positioning
You are a senior technical consultant, specializing in software architecture and system design.

## Personality Traits
- Rigorous, professional
- Attention to detail and best practices
- Good at analyzing complex problems

## Professional Fields
- Microservices architecture
- Cloud-native technologies
- DevOps practices
- Performance optimization

## Response Style
- Understand requirements first, then provide solutions
- Give specific and feasible suggestions
- Provide code examples and architectural diagrams when necessary
- Consider scalability and maintainability
3. Edit Gateway ✏️
Modify the configuration and personality settings of an existing Gateway.
Modifiable Items:
- Bot Name
- Port Number
- Agent ID
- AI Model (preset or custom)
- Lark App ID and Secret (optional)
- SOUL.md personality setting
Notes:
- Profile ID cannot be modified
- Leaving Lark secret blank means it will not be modified
- Changes require Gateway restart to take effect
4. Delete Gateway 🗑️
Completely remove a Gateway instance and all its configurations.
Deleted Content:
- Gateway configuration file
- Agent configuration directory
- SOUL.md personality file
- launchd keep-alive configuration (if present)
⚠️ Warning: Delete operations are irreversible. It is recommended to back up important configurations first.
5. Service Control 🎮
Batch Operations:
- ⚙️ Configure Keep-Alive: Configure launchd keep-alive service (autostart on boot, restart on crash)
- ▶️ Start All: Start all Gateway instances
- ⏹️ Stop All: Stop all Gateway instances
- 🔄 Restart All: Restart all Gateway instances
Single Operations:
- ✏️ Edit: Edit Gateway configuration
- 🗑️ Delete: Delete Gateway
- 📝 Logs: View running logs
6. Real-time Status Monitoring 📊
Displayed Information:
- Running status (Running/Stopped)
- Port number
- AI model used
- launchd keep-alive status
Status Indicators:
- 🟢 Green: Running
- 🔴 Red: Stopped
- ⚪ Gray: Unknown
Automatic Refresh: Automatically refreshes status every 10 seconds, or manually click "Refresh Status" button.
9.12.3 Installation and Usage
Installation Steps
# 1. Clone project
git clone https://github.com/xianyu110/openclaw-manager.git
cd openclaw-manager

# 2. Install dependencies
npm install

# 3. Start service (frontend + backend)
npm start
The application will start at:
- Frontend: http://localhost:3000
- Backend API: http://localhost:3001
First Use
-
Start Application
npm start -
Open Browser Visit http://localhost:3000
-
Configure Keep-Alive Service
- Click the "⚙️ Configure Keep-Alive" button
- Wait for configuration to complete
- The service will automatically start on boot and restart after a crash
Daily Operations
View Service Status:
- The interface automatically refreshes status every 10 seconds
- Click the "Refresh Status" button to manually refresh
- Green indicator means running, red means stopped
Control Services:
- Start All: One-click start of all Gateways
- Stop All: One-click stop of all Gateways
- Restart All: One-click restart of all Gateways
- Single Control: Click the "Restart" button in the service card
View Logs:
- Click the "View Logs" button in the service card
- Displays the last 100 lines of logs
- Supports real-time refresh
9.12.4 Usage Scenarios
Scenario 1: Create a Specialized Assistant
Requirement: Create a technical assistant focused on frontend development
Steps:
- Click "➕ New Gateway"
- Fill in basic information:
- Profile ID:
frontend-expert - Bot Name:
Frontend Expert - Port:
18793
- Profile ID:
- Configure Agent:
- Agent ID:
frontend-agent - Model:
Claude Sonnet 4.5 Thinking
- Agent ID:
- Expand the personality editor and define the professional domain:
# Frontend Development Expert

## Role Positioning
You are a senior frontend development engineer, proficient in modern frontend technology stacks.

## Professional Fields
- React / Vue / Angular
- TypeScript
- Webpack / Vite
- CSS-in-JS / Tailwind CSS
- Performance optimization
- Browser compatibility

## Response Style
- Provide the latest best practices
- Give runnable code examples
- Consider performance and maintainability
- Recommend suitable tools and libraries- Fill in Lark configuration
- Click "Create"
Scenario 2: Use Custom Models
Requirement: Use OpenAI's GPT-4o model
Steps:
- When creating or editing a Gateway
- Check "Use Custom Model"
- Enter Model ID:
gpt-4o - Ensure OpenAI API Key is set in the OpenClaw main configuration
Supported Custom Models:
- OpenAI:
gpt-4o,gpt-4o-mini,gpt-4-turbo - Anthropic:
claude-3-opus-20240229,claude-3-sonnet-20240229 - Google:
gemini-2.5-pro,gemini-2.5-flash - DeepSeek:
deepseek-chat,deepseek-coder - Other OpenAI API compatible models
Scenario 3: Create Multiple Professional Assistants
Requirement: Create exclusive assistants for different teams
Assistant Configuration:
-
Product Manager Assistant
- Profile:
product-manager - Model:
Claude Opus 4.6 - Personality: Focus on user experience, data analysis, product planning
- Profile:
-
Designer Assistant
- Profile:
designer - Model:
Claude Sonnet 4.5 - Personality: Focus on visual design, user interface, interaction experience
- Profile:
-
DevOps Engineer Assistant
- Profile:
devops-engineer - Model:
Claude Sonnet 4.5 Thinking - Personality: Focus on system stability, automation, monitoring and alerting
- Profile:
-
Data Analyst Assistant
- Profile:
data-analyst - Model:
Gemini 2.5 Pro - Personality: Skilled in data processing, visualization, statistical analysis
- Profile:
9.12.5 Advanced Tips
1. Personality Setting Best Practices
Structured Definition:
# Agent Name

## Role Positioning
Clearly define the Agent's role and positioning

## Personality Traits
- List 3-5 core personality traits
- Maintain consistency

## Professional Fields
- List professional skills
- Clearly define areas of expertise

## Response Style
- Describe the response method
- Set tone and style

## Workflow
1. Step-by-step working method
2. Ensure clear logic
3. Provide actionable advice

## Limitations and Boundaries
- Clearly define areas not specialized in
- Set reasonable expectations
2. Model Selection Suggestions
Claude Opus 4.6:
- Strongest reasoning ability
- Suitable for complex problem analysis
- Higher cost
Claude Sonnet 4.5:
- Balanced performance and cost
- Suitable for daily conversations
- Recommended for most scenarios
Claude Sonnet 4.5 Thinking:
- Enhanced thought process
- Suitable for scenarios requiring deep analysis
- Will display thought steps
Gemini 2.5 Flash:
- Fast response speed
- Low cost
- Suitable for simple queries and quick responses
DeepSeek Chat:
- Domestic model, extremely low cost
- Strong Chinese language capability
- Suitable for daily conversations and simple tasks
3. Port Allocation Suggestions
Recommended Range: 18789-18799
Example Allocation:
- 18789: Main Assistant
- 18790: Content Creation
- 18791: Technical Development
- 18792: Data Analysis
- 18793: Product Design
- 18794: Operations Support
- 18795: Customer Service
- 18796-18799: Reserved
9.12.6 Troubleshooting
Problem 1: Failed to Create Gateway
Possible Causes:
- Profile ID already exists
- Port is already in use
- Missing required fields
Solution:
- Check error messages
- Use a different Profile ID
- Choose an unused port
- Ensure all required fields are filled
Problem 2: Gateway Fails to Start
Possible Causes:
- Configuration file format error
- Lark account configuration error
- Port occupied by another program
Solution:
- Check configuration file syntax
- Verify Lark App ID and Secret
- Use
lsof -i :port_numberto check port usage - View log files to troubleshoot errors
Problem 3: Personality Setting Not Taking Effect
Possible Causes:
- SOUL.md file not saved
- Gateway not restarted
- Agent ID mismatch
Solution:
- Confirm SOUL.md is saved
- Restart Gateway service
- Check if Agent ID is correct
- Check
~/.openclaw-{profile}/agent-configs/{agent}/SOUL.md
Problem 4: Backend Unable to Connect
# Check port usage
lsof -i :3001

# Manually start backend
npm run server
Problem 5: Frontend Unable to Access
# Check port usage
lsof -i :3000

# Clear cache and restart
rm -rf node_modules/.vite
npm start
9.12.7 API Documentation
Status Query
GET /api/status
Get status information for all services
Response Example:
{
  "services": [
    {
      "id": "main-assistant",
      "name": "主助理",
      "port": 18789,
      "status": "running",
      "model": "Claude Opus 4.6",
      "launchd": true
    }
  ]
}
Batch Operations
POST /api/start-all- Start all Gateway servicesPOST /api/stop-all- Stop all Gateway servicesPOST /api/restart-all- Restart all Gateway servicesPOST /api/setup-launchd- Configure launchd keep-alive service
Single Service Operations
POST /api/start/:serviceId- Start the specified Gateway servicePOST /api/stop/:serviceId- Stop the specified Gateway servicePOST /api/restart/:serviceId- Restart the specified Gateway serviceGET /api/logs/:serviceId- Get logs for the specified service (last 100 lines)
Gateway Management
GET /api/gateways- Get all Gateway configurationsPOST /api/gateways- Create a new GatewayPUT /api/gateways/:profileId- Update Gateway configurationDELETE /api/gateways/:profileId- Delete Gateway
9.12.8 Best Practices
1. Naming Conventions
Profile ID:
- Use lowercase letters and hyphens
- Descriptive naming
- Example:
tech-support,content-writer
Agent ID:
- Keep consistent with Profile ID
- Add
-agentsuffix - Example:
tech-support-agent
2. Personality Setting
Clear and Explicit:
- Use concise language
- Avoid vague descriptions
- Provide specific examples
Maintain Consistency:
- Personality traits should be unified
- Response style should be stable
- Avoid contradictory settings
Regular Optimization:
- Adjust based on usage feedback
- Continuously improve personality settings
- Test different configurations
3. Security Recommendations
Protect Sensitive Information:
- Do not include keys in SOUL.md
- Regularly change Lark App Secret
- Restrict Gateway network access
Backup Configuration:
- Regularly back up
~/.openclaw-*directories - Save important SOUL.md files
- Record configuration changes
9.12.9 Project Information
GitHub Repository: https://github.com/xianyu110/openclaw-manager
Tech Stack:
- Frontend: React 18 + Tailwind CSS + Vite
- Backend: Express + Node.js
- State Management: React Hooks
- Styling: Tailwind CSS
License: MIT
Author: Maynor (@xianyu110)
Contributions: Welcome to submit Issues and Pull Requests!
📝 Chapter Summary
Through this chapter, you have mastered:
- Lark Bot Configuration: Complete process for creating and configuring a Lark bot
- WeCom Bot: Configuration method for WeCom bots
- DingTalk Bot Configuration: Steps for integrating DingTalk bots
- QQ Bot Configuration: Detailed configuration for QQ bots
- Discord Bot: Reference configuration for Discord bots
- Platform Comparison: Feature comparison and selection advice for various platforms
- Multi-Agent Configuration: Advanced multi-Agent management and configuration
- Local Multi-Agent: Local usage without binding to IM platforms
- OpenClaw Manager: Usage of the visual management tool
🎯 Practical Exercises
- Configure a Lark bot and test its basic functions
- Try configuring multiple Agents, using different models for different scenarios
- Use OpenClaw Manager to create and manage multiple Gateways
- Customize exclusive personality settings for each Agent
- Configure launchd keep-alive service to enable autostart on boot
💡 Advanced Suggestions
- Explore more IM platform integration methods
- Optimize Agent personality settings to enhance user experience
- Use OpenClaw Manager to simplify daily management
- Create exclusive AI assistants for team members
- Regularly back up configurations to prevent data loss
Next Chapter Preview: Chapter 10 will cover API integration, including how to connect to various third-party services to achieve more powerful automation features.
Return to Directory: README