Installation & Deployment
OpenClaw installation and deployment guide
This chapter will walk you through installing OpenClaw step by step.
📋 Prerequisites & Recommended Configuration
Recommended Configuration
For the best experience, we recommend:
Operating System:
- 🍎 Mac (Highly Recommended): Best native support, can operate Calendar, Notes, screenshots, and other system features
- 🪟 Windows: Fully usable, but some system integration features are limited
- 🐧 Linux: Great for developers, flexible configuration
IM Tool Selection:
- 🌍 International Users: Recommended Telegram (best compatibility, most complete features)
- 🇨🇳 China Users: Recommended Lark (modern, developer-friendly, feature-rich)
- Alternatives: WeCom, DingTalk, QQ
Deployment Method:
- 💻 Have a Mac: Recommended local deployment (best experience, full features)
- ☁️ No Mac or want 24/7 operation: Recommended cloud deployment (low cost, stable and reliable)
Why Mac is Recommended?
OpenClaw works best on Mac because:
- ✅ Best native support with deep system integration
- ✅ Can operate Mac Calendar, Notes, Reminders
- ✅ Perfect screenshot support
- ✅ Seamless sync with iPhone and iPad
- ✅ Smarter file management
- ✅ Simple development environment setup
Why Lark is Recommended (China)?
- ✅ Modern design, great user experience
- ✅ Developer-friendly with comprehensive API
- ✅ Supports rich text, documents, spreadsheets
- ✅ Stable message push notifications
- ✅ Feature-rich free tier
Why Telegram is Recommended (International)?
- ✅ Large global user base
- ✅ Most comprehensive API, most powerful features
- ✅ Rich Bot functionality support
- ✅ Real-time message push
- ✅ Good privacy protection
Quick Navigation
Recommended Paths:
- 🍎 Have a Mac → Mac Local Deployment + Lark Configuration
- ☁️ No Mac / Want 24/7 operation → Cloud One-Click Deployment + Lark Configuration
All Deployment Methods:
- 🍎 Mac Local Deployment (Recommended)
- 🪟 Windows Local Deployment
- 🐧 Linux Local Deployment
- 🚀 Cloud One-Click Deployment
- 🇨🇳 China One-Click Installation
- ☁️ Cloudflare Workers Deployment (Advanced)
- 🐳 Docker Deployment (Optional)
Configuration Guides:
Mac Local Deployment (Recommended)
🍎 Best Experience: If you have a Mac, we strongly recommend local deployment for the best experience and full features!
Why Choose Mac Local Deployment?
Advantages:
- ✅ System Integration: Can operate Calendar, Notes, file system
- ✅ Privacy & Security: Data stays completely local, not uploaded to the cloud
- ✅ Fast Response: Runs locally, no network latency
- ✅ Full Features: Supports all advanced features
- ✅ Low Cost: No need to purchase cloud servers
- ✅ Developer-Friendly: Easy to debug and customize
Ideal For:
- Users with a Mac
- Privacy-conscious users
- Users who need system integration features
- Developers and tech enthusiasts
System Requirements
Hardware Requirements:
- CPU: M-series chip or Intel i5 or above
- RAM: 8GB or more (16GB recommended)
- Disk: 10GB or more free space
System Version:
- macOS 12 Monterey or later
- Recommended macOS 14 Sonoma or macOS 15 Sequoia
Prerequisites:
- Node.js 22.0.0+ (will be installed automatically)
- Homebrew (optional, for installing dependencies)
Installation Steps
Step 1: Open Terminal
- Press
Command + Spaceto open Spotlight - Type
Terminal - Press Enter to open Terminal
Step 2: Install OpenClaw
Run the following command in Terminal:
curl -fsSL https://openclaw.ai/install.sh | bashThe installation process will automatically:
- Detect system environment
- Install Node.js (if not installed)
- Download OpenClaw
- Configure environment variables
Estimated Time: 2-5 minutes
Step 3: Verify Installation
After installation, run the following command to verify:
openclaw --versionIf a version number is displayed (e.g., 2026.3.2), the installation was successful!
Step 4: Initialize Configuration
Run the configuration wizard:
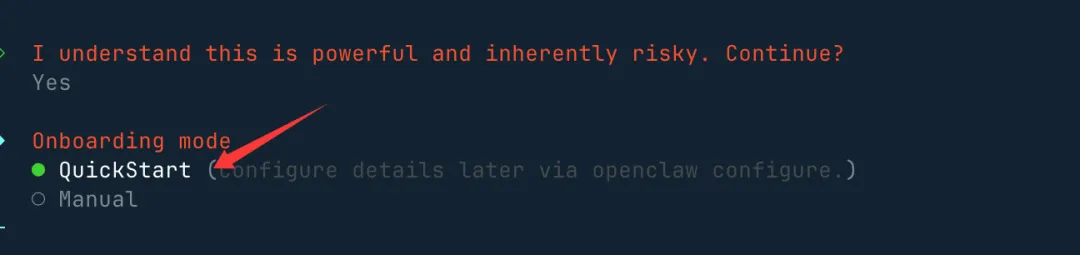
openclaw onboardConfiguration Flow:
1. Accept Risk Notice:
Select Yes to continue
2. Select Startup Mode:
Recommended to select QuickStart:
3. Select AI Model:
Choose your AI provider (supports major domestic and international models):
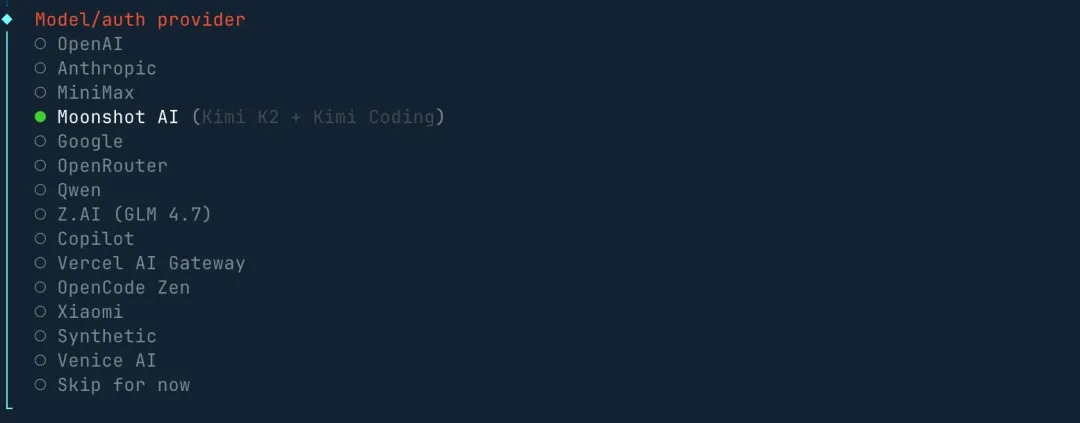
Recommended for China users:
- Kimi (Moonshot AI): Long text expert, 2 million character context
- DeepSeek: Best value for money, strong reasoning capabilities
- GLM (Zhipu AI): Good Chinese comprehension, multimodal support
4. Enter API Key:
Enter the corresponding API Key based on your selected model (see API Configuration Guide)
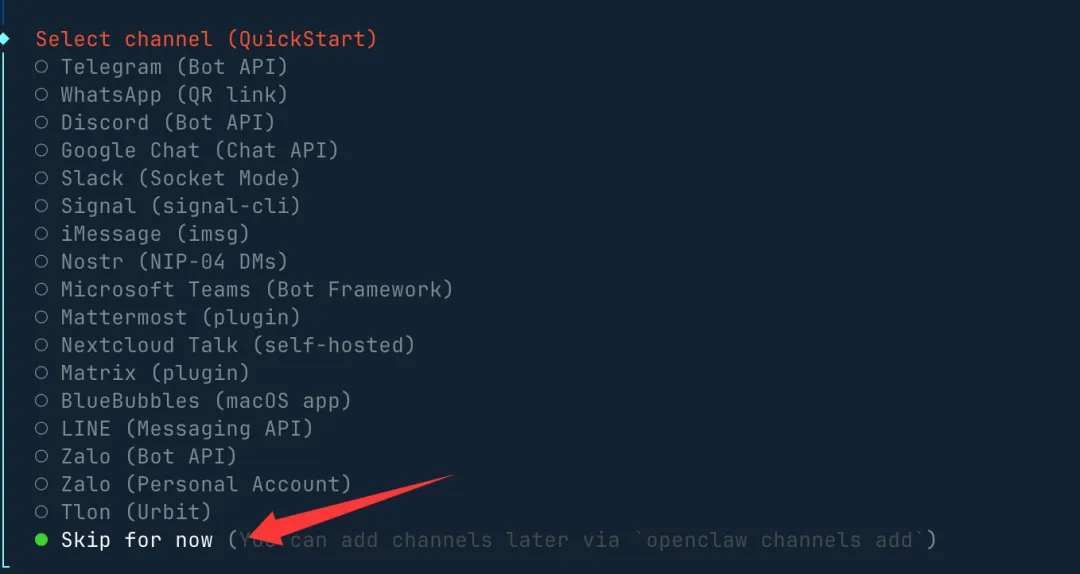
5. Select Chat Tool:
- If connecting to Lark/Telegram, select the corresponding option
- If not connecting yet, select
None(can be configured later)
6. Gateway Port Setting:
Default 18789 is fine:
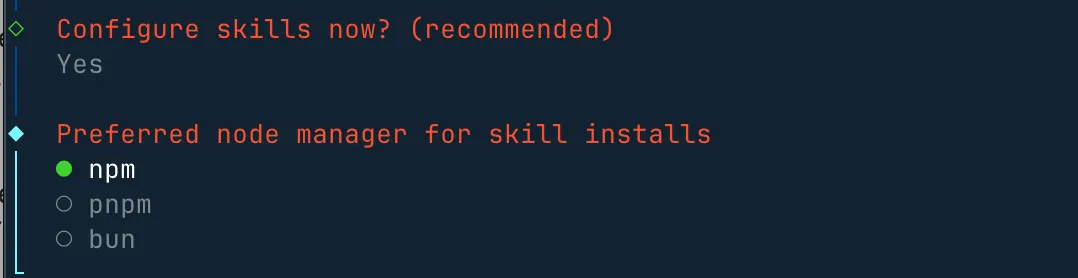
7. Select Skills:
Use the spacebar to select the skills you need, or skip directly:

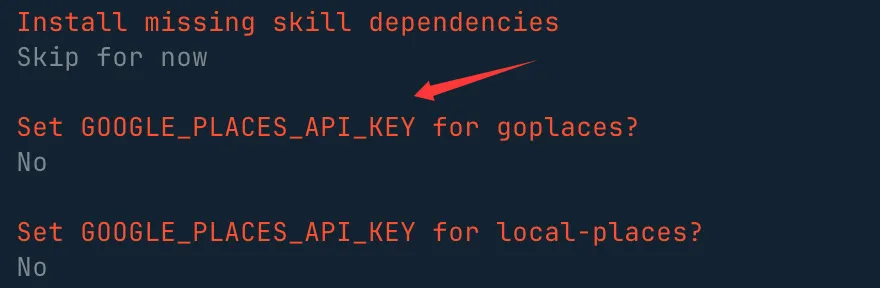
8. API Key Configuration:
If you don't have one, select no to skip:
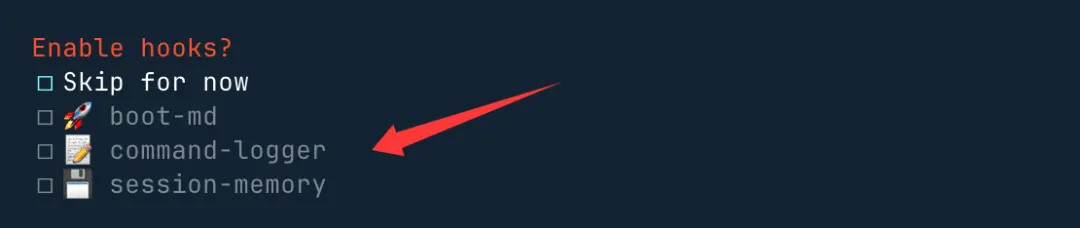
9. Enable Hooks:
Recommended to enable these three hooks (for content guidance, logging, and session recording):
10. Complete Configuration:
After configuration is complete, the Gateway service will automatically start and open the Web UI (http://127.0.0.1:18789/chat)
Step 5: Verify Installation
# Check Gateway status
openclaw channels status

# Should display:
# Gateway reachable.
Daily Usage
Start OpenClaw:
# Start Gateway service
openclaw gateway start

# Or use systemd (recommended, auto-start on boot)
openclaw gateway enable
Access Web UI:
Open your browser and visit: http://127.0.0.1:18789/chat
Stop Service:
openclaw gateway stopConnect to Lark (Recommended)
After Mac local deployment, we strongly recommend connecting to Lark for the best experience:
- Refer to Chapter 9: Lark Bot Configuration
- Once configured, you can chat with OpenClaw anytime in Lark
- Supports text, images, files, and other message types
Common Issues
Q1: Permission denied during installation?
# Install with sudo
curl -fsSL https://openclaw.ai/install.sh | sudo bash
Q2: How to update OpenClaw?
openclaw updateQ3: How to uninstall?
openclaw uninstallWindows Local Deployment
🪟 Windows Users: Fully usable, but some system integration features are limited.
System Requirements
Hardware Requirements:
- CPU: 2 cores or more
- RAM: 4GB or more (8GB recommended)
- Disk: 10GB or more free space
Operating System:
- Windows 10 or Windows 11
Prerequisites:
- Node.js 22.0.0+
Deployment Method Selection
There are two deployment methods for Windows:
- WSL2 + Ubuntu (Highly Recommended): Officially recommended method, provides full Linux environment support
- PowerShell Native Deployment: Pure Windows environment, suitable for users who don't want to use WSL2
Method 1: WSL2 + Ubuntu Deployment (Highly Recommended)
This is the officially recommended Windows deployment method, providing the most complete Linux environment support.
Step 1: Enable WSL2
Open PowerShell as Administrator and run:
# Enable WSL feature
dism.exe /online /enable-feature /featurename:Microsoft-Windows-Subsystem-Linux /all /norestart
dism.exe /online /enable-feature /featurename:VirtualMachinePlatform /all /norestart

# Set WSL 2 as default version
wsl --set-default-version 2
Restart your computer.
Step 2: Install Ubuntu
Method 1: Install from Microsoft Store (Recommended)
- Open Microsoft Store
- Search for "Ubuntu 22.04 LTS" or "Ubuntu 24.04 LTS"
- Click "Get" and install
- Set username and password on first launch
After installation, the Ubuntu terminal will open automatically. Follow the prompts to set your username and password.
Step 3: Update Ubuntu System
Run in the Ubuntu terminal:
# Update package list
sudo apt update && sudo apt upgrade -y

# Install basic tools
sudo apt install -y curl git wget build-essential
Step 4: Install Node.js 22+
# Add NodeSource repository
curl -fsSL https://deb.nodesource.com/setup_22.x | sudo -E bash -

# Install Node.js
sudo apt install -y nodejs

# Verify version (must be ≥22.x)
node -v
npm -v
Step 5: Install OpenClaw
Method A: One-click script installation
curl -fsSL https://openclaw.ai/install.sh | bashStep 6: Verify Installation
# Check version
openclaw --version

# View help
openclaw --help

# Check system status
openclaw status
Step 7: Configure Windows Access to WSL2 Service
Since OpenClaw runs in WSL2, you need to configure port forwarding for Windows access.
Create startup script start-openclaw.bat:
@echo off
echo Starting OpenClaw Gateway in WSL2...
wsl -d Ubuntu-22.04 -u root service openclaw start
timeout /t 3
start http://localhost:18789
Or start directly in WSL2:
# In WSL2 Ubuntu terminal
openclaw gateway run --port 18789
Then visit http://localhost:18789 in your Windows browser
Method 2: PowerShell Native Deployment
Suitable for pure Windows users who don't want to use WSL2.
Step 1: Install Node.js 22+
Method 1: Download from Official Website
- Visit https://nodejs.org/zh-cn
- Download the Windows installer (LTS version 22.x)
- Run the installer, check "Automatically install the necessary tools"
Step 2: Verify Node.js Installation
# Open PowerShell
node -v
npm -v
Step 3: Install OpenClaw as Administrator
Important: You must run PowerShell as Administrator.
# Install latest stable version
npm install -g openclaw@latest

# Or install the Chinese localized version
npm install -g @qingchencloud/openclaw-zh@latest
Step 4: Resolve Installation Permission Issues
If you encounter permission errors:
# Method A: Enable PowerShell script execution
Set-ExecutionPolicy -ExecutionPolicy RemoteSigned -Scope CurrentUser

# Method B: Change npm installation directory
npm config set prefix "C:\npm"
npm config set cache "C:\npm-cache"

# Add directory to PATH
[Environment]::SetEnvironmentVariable("Path", $env:Path + ";C:\npm", "User")
Step 5: Verify Installation
openclaw --version
openclaw --help
Step 6: Resolve Common Issues
Issue: sharp module loading failure
# Clear npm cache
npm cache clean --force

# Reinstall
npm install -g openclaw@latest --force
Issue: Windows Defender blocking
Add the OpenClaw installation directory to Windows Defender exclusions:
C:\Users\YourUsername\AppData\Roaming\npm
C:\Users\YourUsername\.openclaw
Initialize Configuration
After installation, you need to run the initialization wizard.
Start the Initialization Wizard
openclaw onboard --install-daemonConfigure AI Model Provider
OpenClaw needs to connect to an AI model to work.
Example: Configuring Anthropic Claude (Recommended):
📖 Detailed Instructions: For complete API Key configuration methods and priority explanations, refer to the API Key Configuration Complete Guide
# WSL2 or PowerShell
openclaw models auth add
# Follow prompts to select anthropic
# Enter API Key: sk-ant-xxx
Bind Messaging Channels
1. Telegram
Create a Bot:
- Search for
@BotFatherin Telegram - Send
/newbotto create a bot - Save the Bot Token
Configure:
openclaw channels add telegram
openclaw config set channels.telegram.botToken "your-bot-token"
openclaw gateway restart
2. WhatsApp
# Login to WhatsApp (displays QR code)
openclaw channels login whatsapp

# Scan with your phone's WhatsApp
3. WeCom (Recommended for China)
# Install WeCom plugin
openclaw plugins install @m1heng-clawd/wework

# Configure
openclaw config set channels.wework '{"enabled":true,"corpId":"xxx","agentSecret":"xxx"}' --json
4. Lark (Recommended for China)
# Install Lark plugin
openclaw plugins install @m1heng-clawd/feishu

# Configure
openclaw config set channels.feishu '{"enabled":true,"appId":"cli_xxx","appSecret":"xxx"}' --json
Windows Command Quick Reference
System Management:
| Command | Function |
|---|---|
openclaw --version | Check version |
openclaw status | Check system status |
openclaw health | Health check |
openclaw update | Update OpenClaw |
openclaw doctor | Diagnose system issues |
Configuration Management:
| Command | Function |
|---|---|
openclaw onboard | Initialization wizard |
openclaw configure | Interactive configuration |
openclaw config get <key> | View configuration item |
openclaw config set <key> <value> | Modify configuration item |
openclaw config unset <key> | Delete configuration item |
Linux Local Deployment
🐧 Linux Users: Great for developers, flexible configuration.
System Requirements
Recommended Distributions:
- Ubuntu 20.04+
- Debian 11+
- CentOS 8+
Installation Steps
Step 1: Install Node.js
# Ubuntu/Debian
curl -fsSL https://deb.nodesource.com/setup_22.x | sudo -E bash -
sudo apt-get install -y nodejs

# Verify installation
node --version
Step 2: Install OpenClaw
curl -fsSL https://openclaw.ai/install.sh | bashStep 3: Verify Installation
openclaw --versionStep 4: Initialize Configuration
openclaw onboard2.1 System Requirements & Preparation
Cloud Deployment Requirements
If you choose cloud deployment, no local environment is needed, you only need:
- ✅ A web browser
- ✅ ~20 CNY/month budget
- ✅ 10 minutes of time
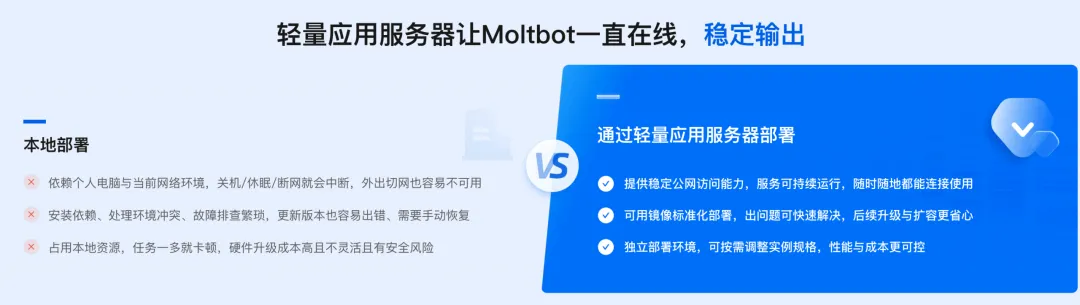
Cloud One-Click Deployment
🔥 Ideal For: No Mac, need 24/7 operation, multi-device access.
Why Choose Cloud Deployment?
Cloud deployment offers several advantages over local deployment, as shown in Table 2-1.
Table 2-1 Cloud Deployment Advantages
| Advantage | Description |
|---|---|
| ⚡ Instant Deployment | Just a few clicks, no environment setup needed |
| 💰 Low Cost | Starting from 20 CNY/month, much cheaper than buying a Mac Mini |
| 📱 Mobile Access | Access anytime, anywhere via QQ, WeCom, Lark |
| 🔒 Stable & Reliable | Runs 24/7, no worries about computer shutdowns |
| 🎥 Video Tutorials | Official step-by-step video guides |
Solution Comparison
The mainstream cloud deployment solutions are compared in Table 2-2.
Table 2-2 Cloud Deployment Solution Comparison
| Solution | Price | Bandwidth | Recommended For |
|---|---|---|---|
| Tencent Cloud Lighthouse | 20 CNY/month, 99 CNY/year | 20M | QQ, WeCom users |
| Volcengine | 9.9 CNY/month, 58 CNY/year | 5M | Lark users |
Tencent Cloud Lighthouse Deployment (Recommended)
Step 1: Purchase a Server
-
Visit the promotion page:
https://cloud.tencent.com/act/pro/lighthouse-moltbot -
Select configuration:
- Specs: 2 cores, 2GB RAM
- Bandwidth: 20M
- Region: Recommended Silicon Valley (overseas regions provide more stable AI model access)
- Price: 20 CNY/month or 99 CNY/year
-
Identity verification:
- First-time use requires identity verification
- Select personal verification
- Follow the prompts to complete verification
-
Complete purchase:
- Click "Buy Now"
- Pay 20 CNY (recommended to buy 1 month first to try)
- Wait for server creation to complete
- Optional: Disable auto-renewal
-
Get server information:
- After purchase, click your avatar → "Internal Messages"
- Note down:
- Public IP address
- Default username (usually
lighthouse) - Initial password
💡 Free Trial Option (Optional)
If you want to try free for 3 months, you can get a free server through the CodeBuddy promotion.
Steps:
-
Register for CodeBuddy:
- International: https://www.codebuddy.ai/promotion/?ref=lweelxalgm (Google/GitHub account)
- China: https://www.codebuddy.cn/promotion/?ref=7zucxaz7zvqi (phone number)
- Recommended to register with a new account
-
Claim rewards:
- After login, click "Practice Reward" → "Claim Now"
- Get 1 month free usage
- Accumulate 7 active days to extend by 2 more months (just greet CodeBuddy daily)
-
Reinstall system as OpenClaw:
- Login to Tencent Cloud console: https://console.cloud.tencent.com/
- Go to "Lighthouse"
- Click "Reinstall System"
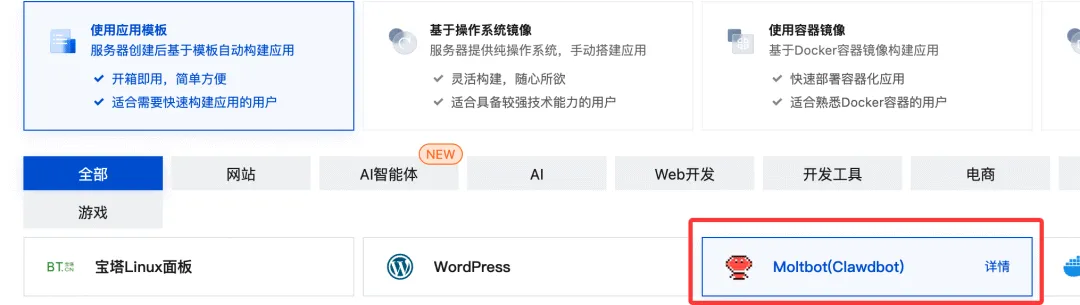
- Select "Use Application Template" → "OpenClaw"
- Select "No Backup Needed", click "Confirm"
-
Next steps:
- After reinstallation, continue with the steps below
Step 2: Connect to the Server
-
Connect using an SSH client:
Method 1: Using an SSH Client (Recommended)
- Download an SSH client (e.g., Xterminal, Termius, FinalShell)
- Create a new SSH connection:
- Name: anything you like
- Address: Public IP address
- Port: 22
- Username: lighthouse (or the username from internal messages)
- Password: the password set during purchase
Method 2: Using Web Terminal
- In the Tencent Cloud console, click the instance card
- Click the "Login" button
- Open the terminal directly in your browser
-
Verify OpenClaw installation:
openclaw --versionIf a version number is displayed (e.g.,
2026.3.2), OpenClaw is pre-installed successfully.
Step 3: Configure the AI Model
-
Enter Application Management:
- Click the server card
- Switch to the "Application Management" tab
-
Select a model:
- Recommended: Kimi k2.5 (best value for money)
- You can also choose other domestic AI models
-
Get API Key:
Kimi k2.5 Configuration (Recommended):
1. Visit: https://platform.moonshot.cn/ 2. Register and login 3. Go to "API Management" 4. Click "Create API Key" 5. Copy the API Key (format: sk-xxx) -
Enter configuration:
- Paste the API Key into the configuration field
- Click "Save"
- Wait for the configuration to take effect
Step 4: Test Connection
-
Access WebUI:
- Use the access URL provided by the console
- Format:
http://YOUR_SERVER_IP:18789/?token=xxx
-
Send a test message:
Hello, can you hear me?
- Verify success:
- If you receive an AI reply, the configuration is successful
- The model name will be displayed in the top right corner
Volcengine Deployment (Cheaper)
If you're a heavy Lark user, Volcengine is recommended:
-
Visit the promotion page:
https://www.volcengine.com/activity/clawdbot -
Price advantage:
- 9.9 CNY/month
- 58 CNY/year
- 10 CNY cheaper than Tencent Cloud
-
Configuration comparison:
- 2 cores, 2GB RAM (same)
- 5M bandwidth (Tencent Cloud has 20M)
- Suitable for Lark users
-
Deployment process:
- Similar to Tencent Cloud
- Follow the on-page instructions
Baidu AI Cloud Deployment (0.01 CNY Trial)
💰 Great Value Trial: Baidu AI Cloud offers a 0.01 CNY/month special promotion, ideal for users who want to try at minimal cost.
Promotion Information
-
Visit the promotion page:
https://cloud.baidu.com/product/BCC/moltbot.html -
Promotion rules:
- First month only 0.01 CNY
- Requires registration and personal ID verification
- Limited to one purchase per account
Deployment Steps
Step 1: Purchase a Server
- Register a Baidu AI Cloud account
- Complete personal identity verification (bind ID card)
- Purchase the special LS instance (0.01 CNY/month)
- If sold out, you can purchase a Lighthouse server at regular price
Step 2: Create an Instance
- Go to the Lighthouse console
- Click "Create Instance":
- Name: auto-generated or custom
- Password: make sure to remember it, needed for login later
- Wait for instance creation to complete
Step 3: One-Click OpenClaw Configuration
-
Go to instance details page:
- Click the instance card
- Go to the "Application Management" tab
-
Application configuration:
- Click "One-Click Activation"
- Click "One-Click Firewall" (open firewall ports)
- Wait until it shows "Opened"
-
Model configuration:
- Select a model from the dropdown (e.g., ERNIE Bot, Qianfan)
- Click "Apply Model Configuration"
- The system will automatically create a Qianfan API Key and configure it
-
Channel configuration (optional):
- Supports: Lark, DingTalk, WeCom, QQ
- Select your preferred messaging tool
- Follow the prompts to complete configuration (see later chapters for details)
-
Skills configuration (optional):
- Default: Baidu Search, Baidu Baike
- Select as needed and click "Apply"
- More Skills available on the OpenClaw website
Step 4: Access WebUI
- Click "Get Website URL"
- Copy the access link
- Open in your browser to start chatting with OpenClaw
Advantages & Limitations
Advantages:
- ✅ Extremely low price (0.01 CNY for the first month)
- ✅ One-click configuration, no manual installation needed
- ✅ Integrated with Baidu Qianfan AI models
- ✅ Automatic API Key configuration
Limitations:
- ⚠️ First month discount only
- ⚠️ Requires identity verification
- ⚠️ Promotion may sell out
Alibaba Cloud Deployment (Optional)
Alibaba Cloud also offers a one-click OpenClaw deployment solution:
-
Visit the promotion page:
https://www.aliyun.com/activity/ecs/clawdbot -
Select Lightweight Application Server:
- Use the OpenClaw image
- One-click installation and configuration
- Price reference:
- Similar to Tencent Cloud
- Check the promotion page for specifics
Official Video Tutorials (Highly Recommended)
Tencent Cloud provides detailed video tutorials — following along with the video makes it even easier:
-
Cloud OpenClaw One-Click Deployment with WeCom and QQ Integration
- Video URL: https://cloud.tencent.com/developer/video/85003
- Duration: ~10 minutes
- Content: From purchase to complete configuration
-
Cloud OpenClaw One-Click Deployment with Lark and DingTalk Integration
- Video URL: https://cloud.tencent.com/developer/video/85055
- Duration: ~10 minutes
- Content: Full Lark and DingTalk integration process
Existing Server Deployment
If you already have a Lighthouse server, you can use the AI assistant for conversational deployment:
- Official Tutorial: https://cloud.tencent.com/developer/article/2625605
- Ideal For: Users with existing Lighthouse servers
- Deployment Method: Complete configuration through AI conversation
- Advantage: More flexible, customizable
Cloud Deployment FAQ
Q1: Is cloud deployment secure?
- ✅ Data is stored on your server
- ✅ Only you can access it
- ✅ You can set an access password
Q2: Can I stop it anytime?
- ✅ You can delete the server anytime
- ✅ Billed by usage duration
- ✅ Delete when not needed, no wasted money
Q3: How to access from mobile?
- Through QQ, WeCom, Lark, and other platforms
- See Chapter 9: Multi-Platform Integration
China One-Click Installation (Recommended)
🇨🇳 Recommended for China Users: Use the official Chinese localized one-click installation script for fast speed and simple configuration.
Why Choose the China Version?
The China version offers several localization advantages over the international version, as shown in Table 2-3.
Table 2-3 China Version Advantages
| Advantage | Description |
|---|---|
| ⚡ Fast Speed | Uses domestic mirror sources for fast downloads |
| 🇨🇳 Chinese-Friendly | Complete Chinese interface and prompts |
| 📦 One-Click Install | Automatically configures all dependencies |
| 🎯 Ready to Use | Pre-configured with commonly used domestic services |
| 💰 Cost Optimized | Defaults to domestic AI models |
Prerequisites
Required Environment:
- Node.js 22.0.0+ (required)
- pnpm (optional, recommended for source builds)
Recommended Configuration:
- Brave Search API key (for web search)
- Can be configured via
openclaw-cn configure --section web
System Requirements:
- macOS: Requires Xcode / Command Line Tools (only CLI + Gateway needs Node.js)
- Windows: WSL2 (Ubuntu) is strongly recommended, native Windows is untested
- Linux: Ubuntu 20.04+, Debian, CentOS
Quick Start
macOS/Linux Installation
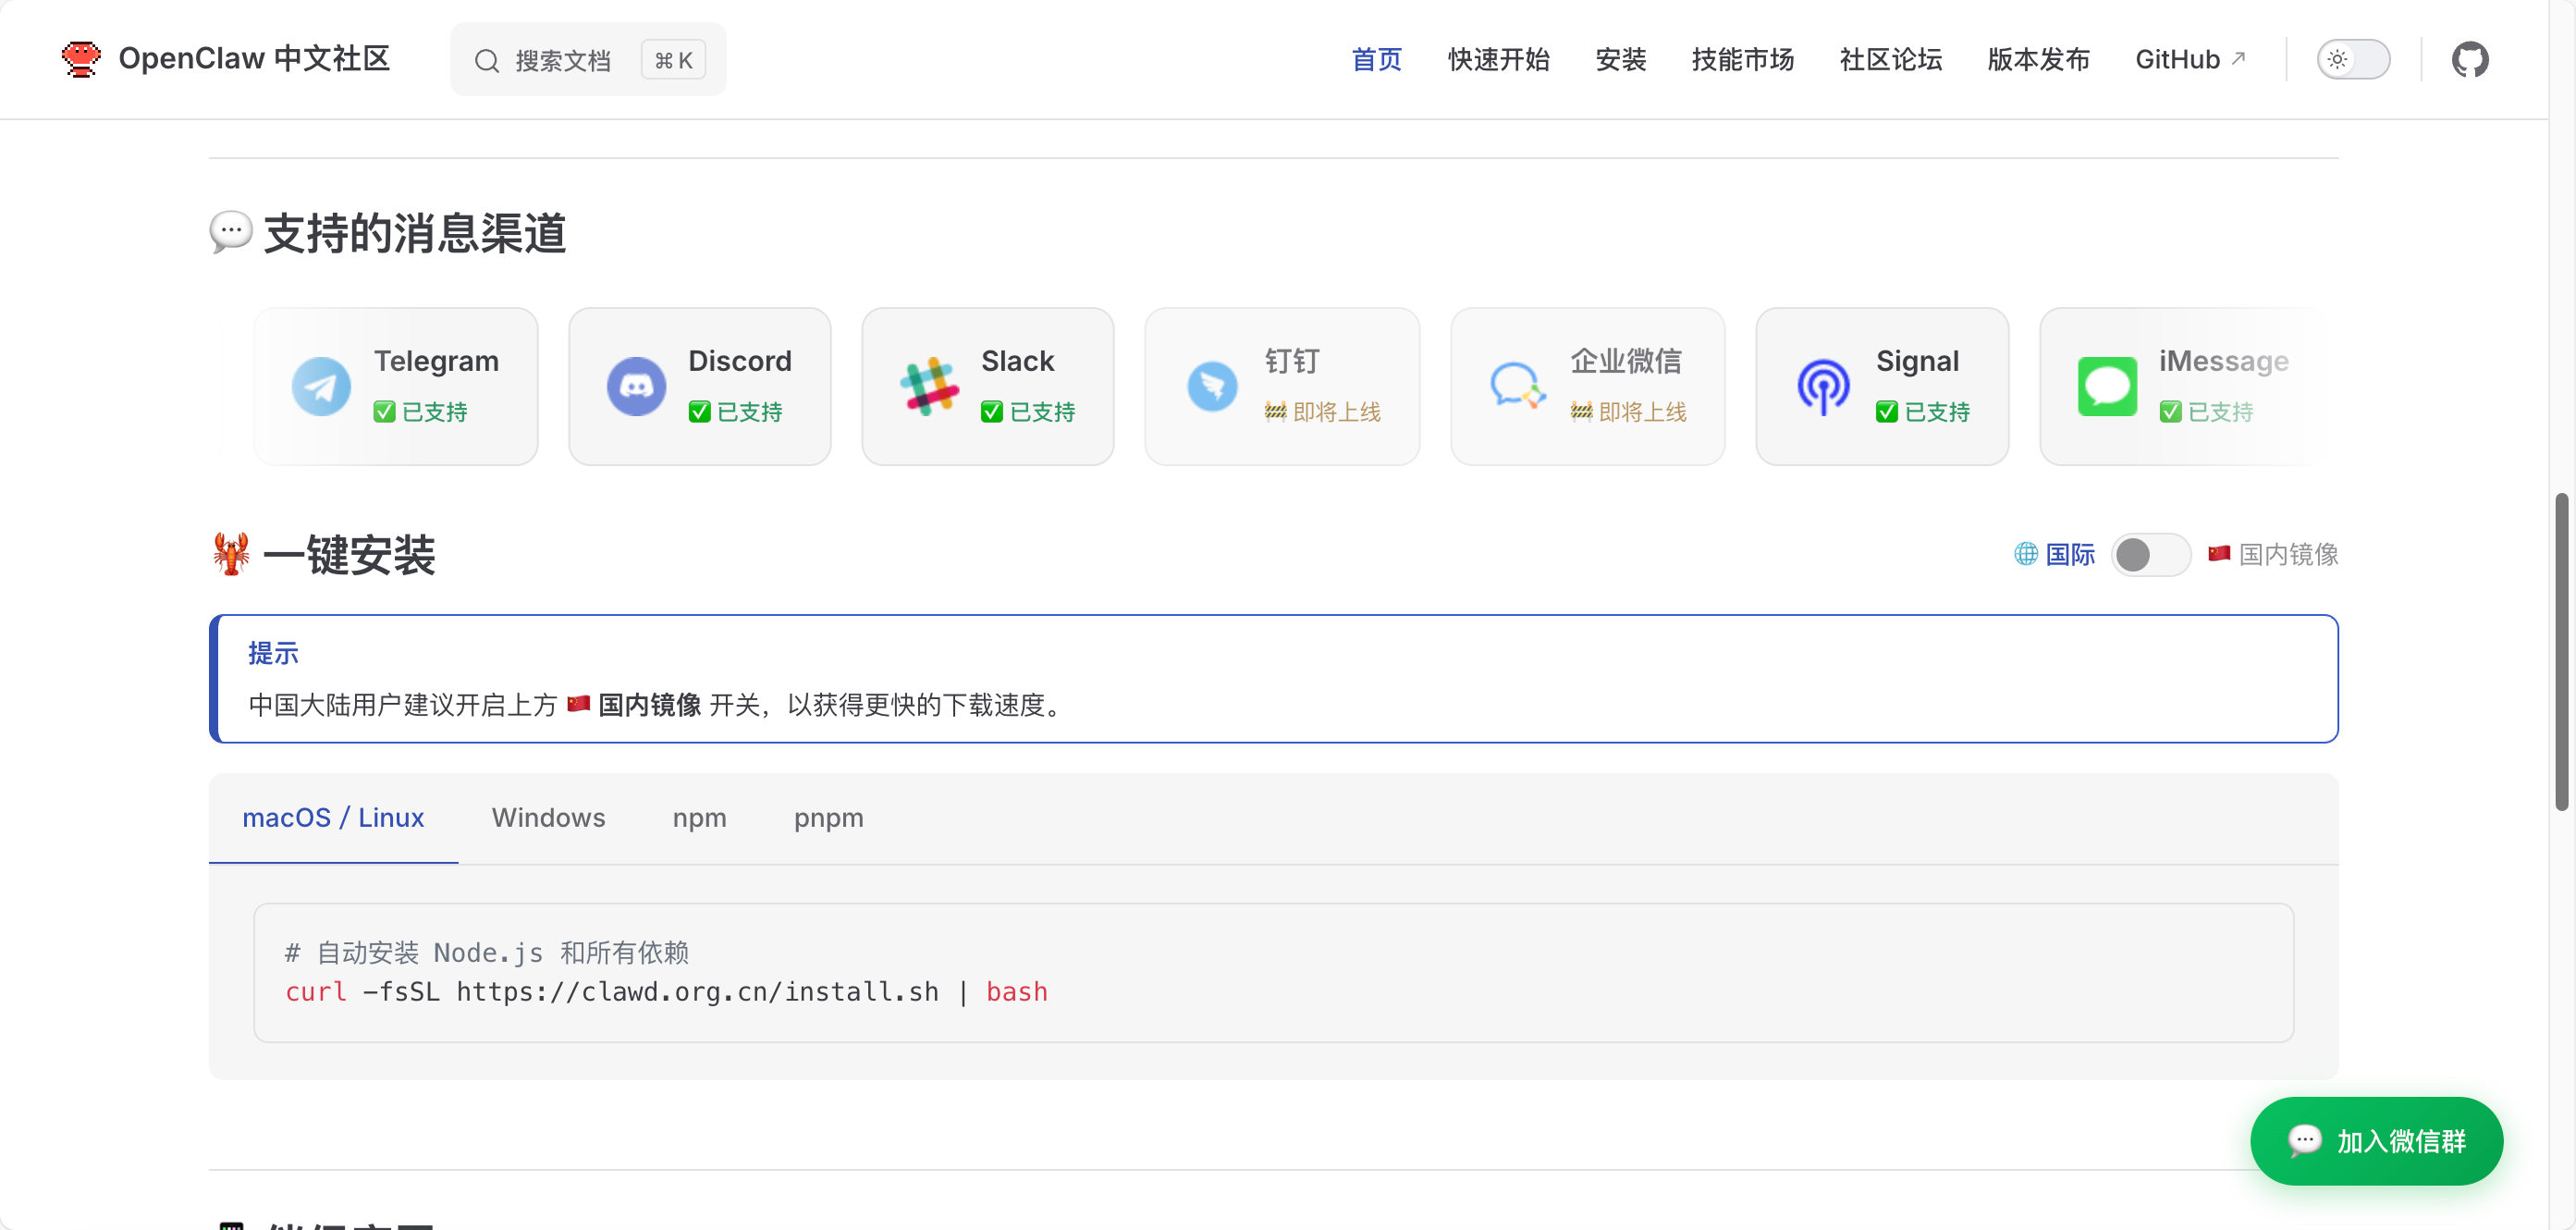
# Use the official China installation script
curl -fsSL https://clawd.org.cn/install.sh | bash
Windows Installation
Using PowerShell (Administrator privileges):
# Use the official China installation script
iwr -useb https://clawd.org.cn/install.ps1 | iex
⚠️ Windows Users Note: WSL2 (Ubuntu) is strongly recommended, native Windows support is limited.
WSL2 Installation Steps:
# 1. Install WSL2
wsl --install

# 2. Restart your computer

# 3. Run the Linux installation command in WSL2
curl -fsSL https://clawd.org.cn/install.sh | bash
Global Installation (Alternative)
If the one-click script fails, you can use npm global installation:
# Using npm
npm install -g openclaw-cn@latest

# Or using pnpm (recommended)
pnpm add -g openclaw-cn@latest
Run the Onboarding Wizard
After installation, run the configuration wizard:
# Run the onboarding wizard and install the background service
openclaw-cn onboard --install-daemon
Configuration Wizard Flow
The wizard will guide you through the following configuration:
1. Select Gateway Mode:
- Local Gateway (recommended): Gateway runs on the local machine
- Remote Gateway: Gateway runs on a server
2. Configure Authentication:
- OpenAI Code (Codex) subscription (OAuth)
- API key (recommended for Anthropic)
- Also supports
claude setup-token
3. Select AI Provider:
- Recommended: Kimi, DeepSeek, GLM-4 (domestic models)
- Optional: Claude, GPT (requires API key)
4. Configure Chat Platform (optional):
- WhatsApp: QR code login
- Telegram: Enter Bot Token
- Discord: Enter Bot Token
- Mattermost: Plugin token
- Lark/WeCom/DingTalk: Enter app credentials
5. Install Background Service (recommended):
- macOS: Uses launchd
- Linux: Uses systemd
- WSL2: Uses systemd
- Runtime: Node (recommended, required for WhatsApp/Telegram)
6. Gateway Token:
- The wizard generates a token by default
- Stored in
gateway.auth.token - Generated even on loopback addresses
Authentication Configuration Notes
Authentication Storage Locations (Important):
- Recommended Anthropic path: Set API key (wizard can store it)
- OAuth credentials (legacy import):
~/.openclaw/credentials/oauth.json - Auth config file:
~/.openclaw/agents/<agentId>/agent/auth-profiles.json
Headless/Server Tips:
- Complete OAuth on a regular machine first
- Then copy
oauth.jsonto the gateway host
Start the Gateway
If you installed the background service, the Gateway should already be running:
# Check Gateway status
openclaw-cn gateway status
Manual Run (Foreground):
# Run in foreground to see real-time logs
openclaw-cn gateway --port 18789 --verbose
Dashboard Access:
Local loopback address: http://127.0.0.1:18789/
If you configured a token, you'll need to paste it into the dashboard settings (stored as connect.params.auth.token).
⚠️ Bun Warning (WhatsApp + Telegram): Bun has known issues with these channels. If using WhatsApp or Telegram, run the gateway with Node.
Quick Verification (2 minutes)
# Check status
openclaw-cn status

# Health check
openclaw-cn health
Pairing + Connecting Chat Interfaces
WhatsApp (QR Code Login)
# Login to WhatsApp
openclaw-cn channels login
Scan the QR code via WhatsApp → Settings → Linked Devices.
Telegram / Discord / Others
The wizard can write tokens/config for you. For manual configuration:
Telegram:
openclaw-cn channels add \
  --channel telegram \
--token "YOUR_BOT_TOKEN"Discord:
openclaw-cn channels add \
  --channel discord \
  --token "YOUR_BOT_TOKEN"
💡 Telegram DM Tip: The first DM will return a pairing code. The bot won't respond until the pairing is approved.
DM Security (Pairing Approval)
Default policy: Unknown DMs receive a short code, and messages are not processed until approved.
If the first DM doesn't get a reply, you need to approve the pairing:
# View pairing list
openclaw-cn pairing list whatsapp

# Approve pairing
openclaw-cn pairing approve whatsapp <code>
Running from Source (Development)
If you need to modify OpenClaw itself, you can run from source:
# Clone the repository
git clone https://github.com/clawdbot/clawdbot.git
cd clawdbot

# Install dependencies
pnpm install

# Build UI (automatically installs UI dependencies on first run)
pnpm ui:build

# Build the project
pnpm build

# Run the onboarding wizard
openclaw-cn onboard --install-daemon
If you haven't installed globally yet, you can run commands from the repo via pnpm openclaw-cn ....
Running Gateway from Source:
node dist/entry.js gateway --port 18789 --verboseEnd-to-End Verification
In a new terminal, send a test message:
# Send a test message
openclaw-cn message send --target +15555550123 --message "Hello from OpenClaw"
If openclaw-cn health shows "no auth configured", you need to go back to the wizard to set up OAuth/key authentication.
Debugging Tips:
openclaw-cn status --all: Best read-only debug reportopenclaw-cn health: Requests a health snapshot from the running gatewayopenclaw-cn status --deep: Deep status check
Configuration File Locations
📖 Detailed Instructions: For the complete configuration file structure and usage guide, refer to the Configuration File Structure Complete Guide
# Main configuration file
~/.openclaw/openclaw.json

# Authentication configuration
~/.openclaw/agents/<agentId>/agent/auth-profiles.json

# OAuth credentials (legacy)
~/.openclaw/credentials/oauth.json

# Log files
~/.openclaw/logs/gateway.log
China Version Special Features
1. Pre-configured Domestic Models:
- Kimi (Moonshot AI)
- DeepSeek
- GLM-4 (Zhipu AI)
- Qwen (Alibaba Cloud)
- ERNIE Bot (Baidu)
2. Domestic Platform Integration:
- Lark (ByteDance)
- WeCom (Tencent)
- DingTalk (Alibaba)
- QQ (Tencent)
3. Optimized Network Configuration:
- Uses domestic mirror sources
- Optimized API access speed
- Supports proxy configuration
Common Issues
Q1: Installation failed?
# Check Node.js version (requires 22+)
node --version

# If version is too low, upgrade with nvm
nvm install 22
nvm use 22
Q2: How to update to the latest version?
# Re-run the installation script
curl -fsSL https://clawd.org.cn/install.sh | bash
Q3: How to uninstall?
# Stop the service
openclaw-cn gateway stop

# Uninstall
npm uninstall -g openclaw-cn

# Delete configuration (optional)
rm -rf ~/.openclaw
Q4: Which systems are supported?
- ✅ macOS 12+
- ✅ Linux (Ubuntu 20.04+, Debian, CentOS)
- ✅ Windows 10/11 (via WSL2)
Q5: Configuration wizard stuck?
# Press Ctrl+C to interrupt

# Check if gateway is running
openclaw-cn gateway status

# Restart gateway and retry
openclaw-cn gateway restart
openclaw-cn onboard
Q6: Health check shows "no auth configured"
You need to configure authentication:
# Re-run the wizard
openclaw-cn onboard

# Or manually configure API key
openclaw-cn configure --section auth
Next Steps (Optional, but Great)
- macOS menu bar app + voice wake: macOS App
- iOS/Android nodes (Canvas/Camera/Voice): Nodes
- Remote access (SSH tunnel / Tailscale service): Remote Access
- Always-on / VPN setup: Tailscale
Next Steps
After installation, you can:
- Configure AI models (see "API Configuration Guide" below)
- Connect chat platforms (see Chapter 9: Multi-Platform Integration)
- Install Skills (see Chapter 8: Skills Extension)
- Start using (see Chapter 3: Quick Start)